Retro Review: HP Omnibook 600C - Part 1
28th October 2025
Introduction
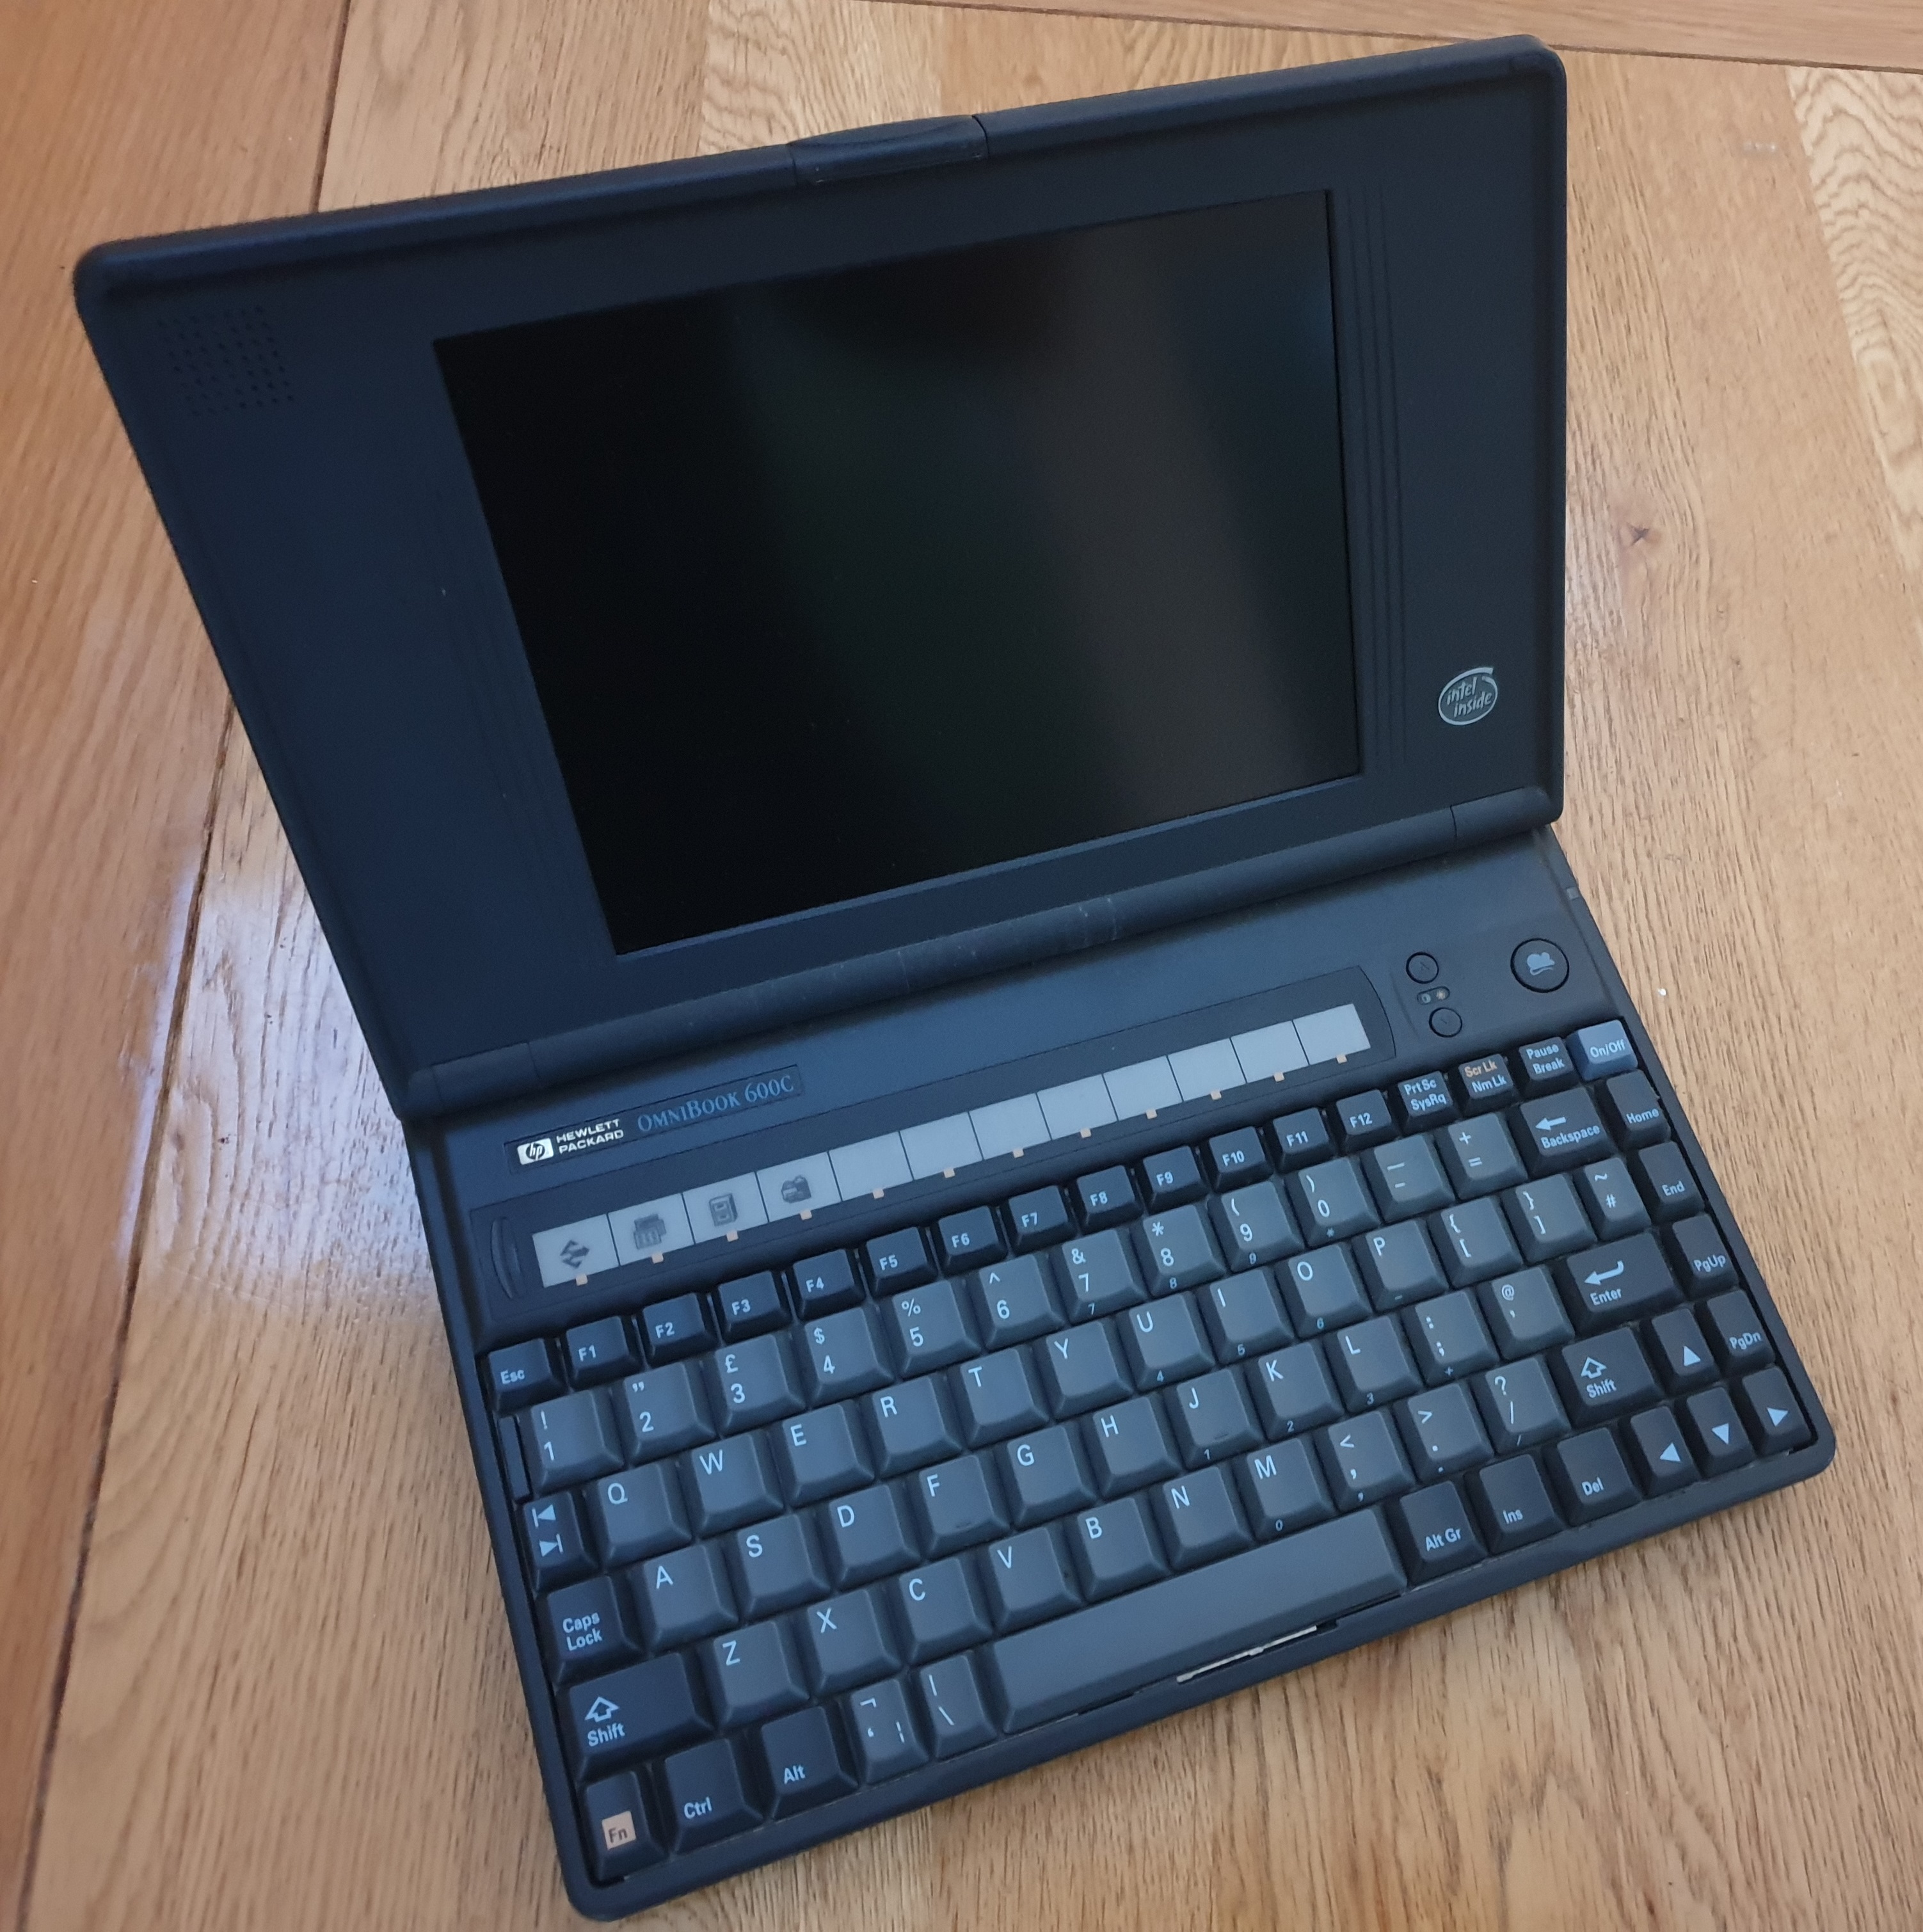
I picked up this "sub-notebook" PC back in around 2019. I've always had a fondness for miniaturisation, and HP were one of those pioneer hardware manufacturers known to do a solid job of it for the humble 90s PC. The HP Omnibook 600C was their first ever colour notebook PC. My unit here, manufactured in March 1995, is sadly a bit dinged up, so in this article, we'll not only cover what this interesting machine was, but due to some major main battery leakage, I'll be doing a teardown, clean, and rebuild - fun times ahead!
 |
   |
The Omnibook 600 series was first unveiled in September 1994 and comprised seven models:
| Product | Description | HP Part # |
|---|---|---|
| HP Omnibook 600C | 486DX2/50, 4 MB RAM, 170 MB hard disk | F1065A |
| HP Omnibook 600C | 486DX2/50, 4 MB RAM, 260 MB hard disk | F1110A |
| HP Omnibook 600C | 486DX4/75, 8 MB RAM, 170 MB hard disk | F1066A |
| HP Omnibook 600C | 486DX4/75, 8 MB RAM, 260 MB hard disk | F1111A |
| HP Omnibook 600C | 486DX4/75, 8 MB RAM, 340 MB hard disk | F1113A |
| HP Omnibook 600CT | 486DX4/75, 8 MB RAM, 260 MB hard disk | F1114A |
| HP Omnibook 600CT | 486DX4/75, 8 MB RAM, 340 MB hard disk | F1115A |
It succeeded their earlier OmniBooks which started with the OmniBook 300 arriving in June 1993 - a 386SX-20 subnotebook. The OmniBook 425 and 430 came in November 1993 and February 1994 respectively, with a TI 486SLC-25 processor. The 530 arrived in June 1994, running a 486SX-33. All of these came with the same 9" monochrome DSTN display. The pop-up mouse that we have here was on all of these earlier models, as was the "Instant On" capability.
As I understand it, the 600C and 600CT were first unveiled in September 1994 and went on sale in November of that year with estimated street prices starting at around $2,800 for the 600C DX2/50 with 4 MB of RAM and 170 MB hard disk. If you opted for the faster 600C DX4/75 with 8 MB of RAM and 170 MB hard disk, you would pay $3,199. These reduced in April 1995 to $2,419 for the lowest-priced variant. HP reduced their prices again in September 1995, now starting at $2,080.
Did You Know?
The Omnibook 600 series launched alongside its bigger brother, the Omnibook 4000, which came with a 10.4" display (either passive DSTN or active TFT), Sound Blaster Pro-compatible audio, a range of processors up to 486DX4/100, from 4 to 32 MB of RAM, a built-in floppy drive, and up to 520 MB of hard disk storage.600C models came with an 8.6" passive matrix dual-scan (DSTN) LCD which was backlit and supported a native resolution of 640 x 480. The 600C did not come with onboard Windows sound, only had one built-in speaker, and its maximum memory capacity was limited to 16 MB.
600CT models got the better 9.5" active matrix TFT LCD (backlit and supported a native resolution of 640 x 480 like the 'C' model). The 600CT also got onboard Windows sound, two built-in speakers, and was able to have its memory expanded to 32 MB.
The base specifications shared by all of the Hewlett-Packard Omnibook 600 range looks like this:
- Intel 80486DX2-50 or 80486DX4-75
- 4 or 8 MB of RAM (expandable to 16 MB for C model, 32 MB for CT model)
- 640 x 480 native resolution in 64,000 colours with LCD
- 1024 x 768 maximum resolution in 256 colours with external monitor
- Accelerated Local Bus video with 1 MB of video RAM
- ESS ES1688 onboard 16-bit audio (600CT only) with two speakers
- 170 MB, 260 MB or 340 MB hard drive (PC Card hard disk)
- External 3.5" 1.44 MB DS/HD floppy drive
- External ports including 1 x 9-pin RS232 serial port, 1 x 25-pin parallel port, 15-pin DSUB video output, IrDA infrared, Enhanced Port Replicator connector, floppy drive port, and PC Card slots (2 x Type II or 1 x Type III)
- 9.6V DC NiMH (600C) or Li-Ion (600CT) rechargeable battery with up to 3 - 3.5 hours of battery life
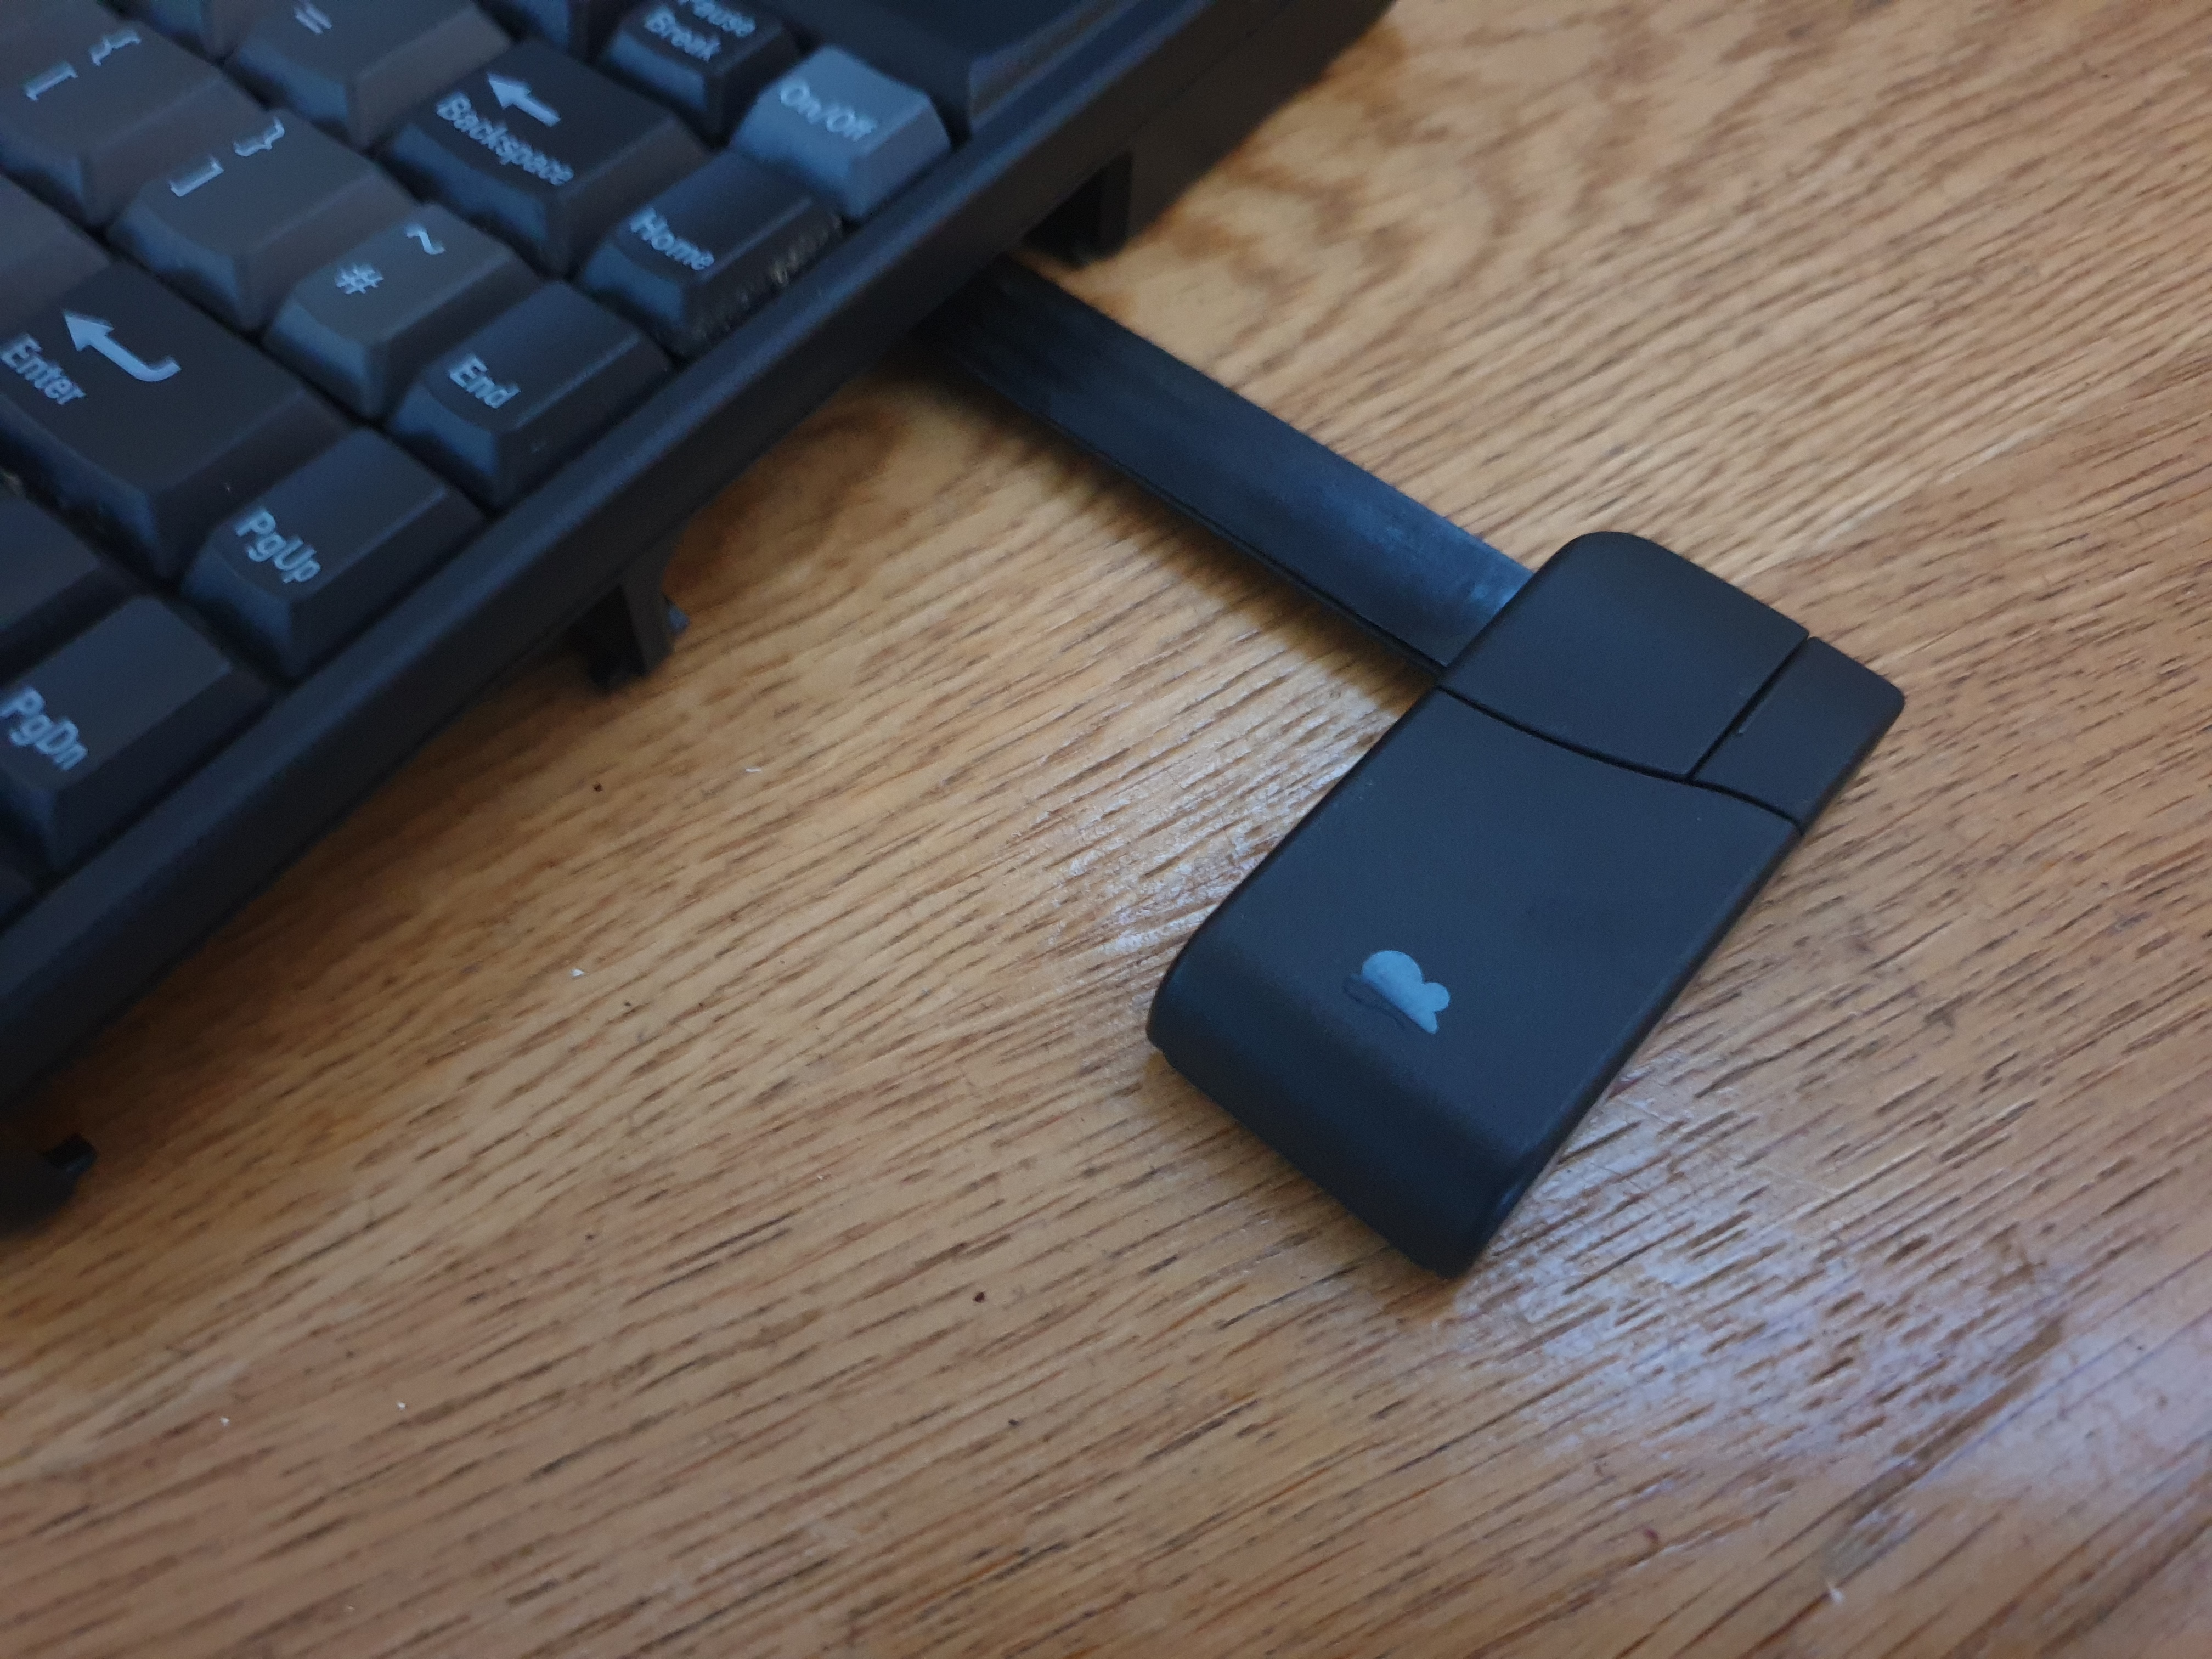
What certainly made the Omnibook 600 series unique was its pop-out mouse! A button on the right side of the keyboard ejected a tiny two-button mouse connected via a semi-rigid ribbon cable to the computer. You could either use it flat or pull up on the rear of it which elevated it to about 30 degrees. This took a little bit of getting used to, but was entirely functional after a while, and certainly innovative for its time.
The Omnibook 600 series were Energy Star-compliant with configurable power-down modes available. What was probably most useful was its ability for 'Instant On'. With the help of special 'self-refreshed DRAM technology', you could keep your Omnibook in a 'ready for work' state for weeks on a full charge, and on power-up it would return instantly to its previous state.
All models came with an AC adapter (12V DC, 2.5A), external floppy disk drive, user manual, and quick start guide.
These machines came bundled with Windows for Workgroups 3.11 and either MS-DOS 6.20 or 6.22, Laplink Remote Access, HP PIM applications (Appointment Book, HP Financial Calculator, and Phone Book) that were compatible with HP's palmtop range (95LX, 100LX and 200LX), and an IrDA infrared printing driver. Later on, Windows 95 was also provided as an option.
They were built at the HP Advanced Products Division in Corvallis, OR., the same site that built other ground-breaking machines like the HP 95LX (June 1991) and Omnibook 300 (1993).
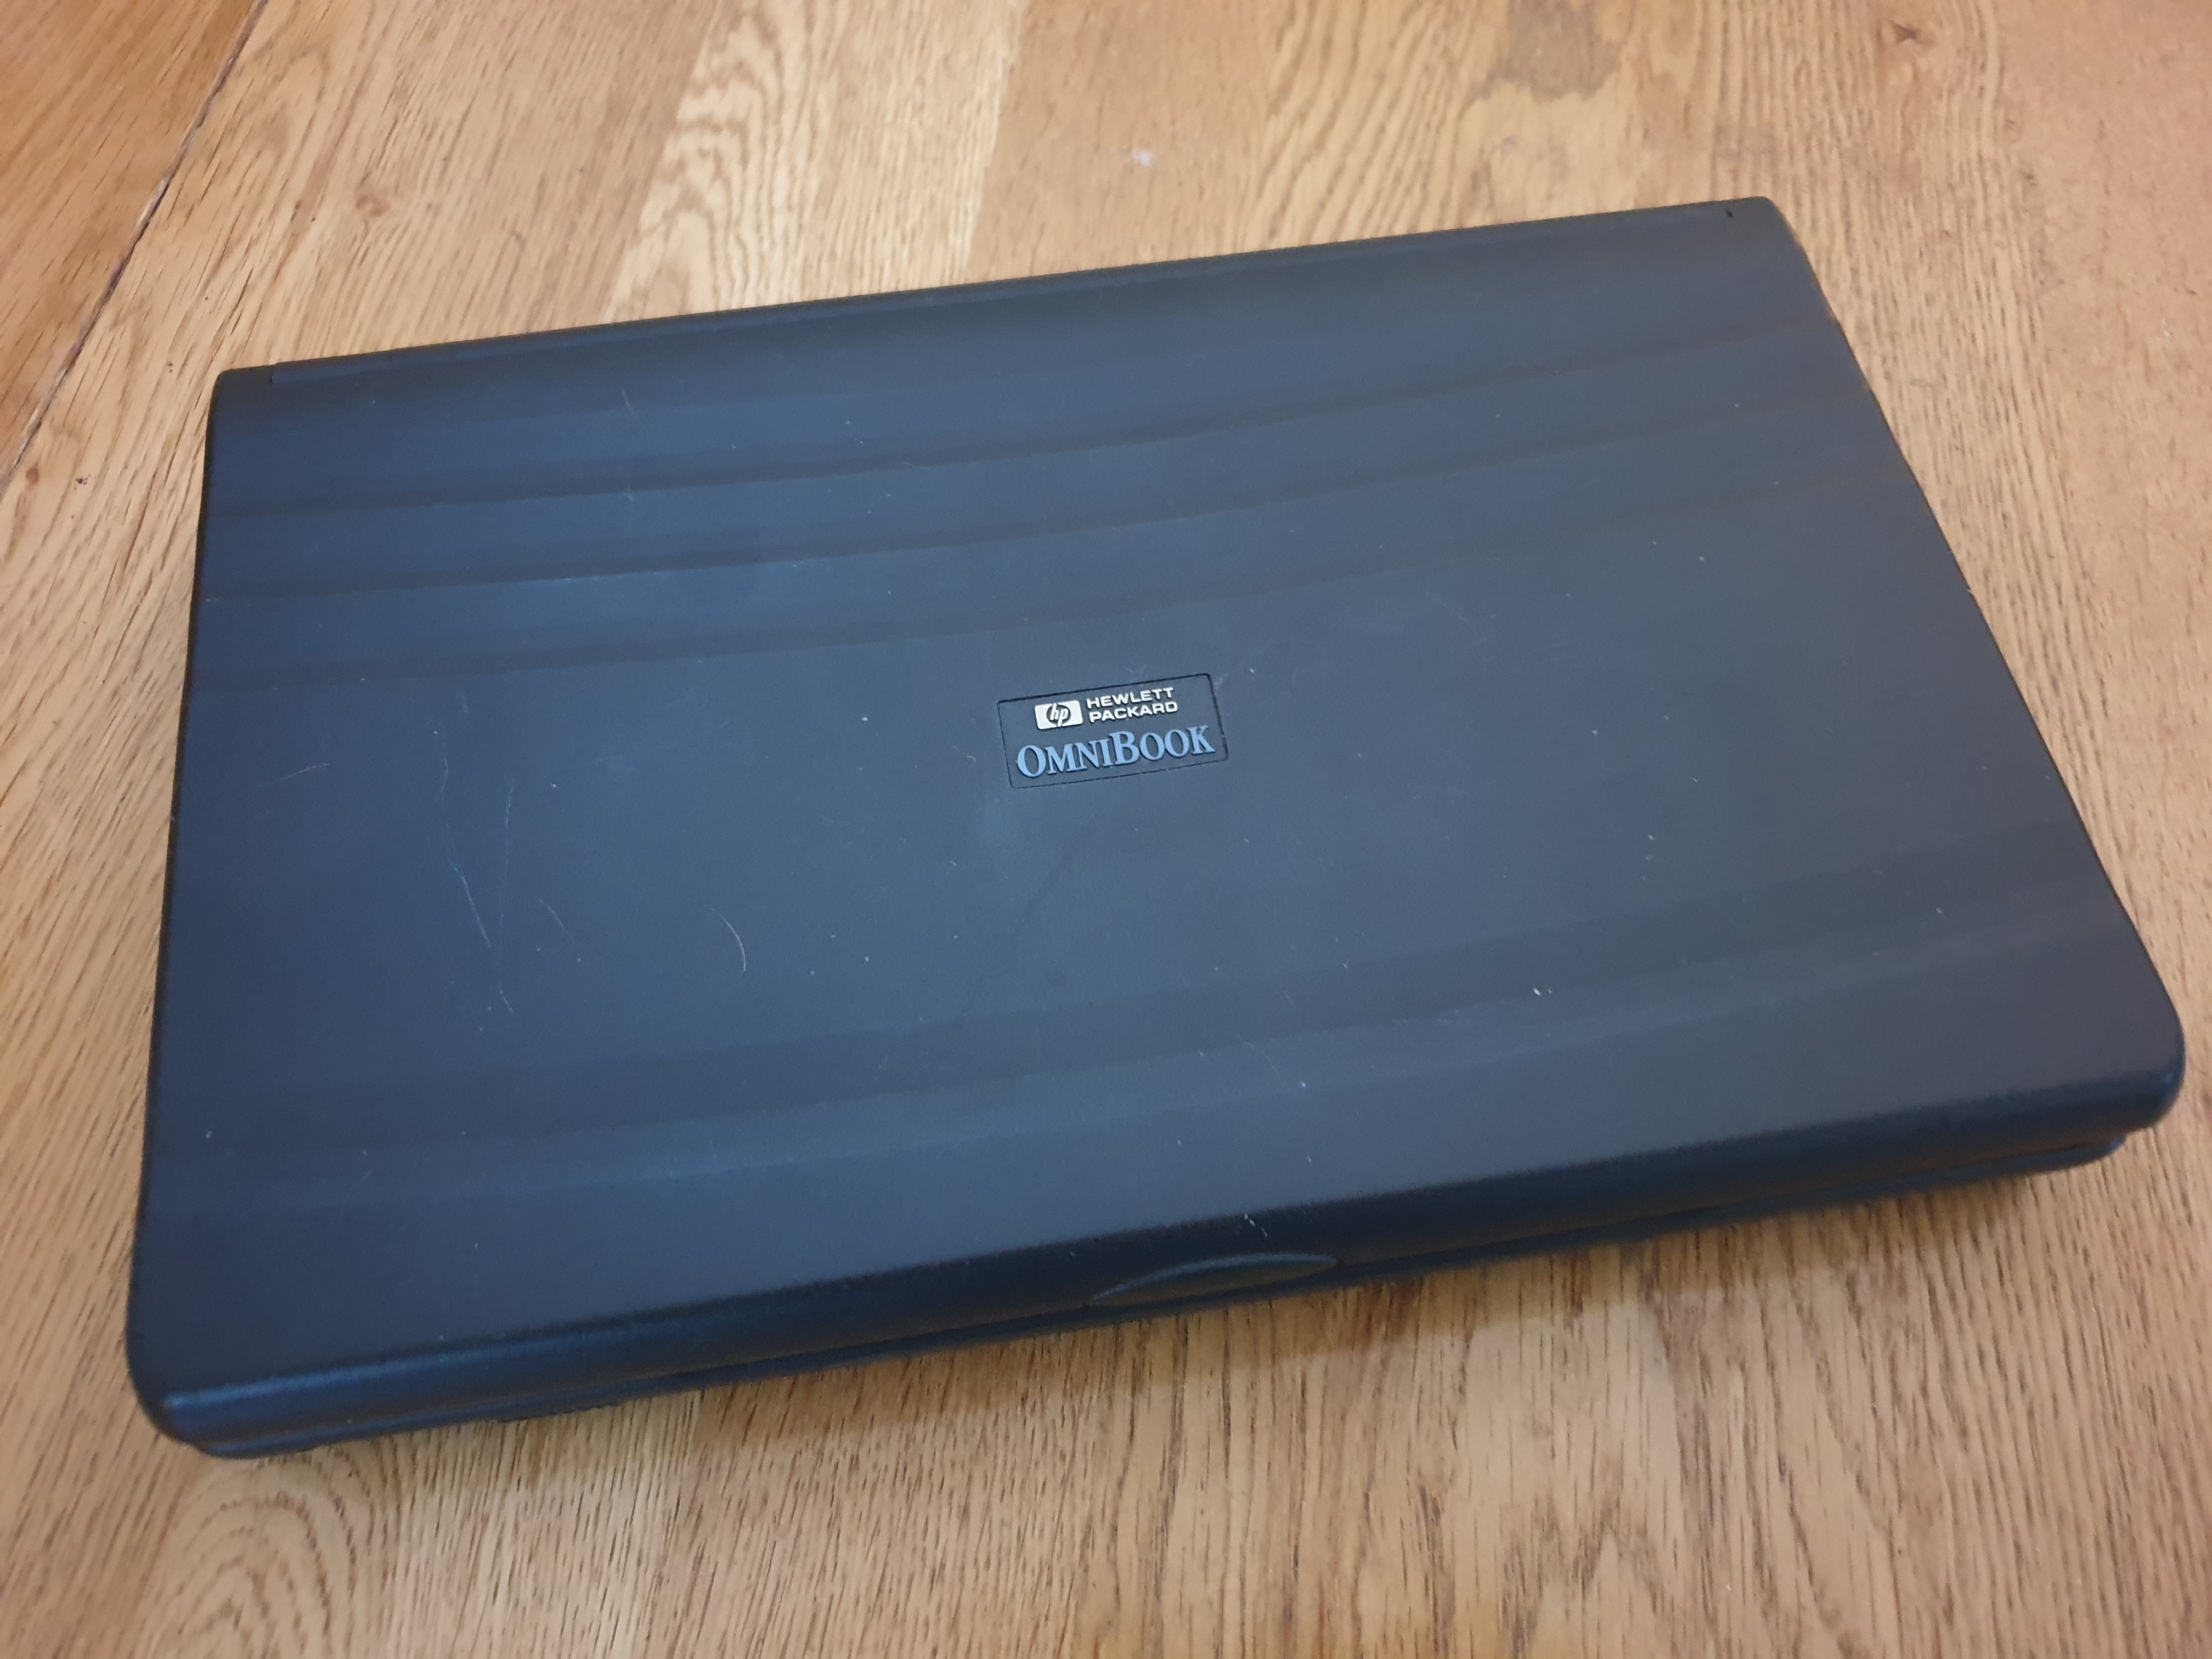
The notebook itself measured 28 x 18 x 4cms and weighed just 1.72 kg (3.8 lbs) with the battery installed.

The screen doesn't look half as bad in real life - passive matrix DSTNs were known for their 'ghosting' (slow refresh rates) and an overall 'washed out' image, but with brightness and contrast controls you can make it look pretty decent.
The Component Parts
The 80486DX2 and DX4 CPU
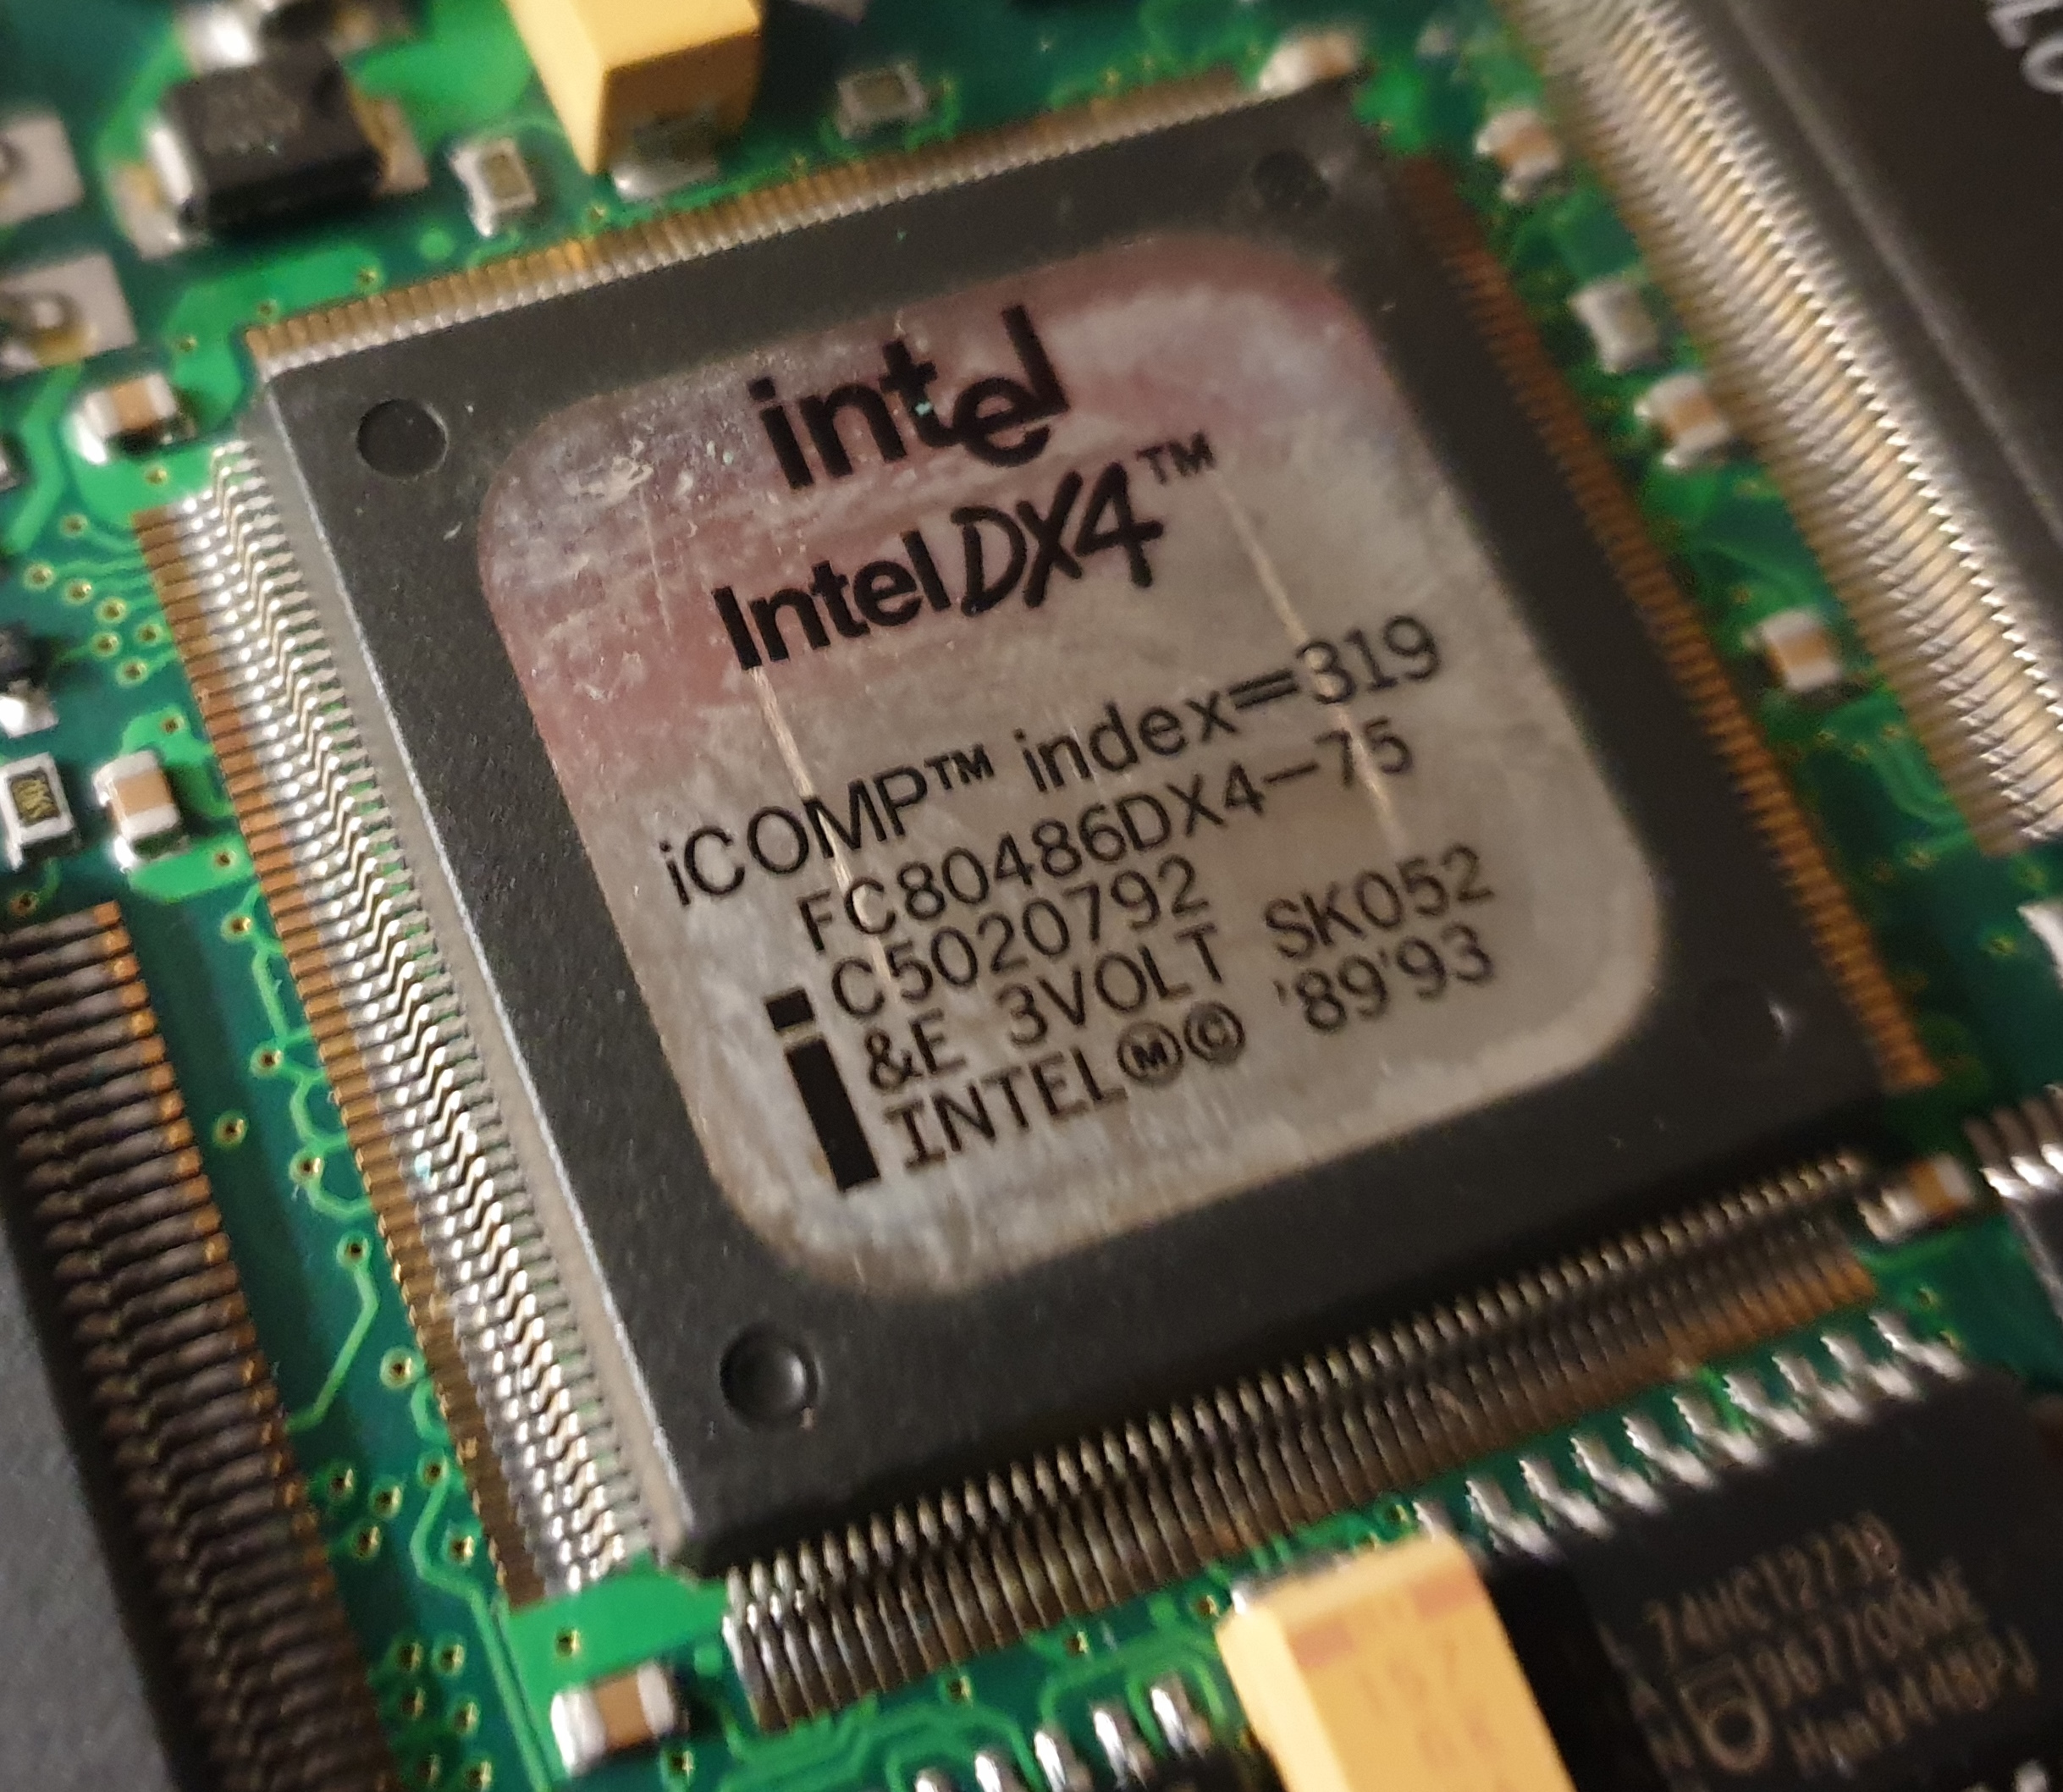 Released in late 1994, the 80486DX4 CPU was a clock-tripled 486DX-25. It arrived two years after the 80486DX2 clock-doubled 486DX-25. The DX2 came with 8 KB of L1 cache on the die while the DX4 got 16 KB.
Presumably, the Omnibook 600 series motherboard is universal, supporting both the 5-volt DX2 and the 3.45-volt DX4 with an on-board voltage regulator.
In Part 2 I did a teardown of this notebook, so the picture on the left is the one inside this machine. It's the SK052 variant of the DX4 which had the codename P24C - this is the 'SL Enhanced' version but only has a 'write-through' cache. The '&E' stamp on the label tells us this [it would read '&EW' if it were the write-back cache version]. Intel's "SL Technology" means the CPU has power-saving features including Auto Idle, an enhanced HALT instruction, and Stop Clock.
Chipset
The OmniBook 600 series used the VLSI VL82C715 / VL82C717 chipset. The datasheets for these are not obtainable, so I have no more information on its capabilities. What is known is that it's a 486DX (32-bit) chipset that supports both the ISA bus and VESA Local Bus.
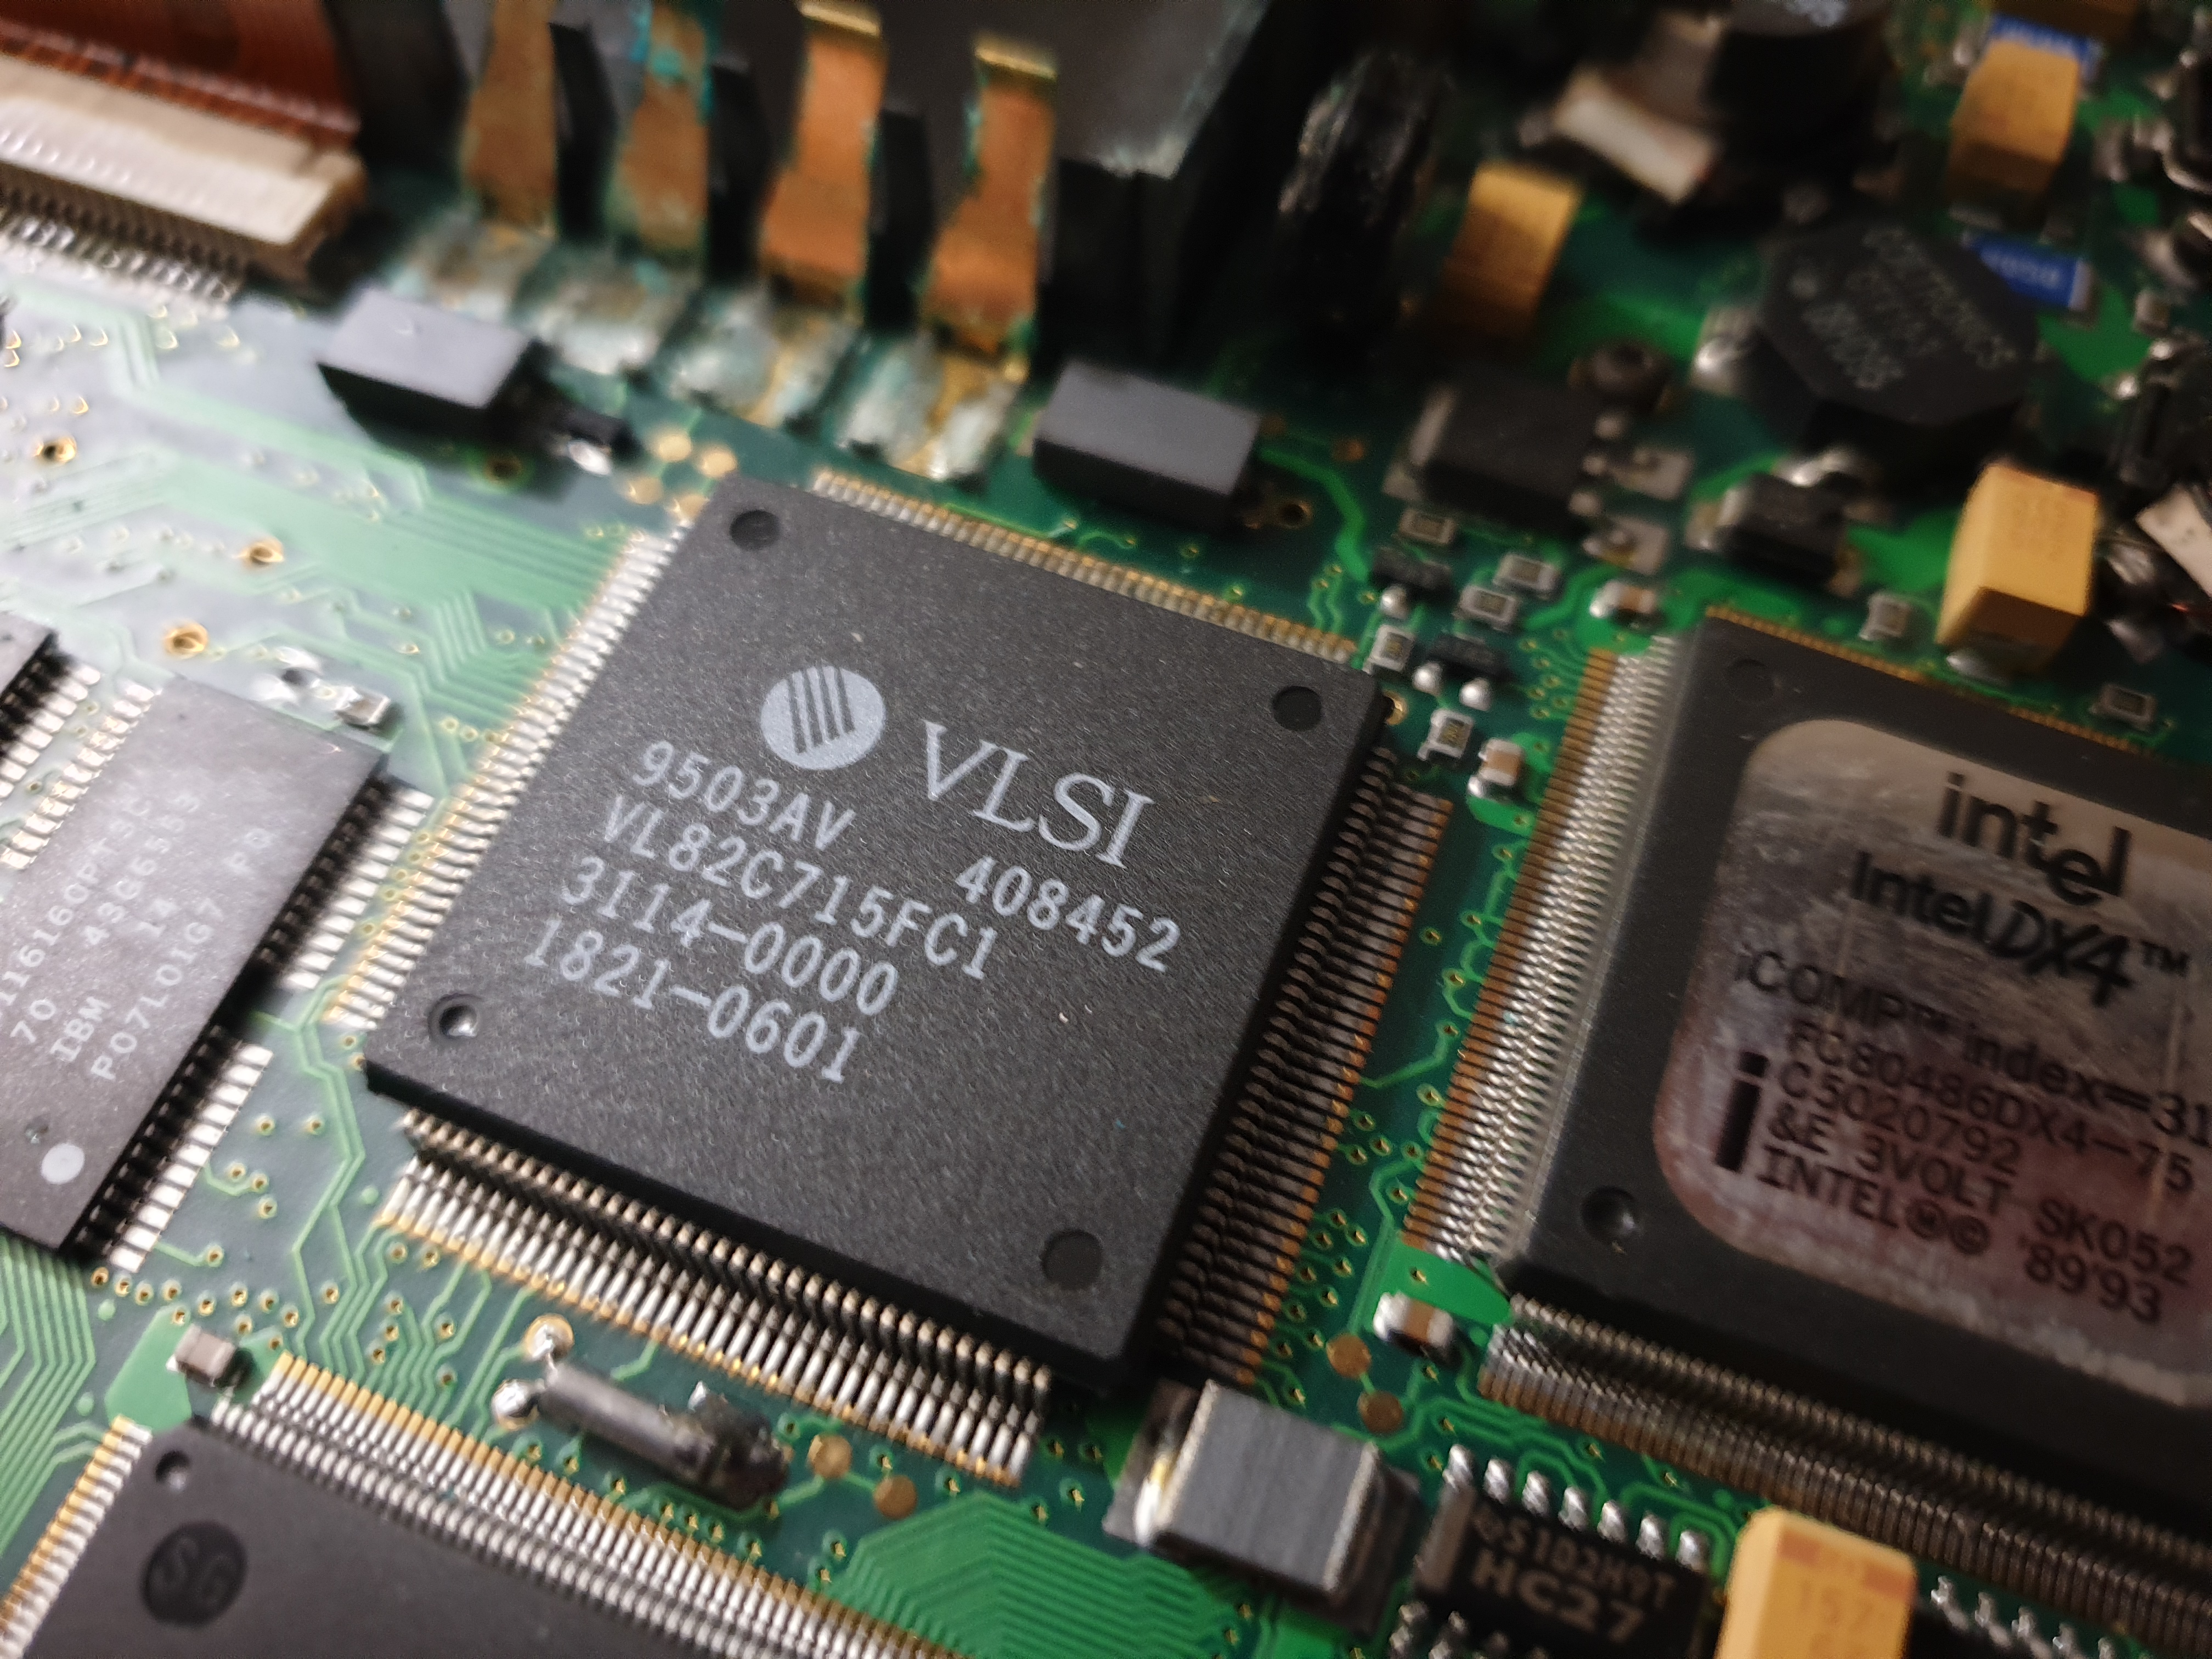
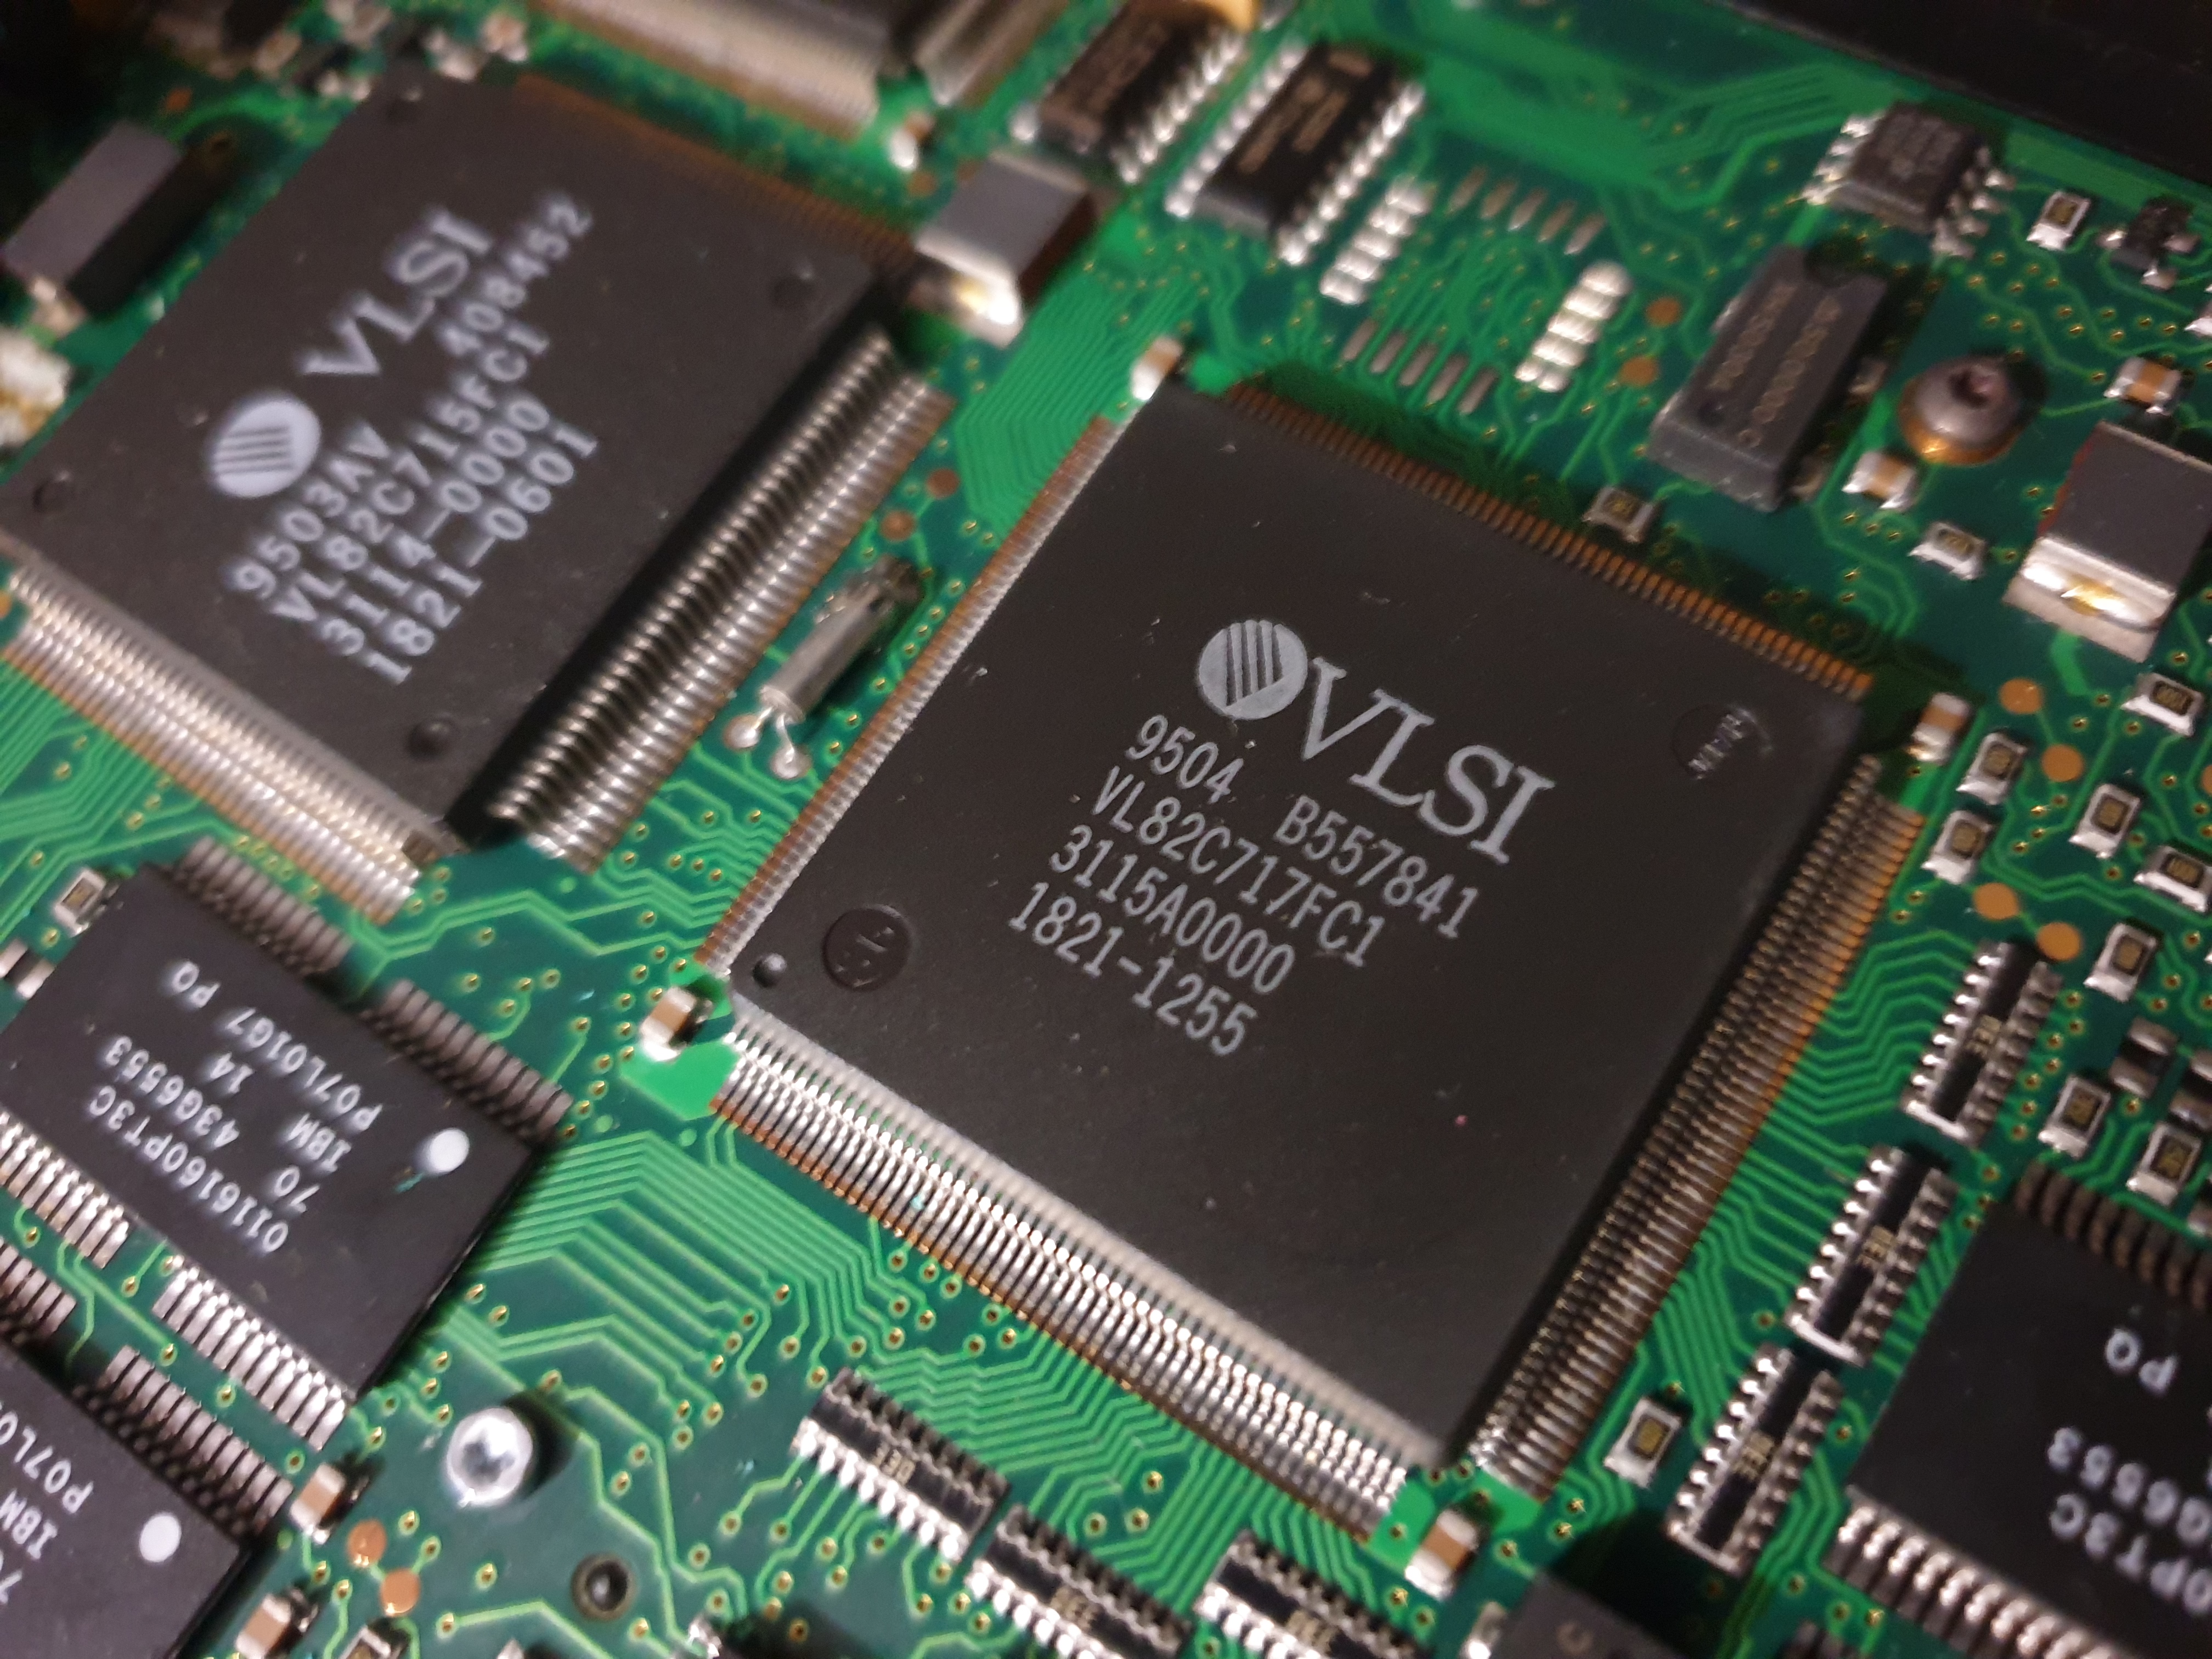
The two-chip VLSI VL82C715 and VL82C717 chipset
This chipset pre-dated the concept of Northbridge and Southbridge found on later systems.This is guesswork, but it's likely the 715 is the main System Controller and the 717 is the Bus Controller.
The System Controller is responsible for CPU-to-memory instructions and potentially a L2 cache controller (even though there is no L2 cache installed on this motherboard).
The Bus Controller would comprise DMA controllers, interrupt controllers, a timer, memory mapper, clock generator, as well as the main ISA/VLB bus controller. Most likely this handled all other peripherals such as the hard and floppy disk controllers, serial and parallel I/O, etc.
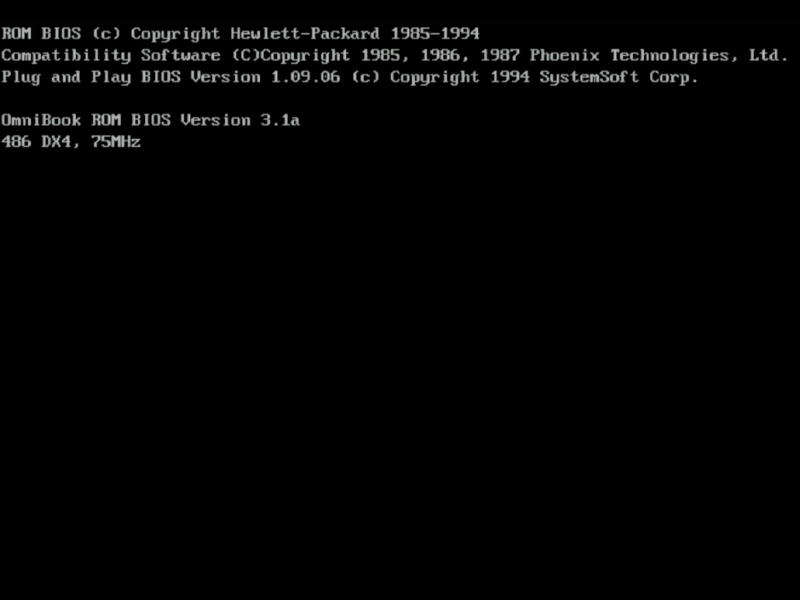
BIOS
The Omnibook 600 series used a custom version of the Phoenix Plug & Play BIOS, which was stored on an EEPROM on the motherboard. This was user-upgradeable via the floppy drive.
Mine is version 3.1a, dated 19th December 1994. There is no CMOS Setup Utility available on system start-up. Diagnosing potential problems with the Omnibook was done via an 'OBTEST' utility provided as part of the Omnibook system software that came with the notebook. When you run it, the system is restarted to a clean startup and OBTEST then starts automatically. It reboots after you exit too.
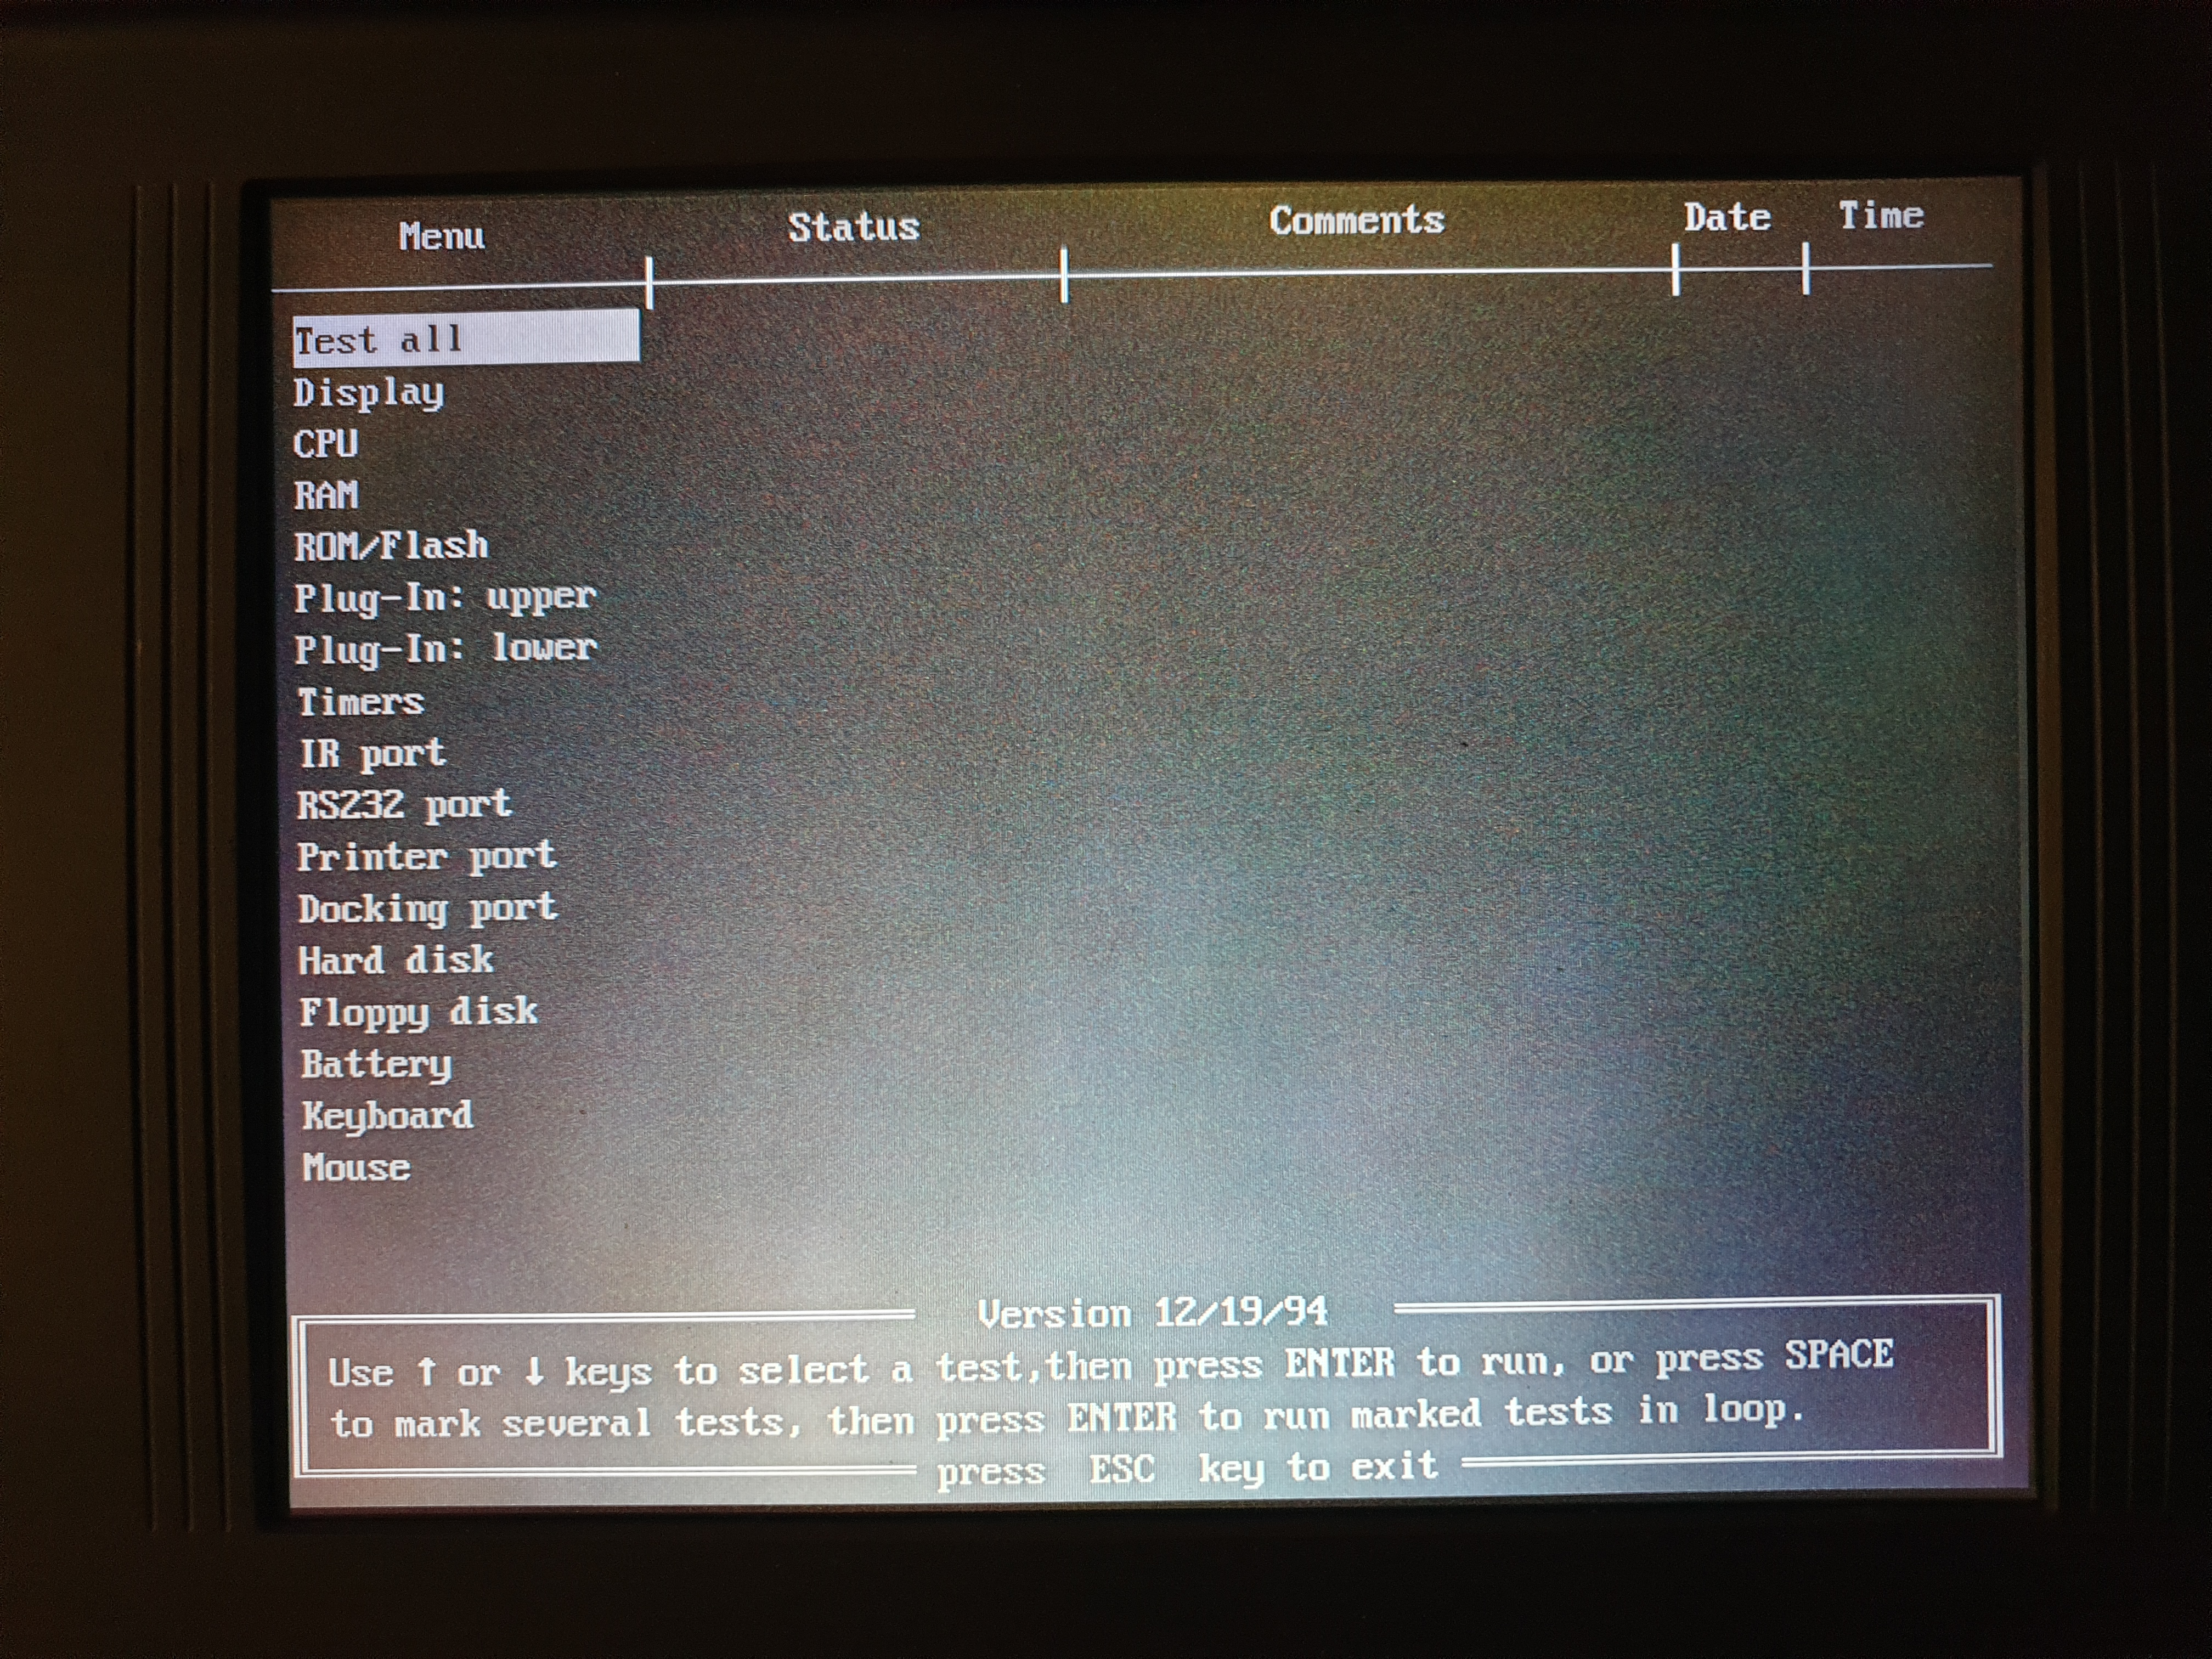
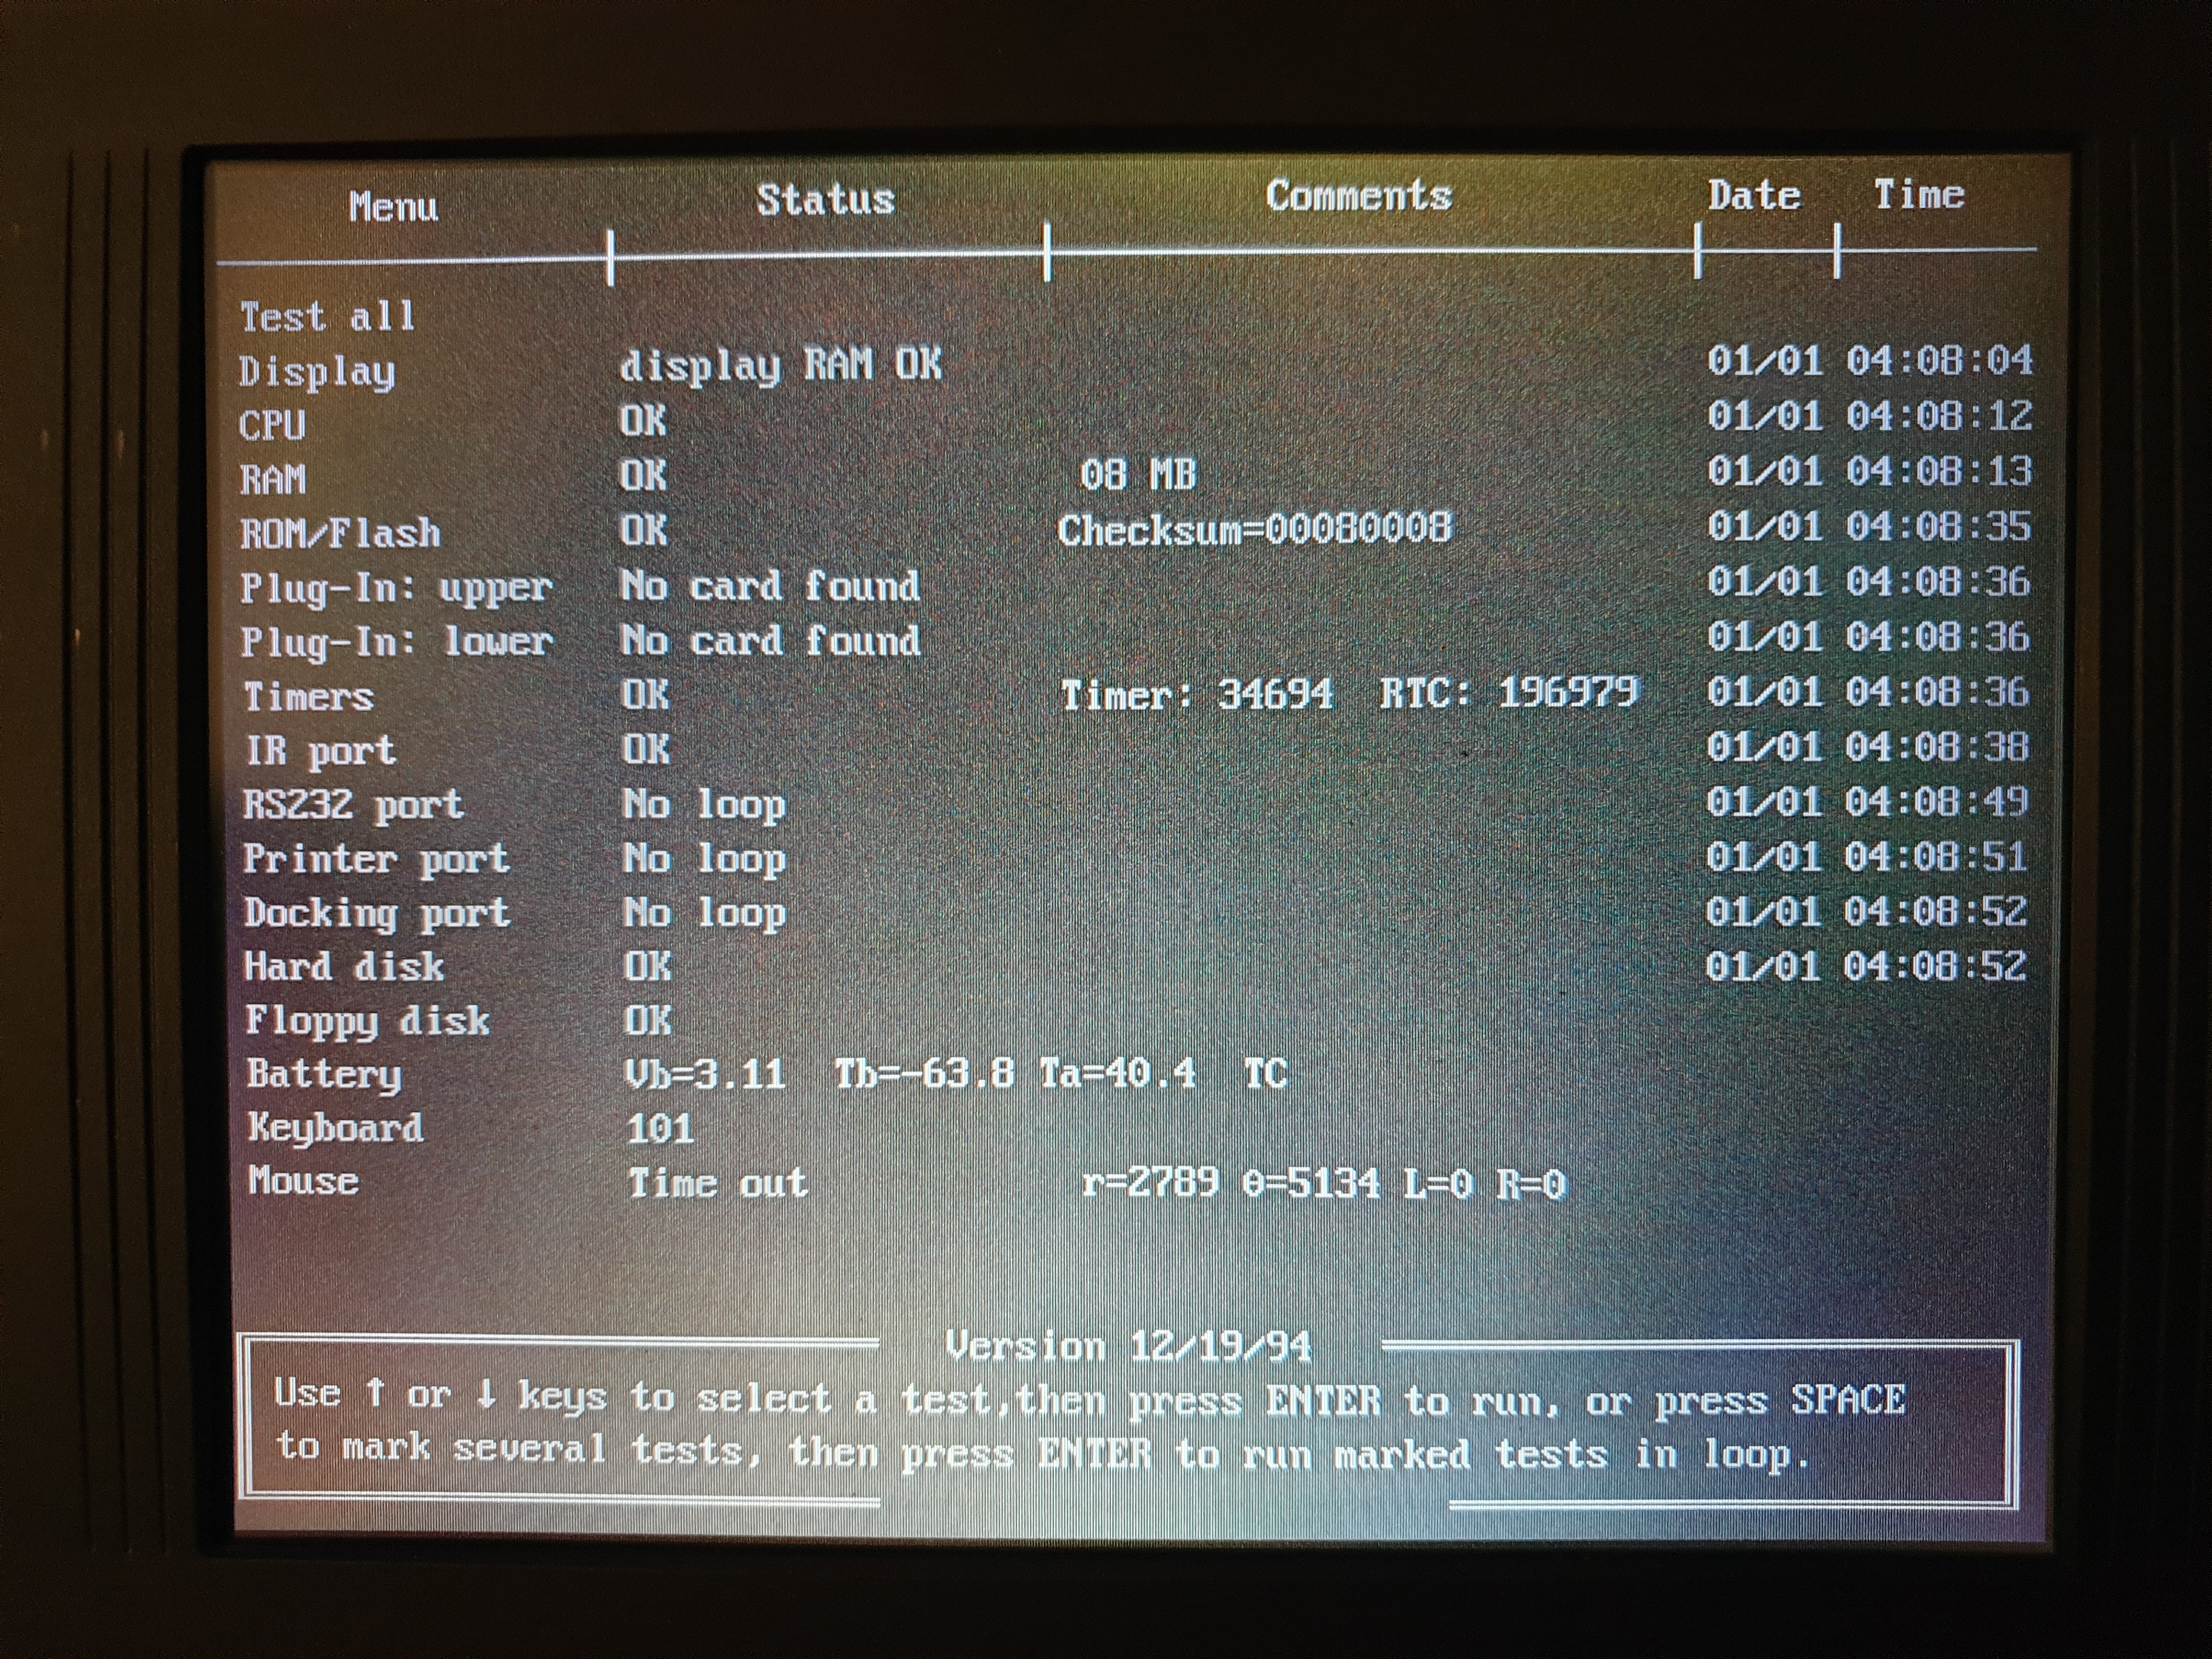
The OBTEST utility
running
Just like almost all Phoenix BIOS-based machines, at any time you can switch the PC to run in 'slow' mode or 'fast' mode. You do this by holding down the Fn key and hitting '-' (for slow mode) or '=' (for fast mode). You hear a single beep to indicate the machine has gone into slow mode, or two beeps for fast mode. Slow mode brings to machine's speed down to something close to a 9 MHz 80286.
The latest known BIOS version is v4.01, released on 11th February 1996 - this is required if you want to install Windows 95, together with a driver update. The upgrade file is called w95upen.exe (for the English version) and creates some Windows 95 upgrade disks. Back in late 1994 when the 600 series first hit the shelves, everyone knew Windows 95 was coming, so it's not surprising HP were already looking ahead to be sure this machine would be able to handle it.
Known BIOS versions:
- 3.1a - 19th December 1994
- 3.22 - 12th July 1995 - HP provided an upgrade download that included a BIOS update to 3.22 and a video BIOS update to 3.17.
- 4.00 - ? - Contained a bug that stopped the password check on boot-up if it was enabled.
- 4.01 - 26th January 1996 - BIOS is for machines running Windows 95 only. Restores the password functionality lost with BIOS v4.00. Updates the Windows 95 Control Panel widget.
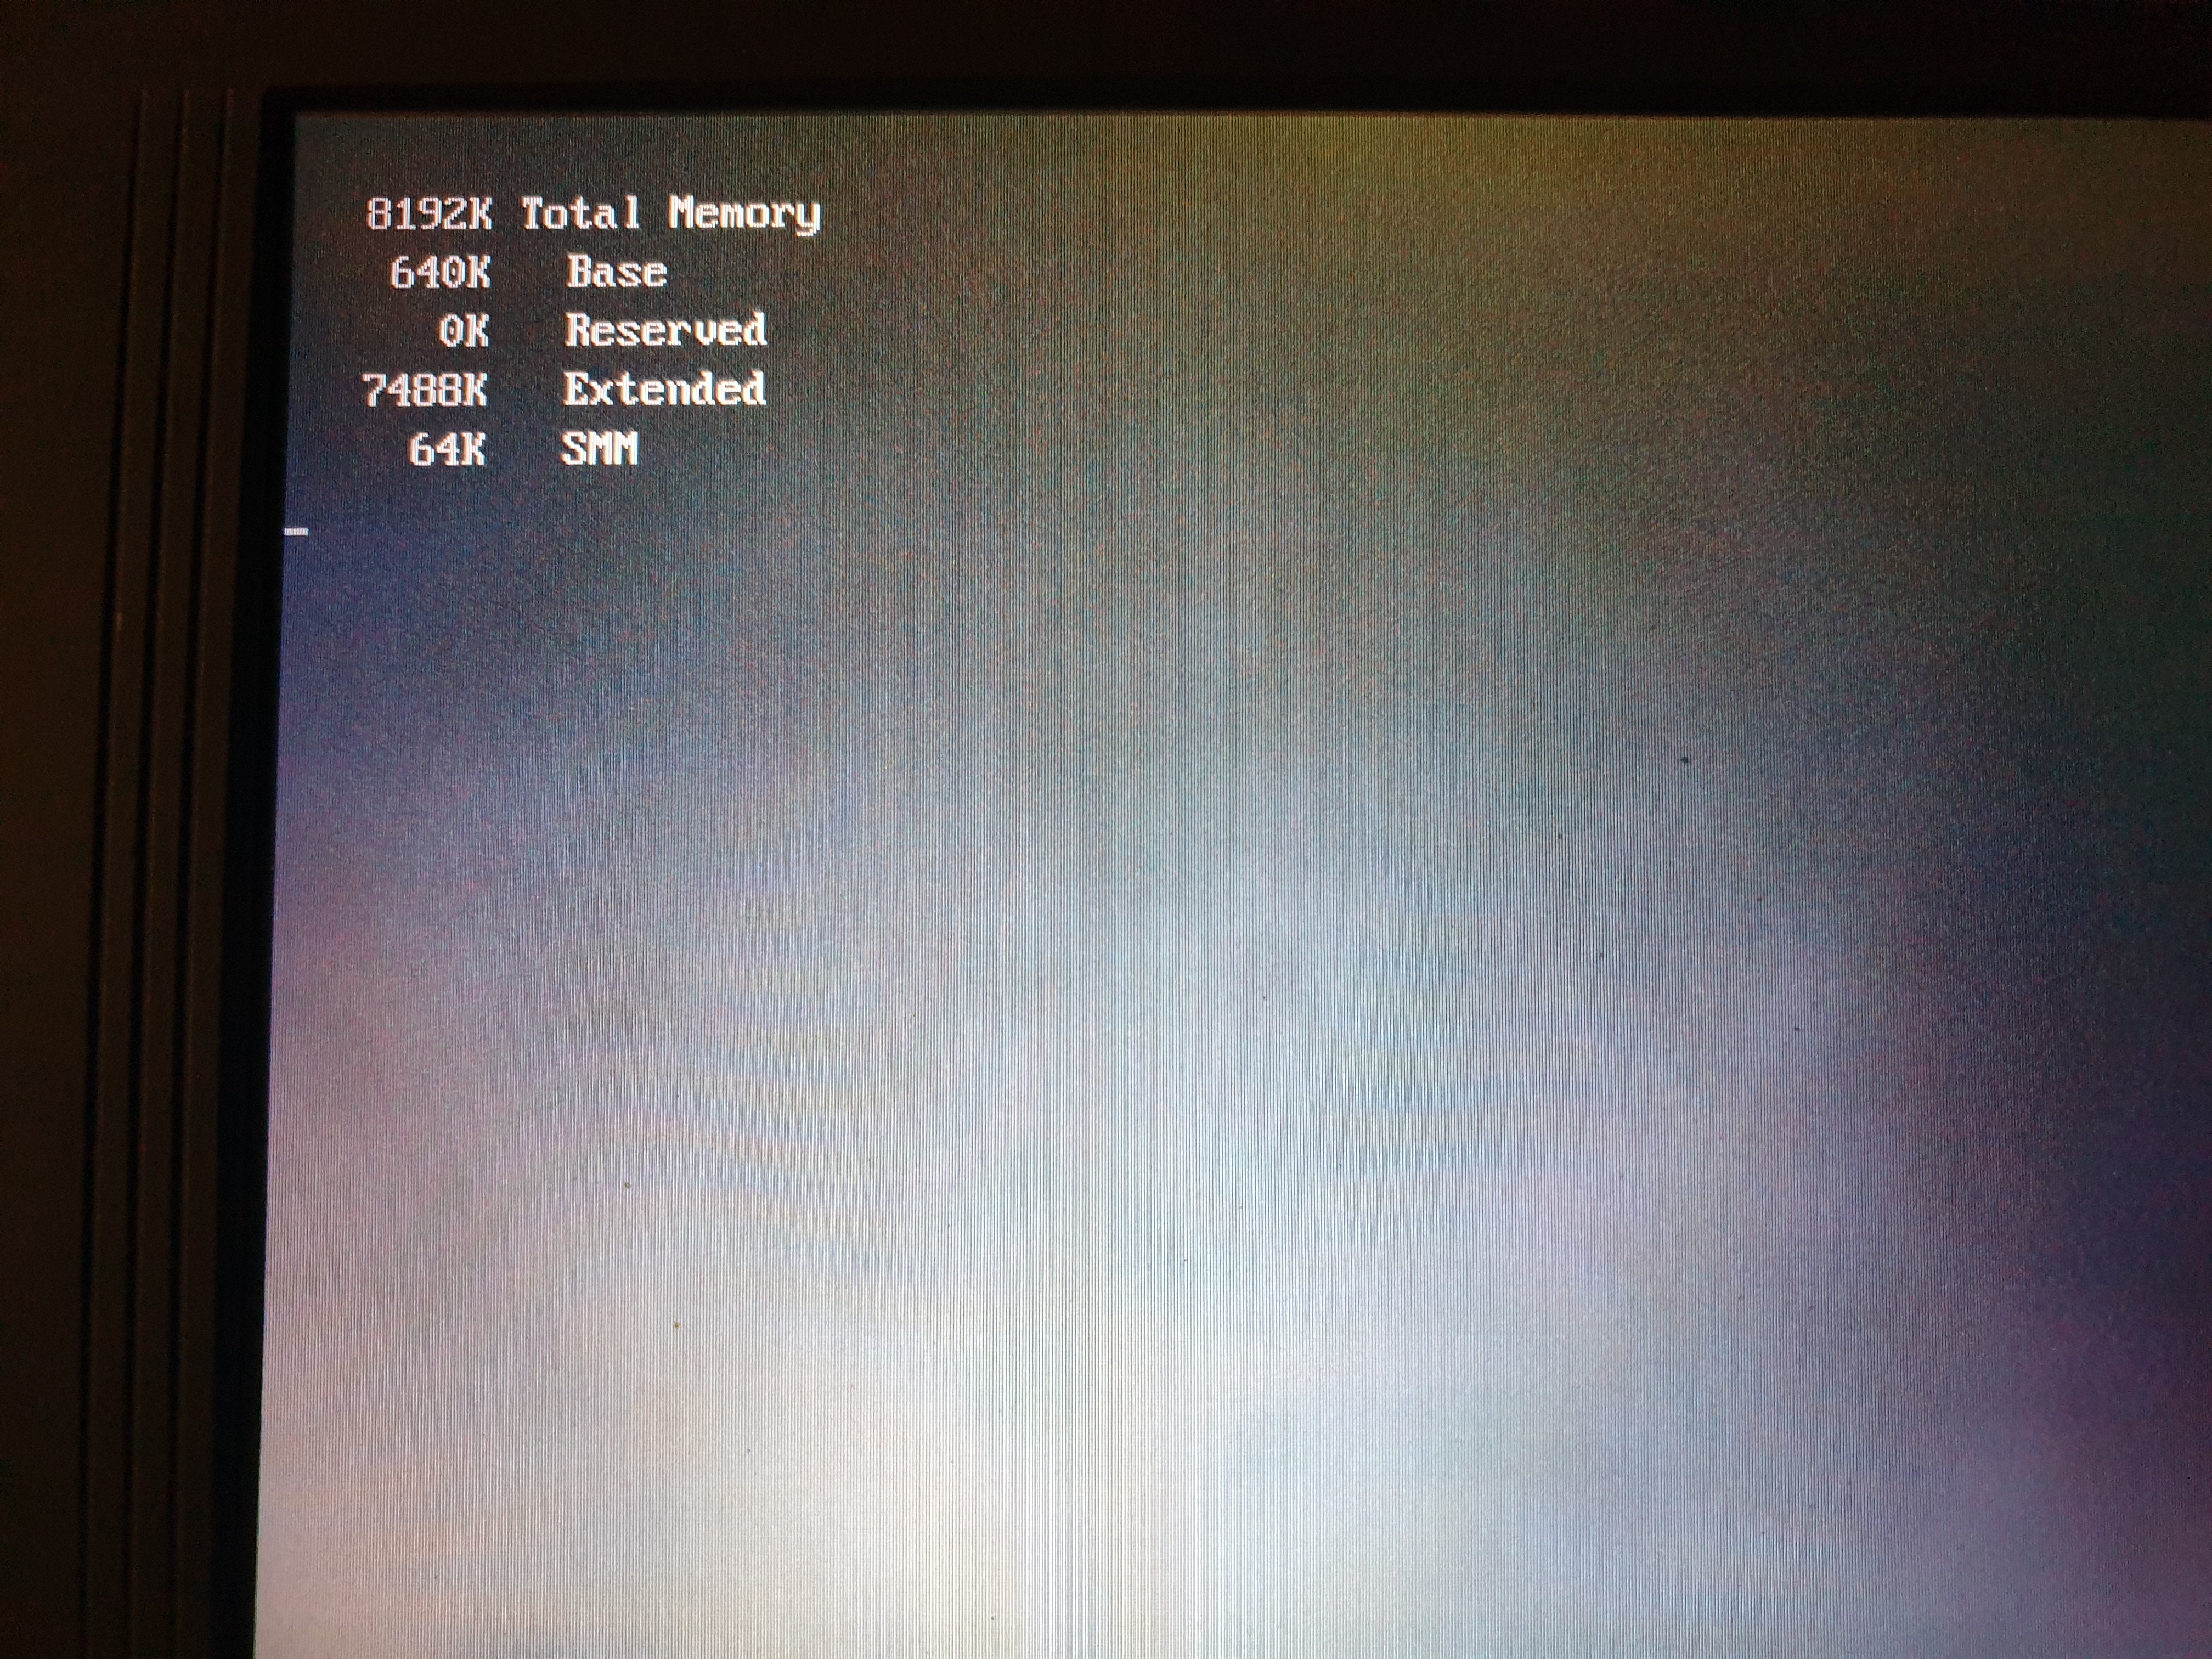
Memory
The Omnibook 600C here came with 8 MB from the factory (soldered-in on the motherboard), though this could be expanded to up to 16 MB. The actual memory used on this notebook's motherboard comprises four IBM 0116160PT3C Fast Page Mode DRAM chips (2 MB each), rated at 70ns.
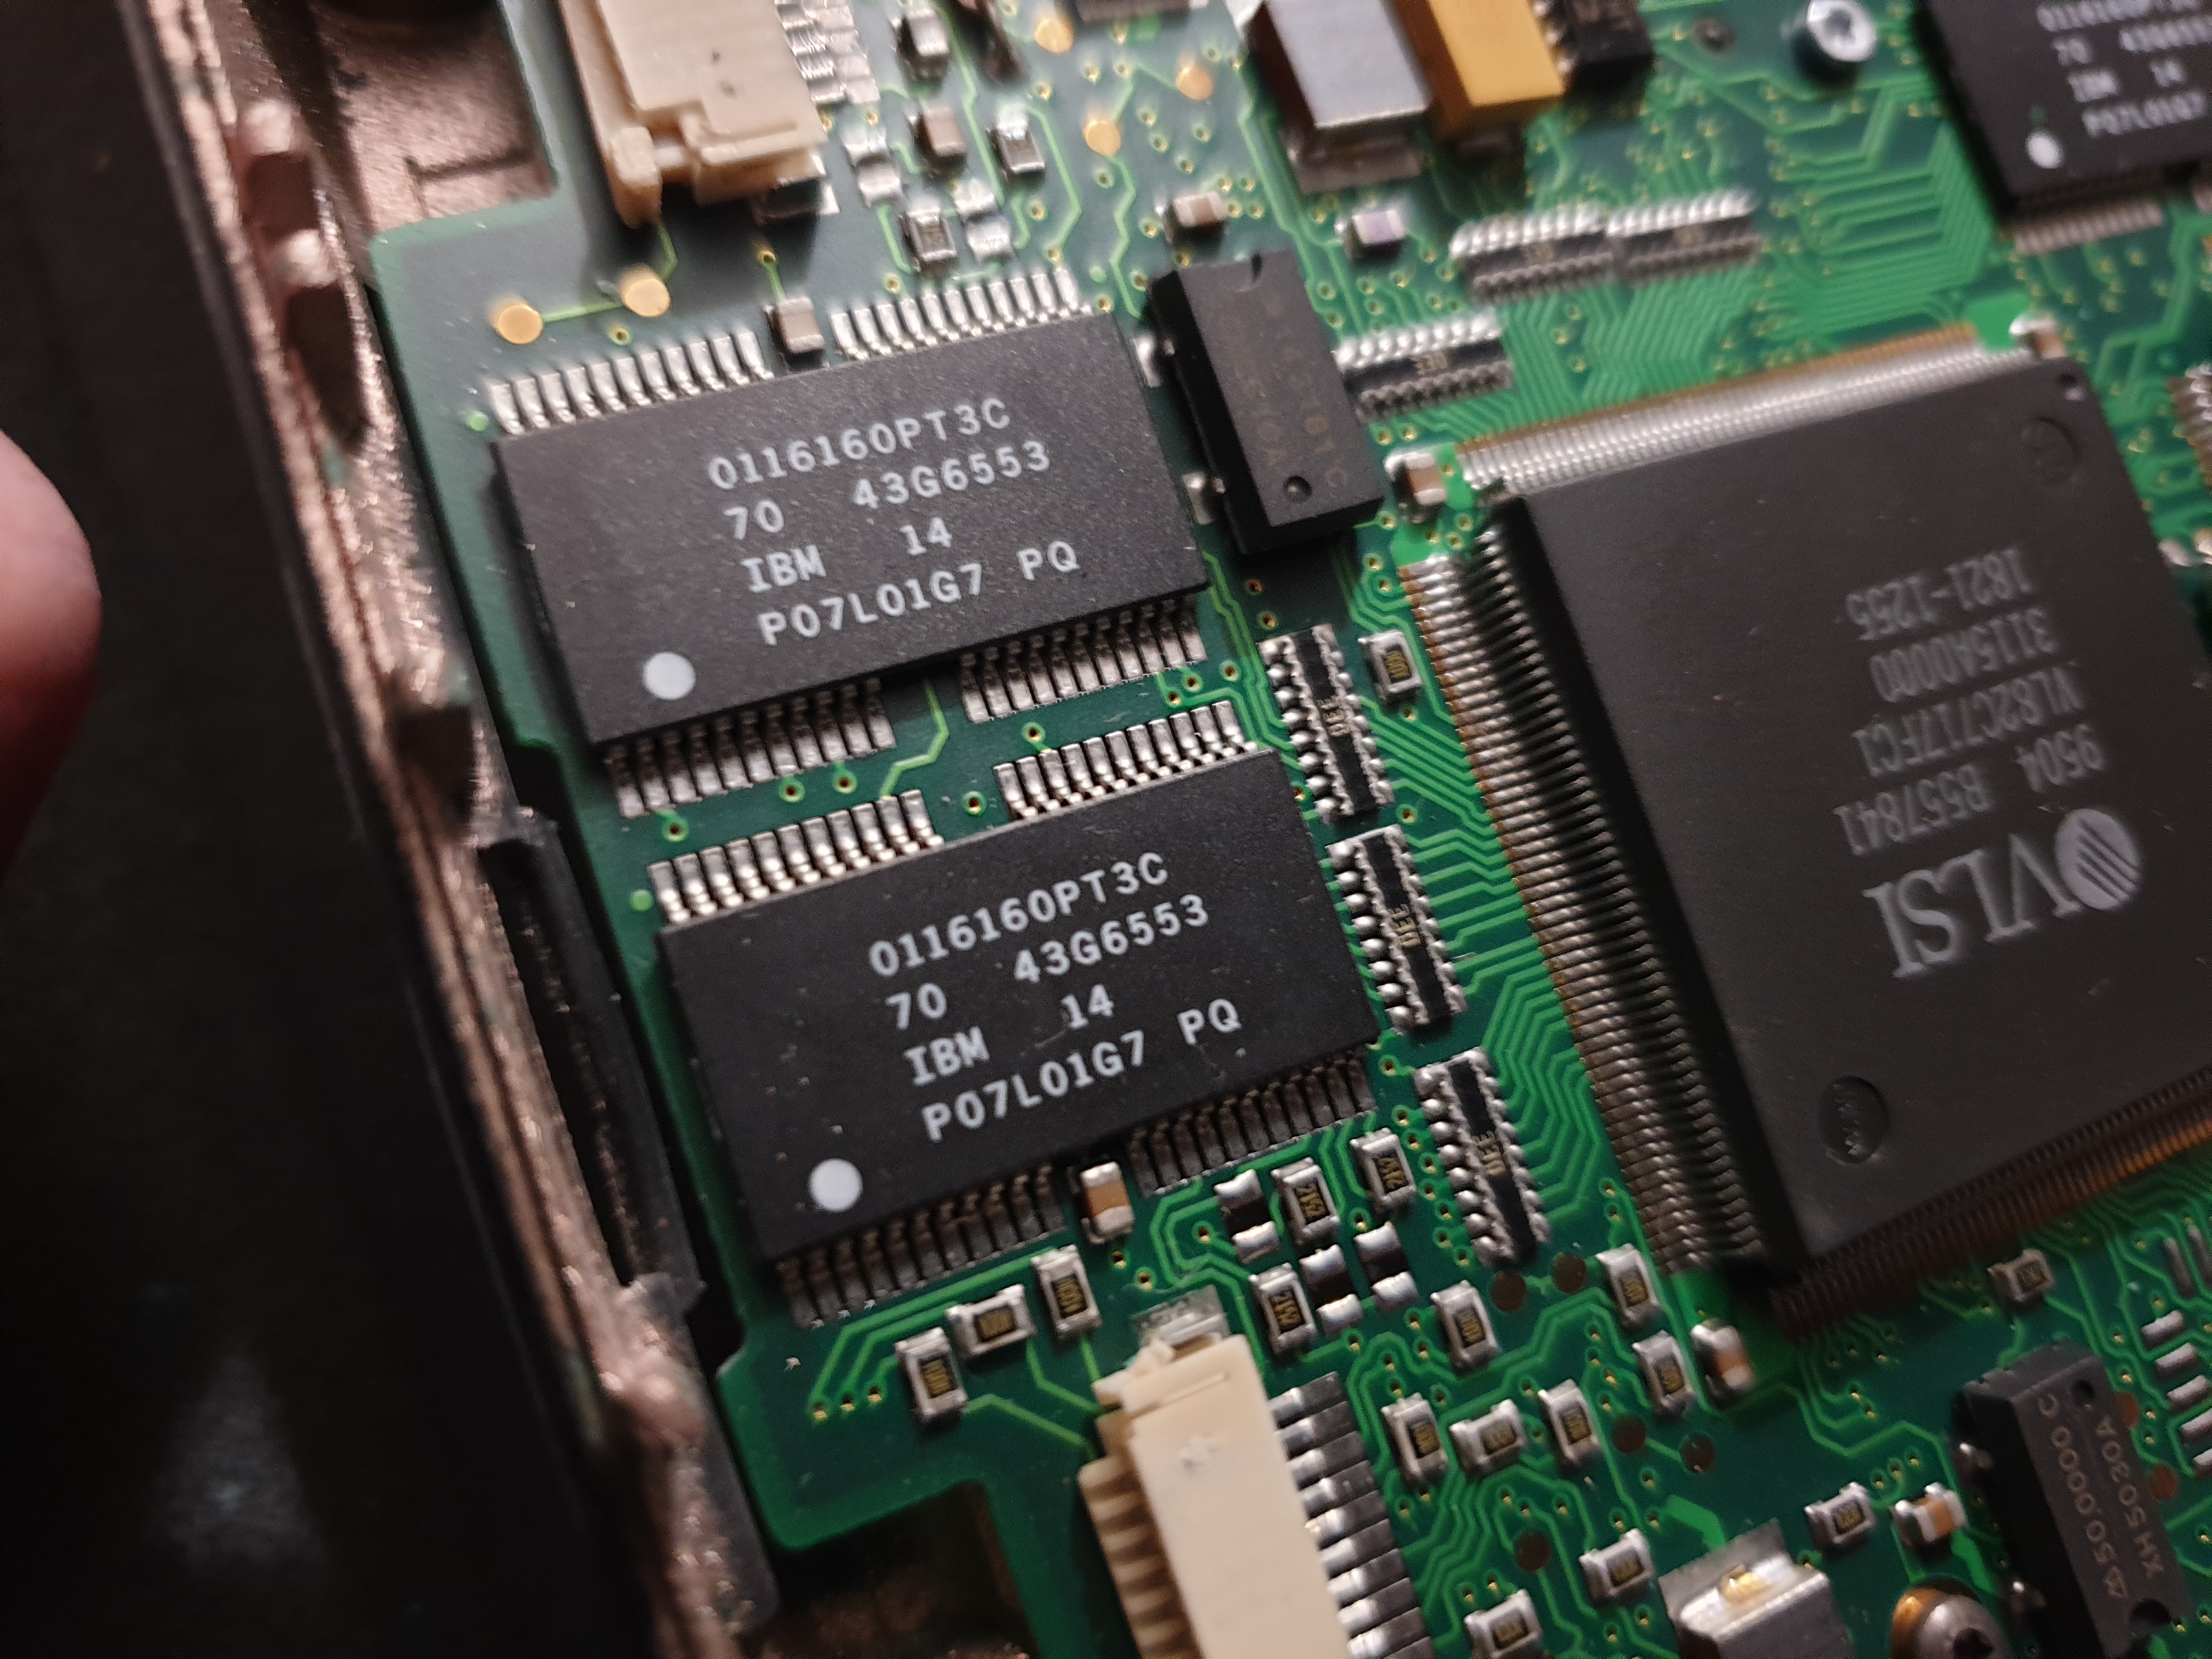

The four DRAM ICs, 8 MB in total
The 'PT' variants like these were special 3.3V ones that had low-power functionality.
Expanding the memory would have been very easy (good luck acquiring a memory module in 2025!) - behind a small plastic cover on the front of the unit is a single memory expansion slot. If your Omnibook 600 came with just 4 MB on the motherboard, the maximum memory you could get was 12 MB with the installation of a single 8 MB expansion board (part #F1055B), though a 4 MB expansion was also available (part #F1054A). These memory expansion boards were proprietary to HP, and all were rated with 70ns DRAMs. If you were lucky enough to own the 600CT, a 16 MB and 24 MB expansion board were also available.
Graphics
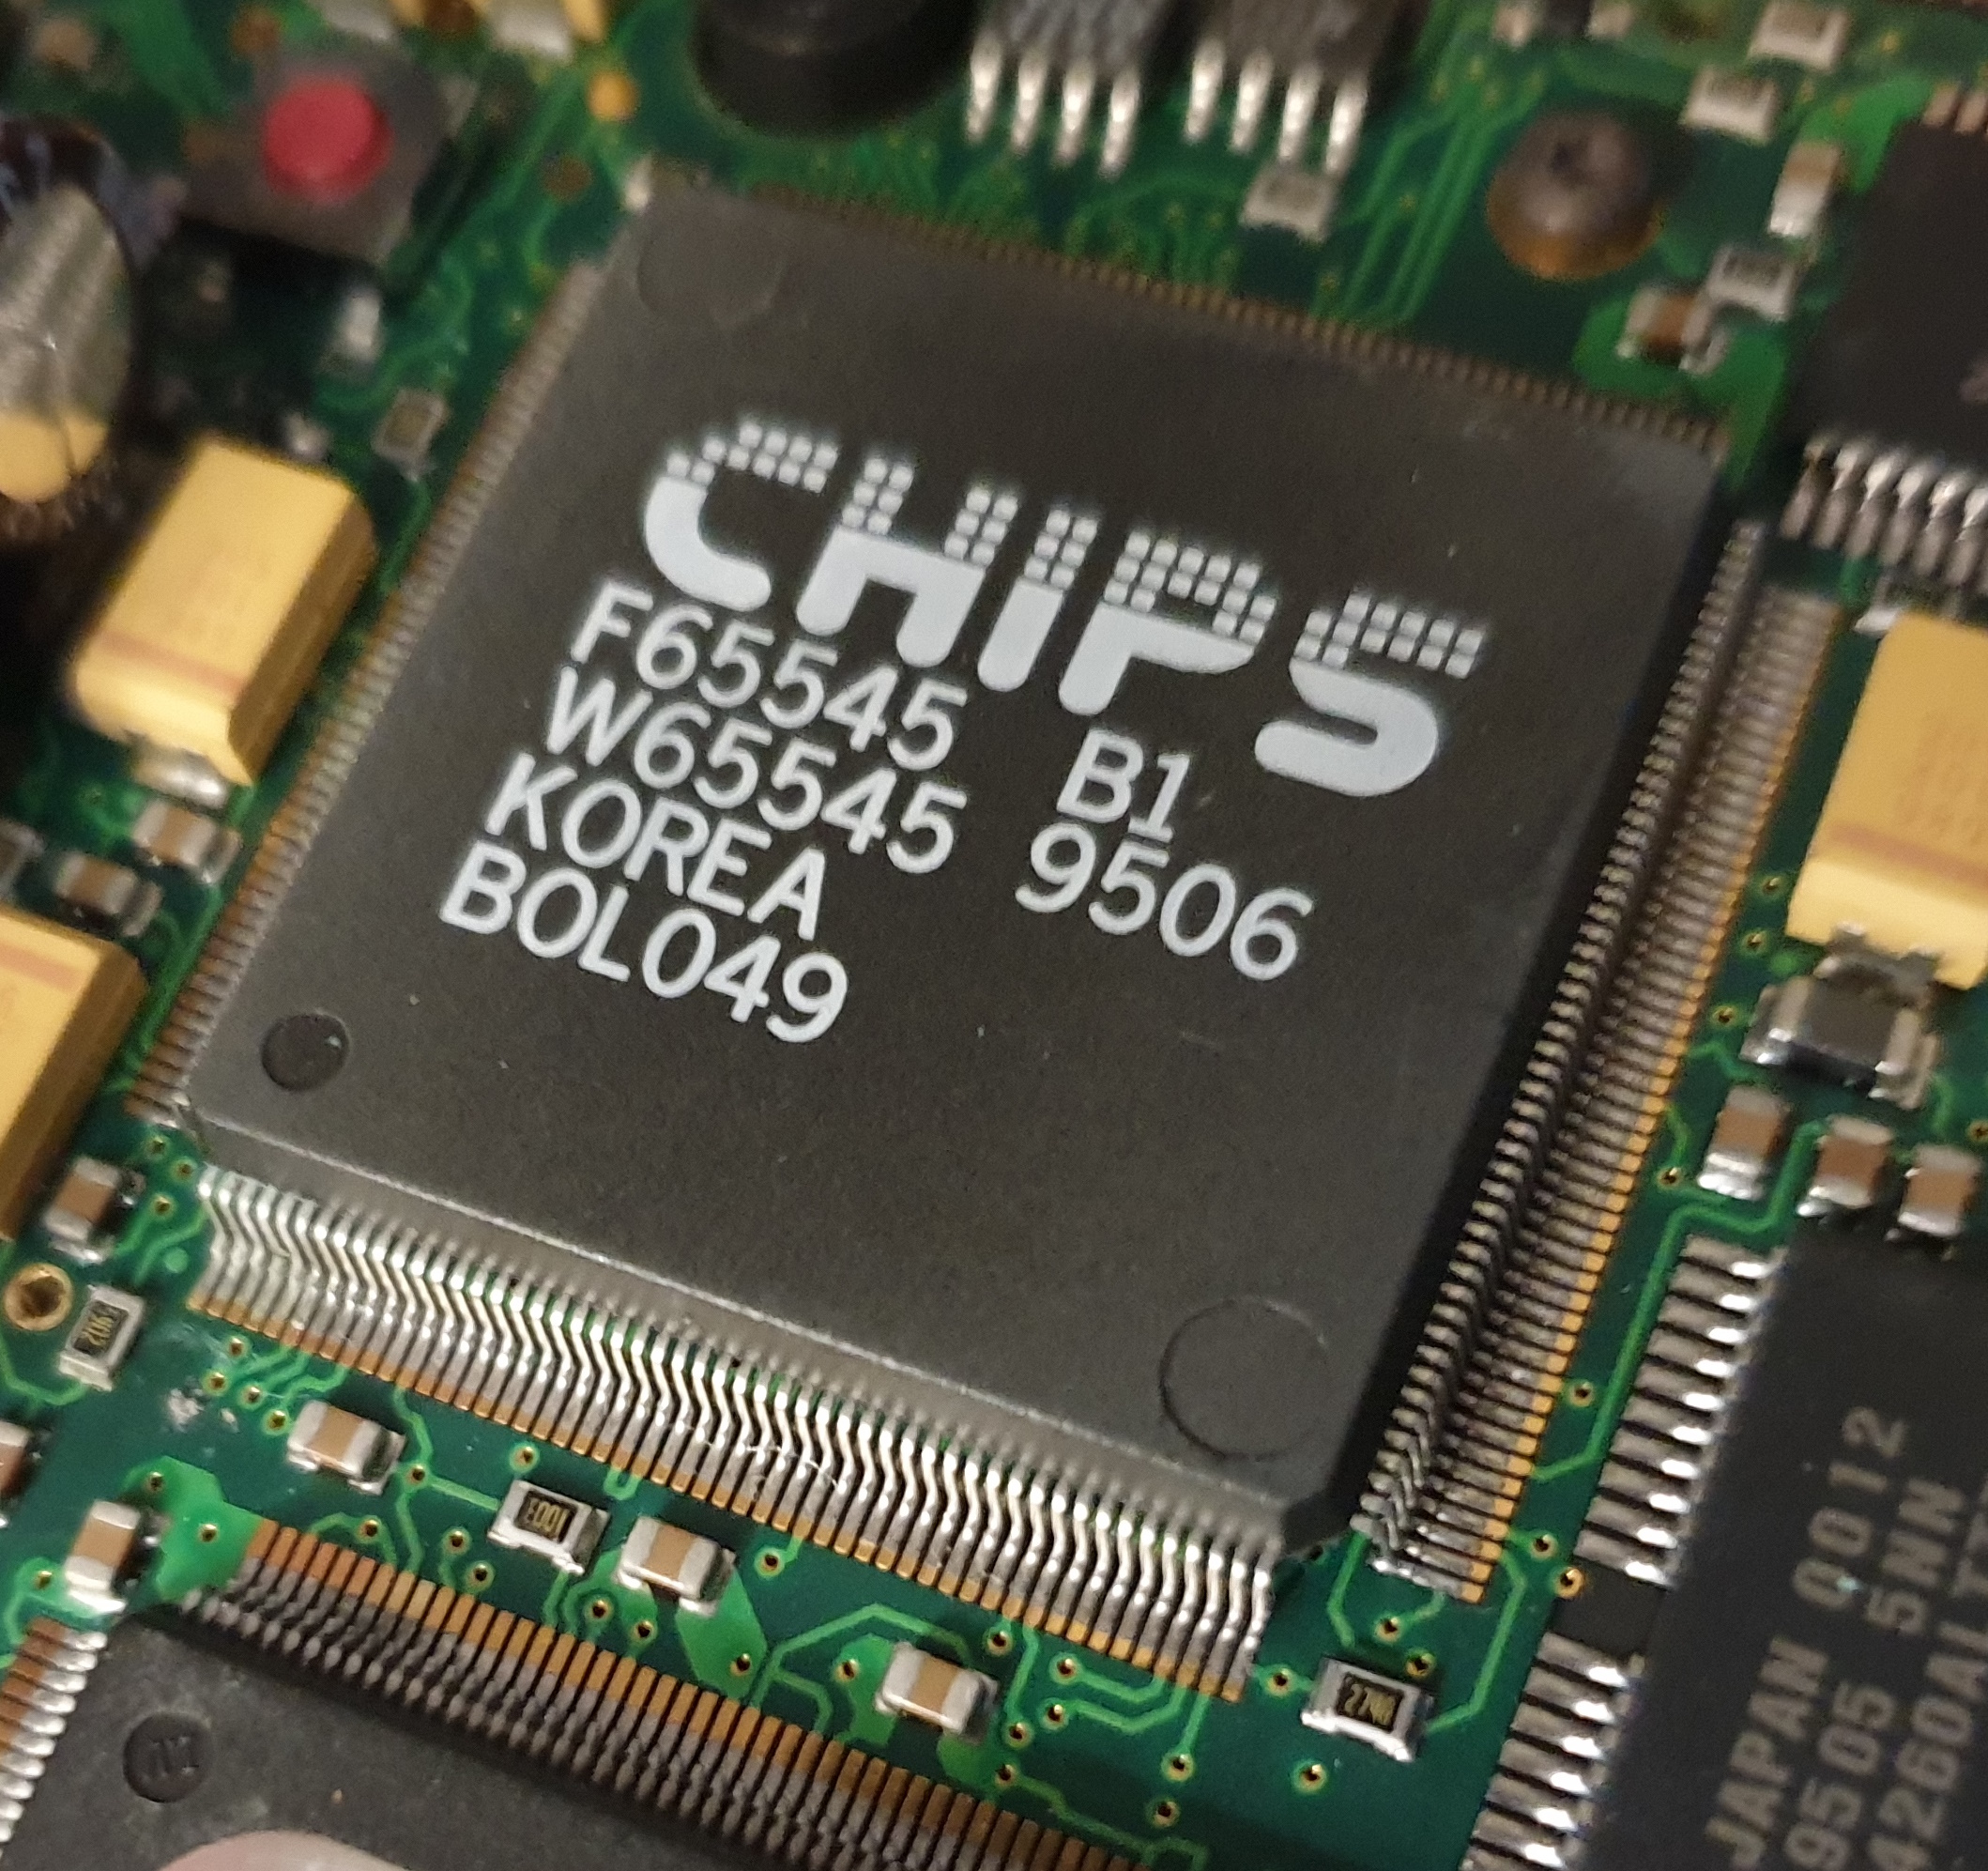 The Omnibook 600-series all used the Chips & Technologies 65545 graphics processor. This ran on the VESA Local Bus, so in theory could communicate with the CPU at 50 MHz.
The chipset supported up to 1 MB of video RAM, able to display resolutions up to 1024 x 768 at 8 bits per pixel (256 colours). The Omnibook 600 series all came with this maximum 1 MB, so resolution is limited to 640 x 480 in 64,000 colours using the built-in display. If you connect the notebook to an external monitor, you can realise the full 1024 x 768 resolution, but only at 8 bpp (bits-per-pixel) colour depth.
The F65545 supported a 32-bit memory interface and graphics acceleration functions included 32-bit BitBlt (bit-block transfers) as well as hardware stretching vertically in graphics and text mode, though only horizontal stretching in text mode - this isn't an issue with our 640 x 480 LCD display here, as stretching isn't required for most applications. DOS games tended to run in 320 x 200, so it would use basic pixel-doubling (not hardware stretching) to run in 640 x 480 - perfect!
Storage
 All Omnibook 600s used a PCMCIA hard disk. This was of course chosen primarily for its small 1.8" size, but it was also apparently much better at handling shocks than traditional 2.5" and 3.5" hard disks (non-operating shock of 1000 G's compared to 100 G's according to what I researched). Regardless of capacity, these hard drives had an average access time of 12ms with 2ms track-to-track, offering a transfer rate of up to 5.7 MB/sec. The actual disk interface in use was able to theoretically transfer up to 16 MB/sec. Sadly, despite the specs on paper seeming to tell me these would score well when it came to performance, the reality in reviews was the exact opposite, with reviews praising most of the machine but criticising its poor hard drive performance.
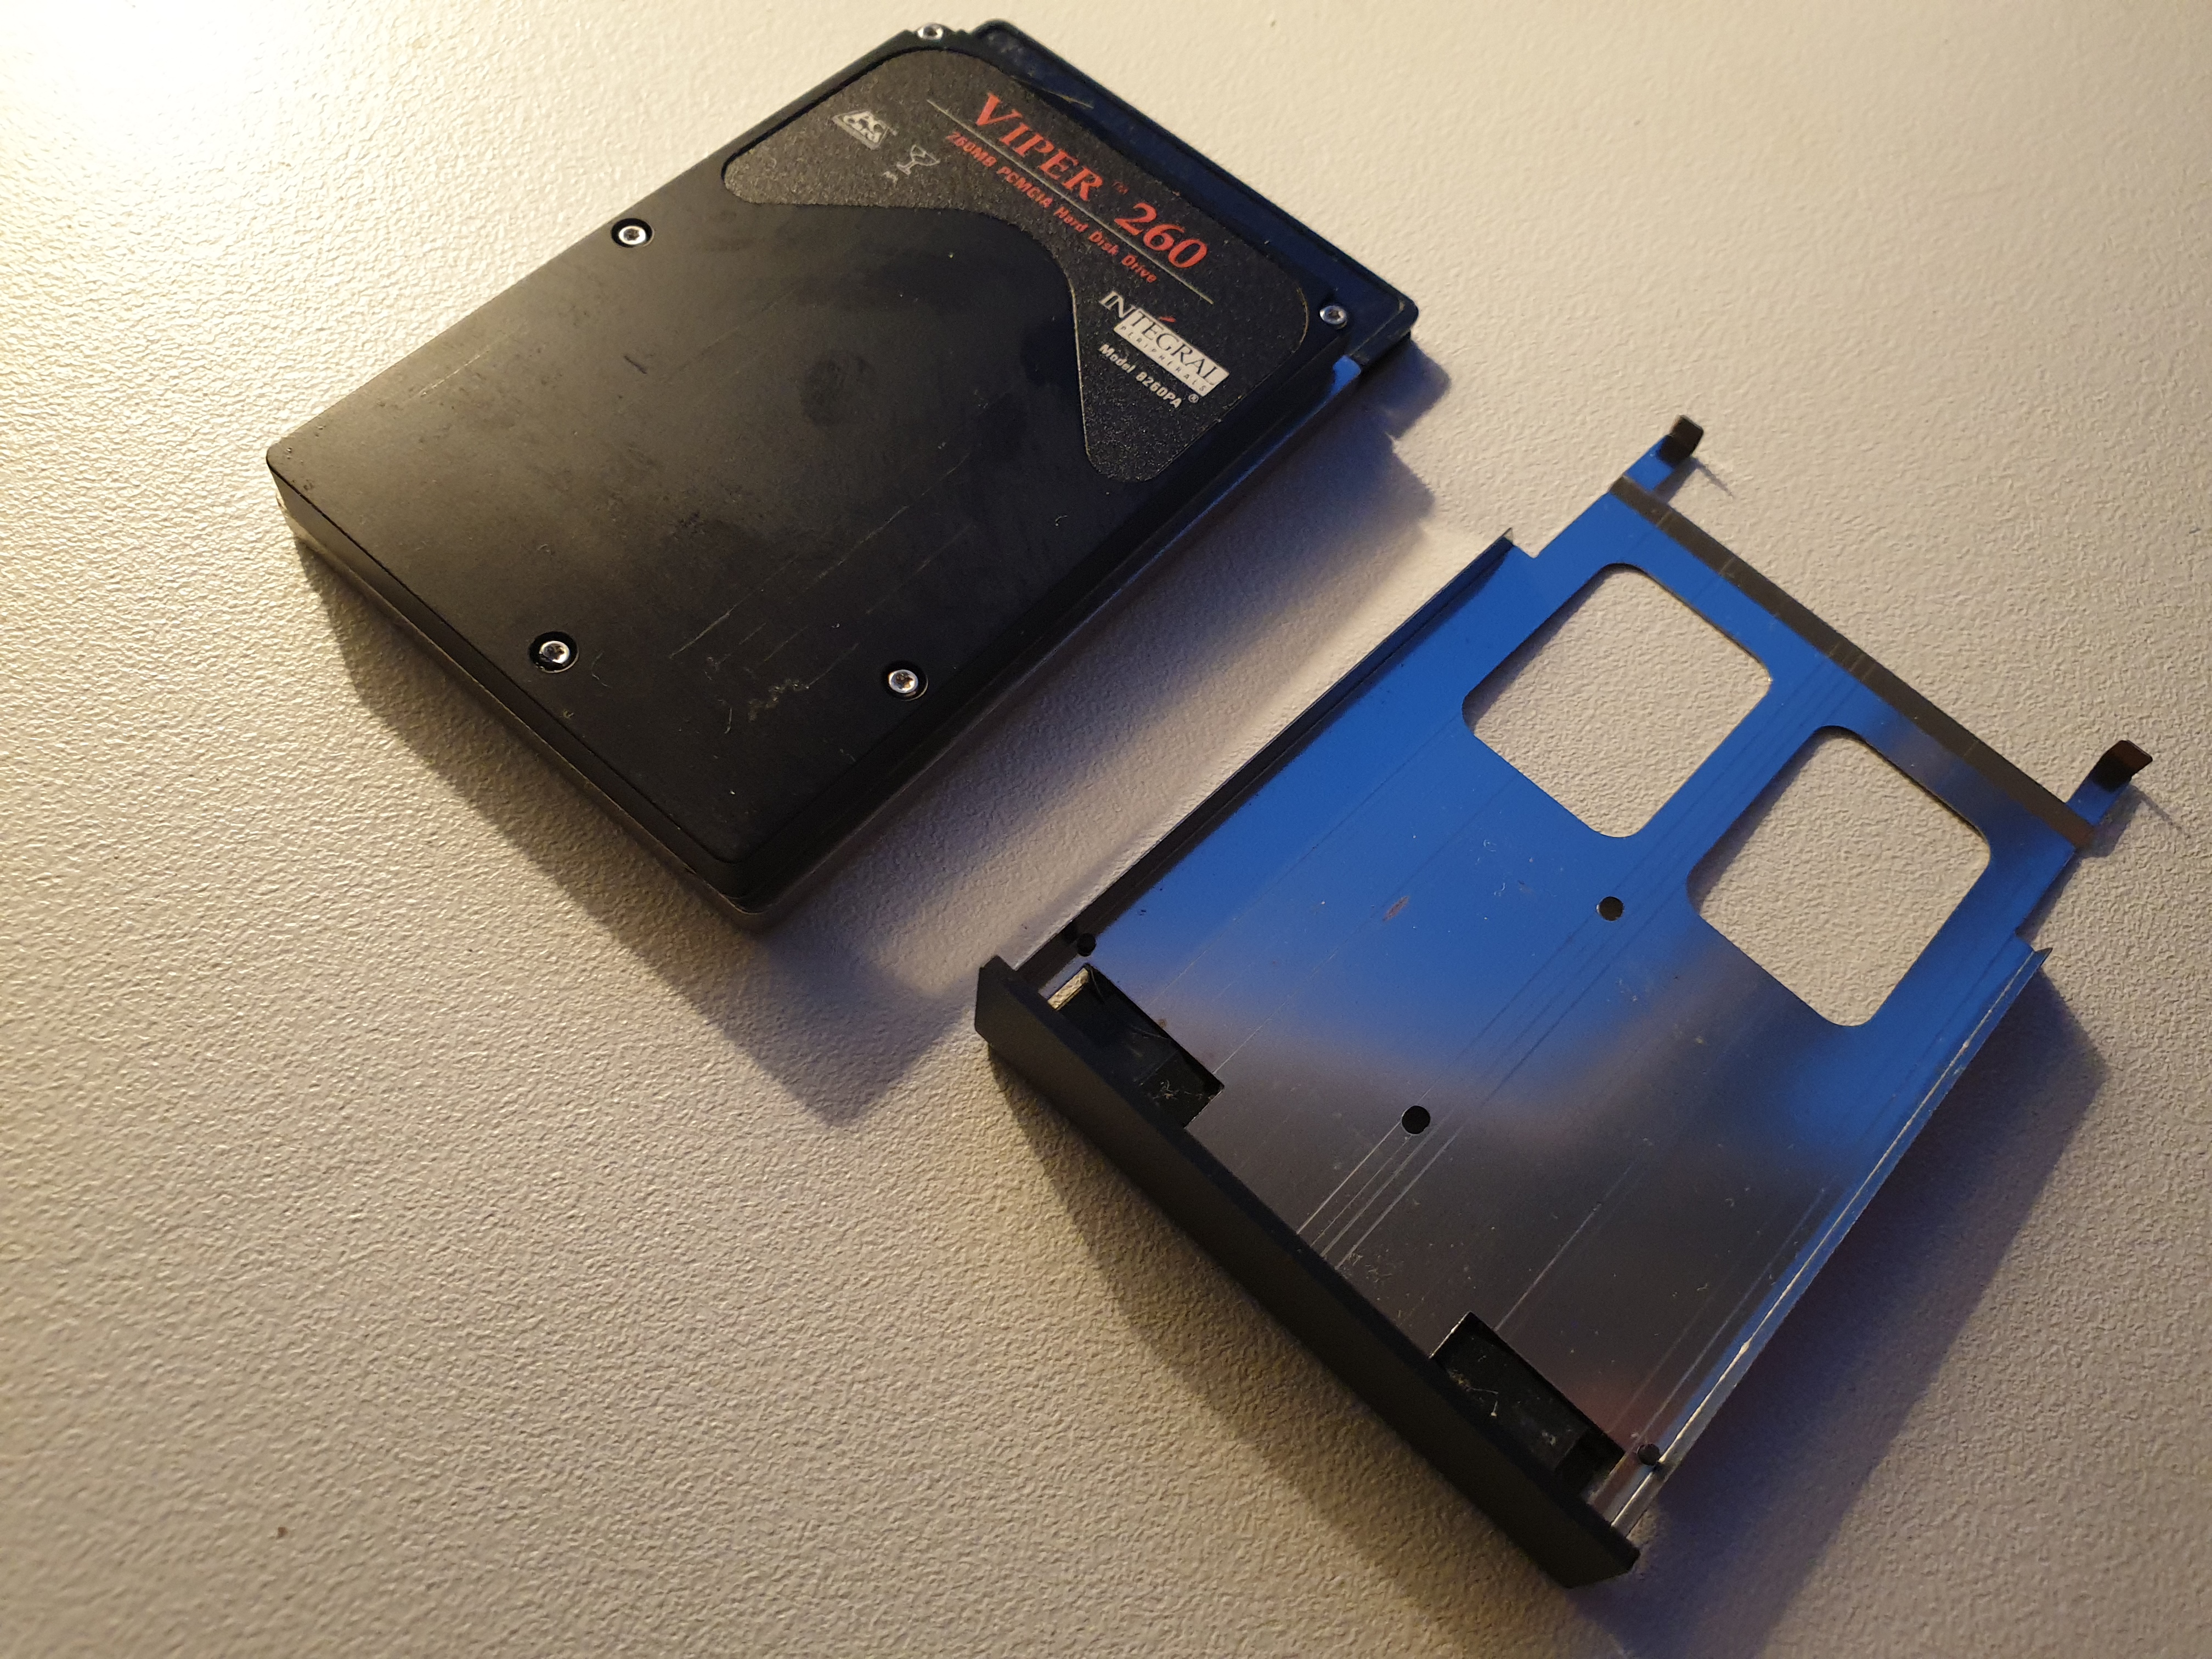
Early Omnibook units came with Maxtor-branded hard disks while later ones used Integral. 170 MB units available early on were found to be unreliable - they were discontinued from sale and replaced with Integral 260 MB units.
Mine came with the Integral 260 MB unit:
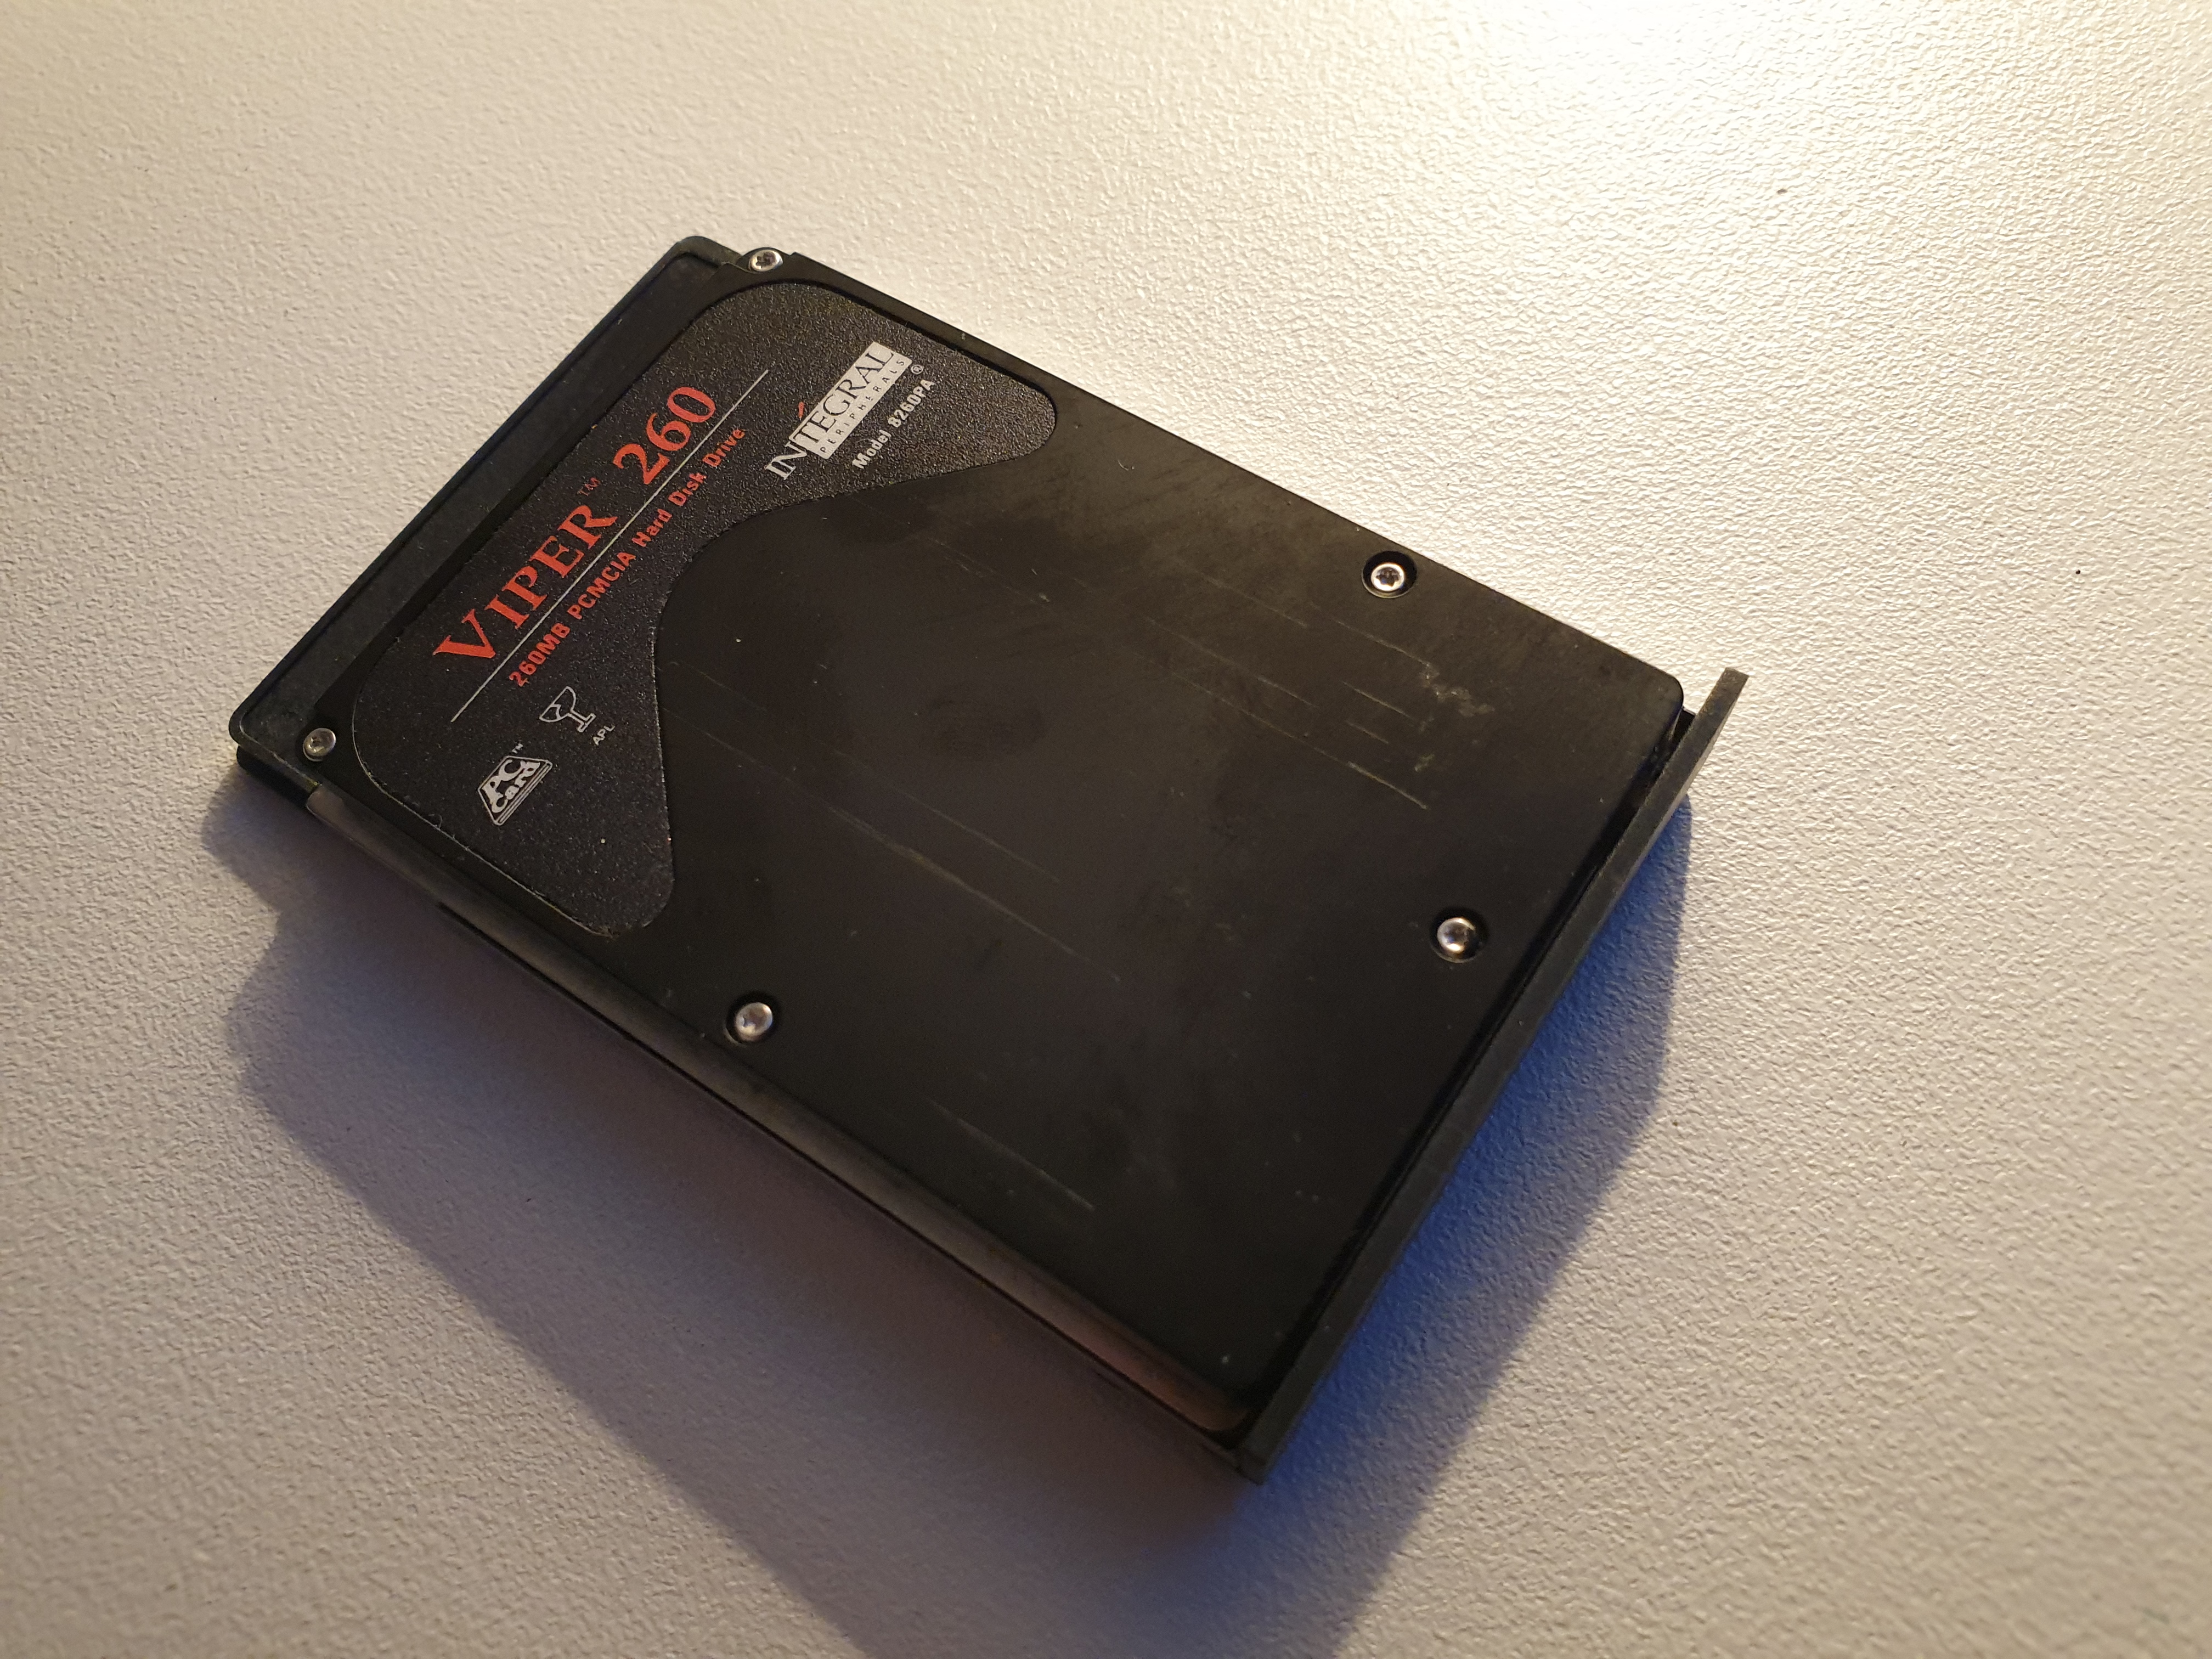
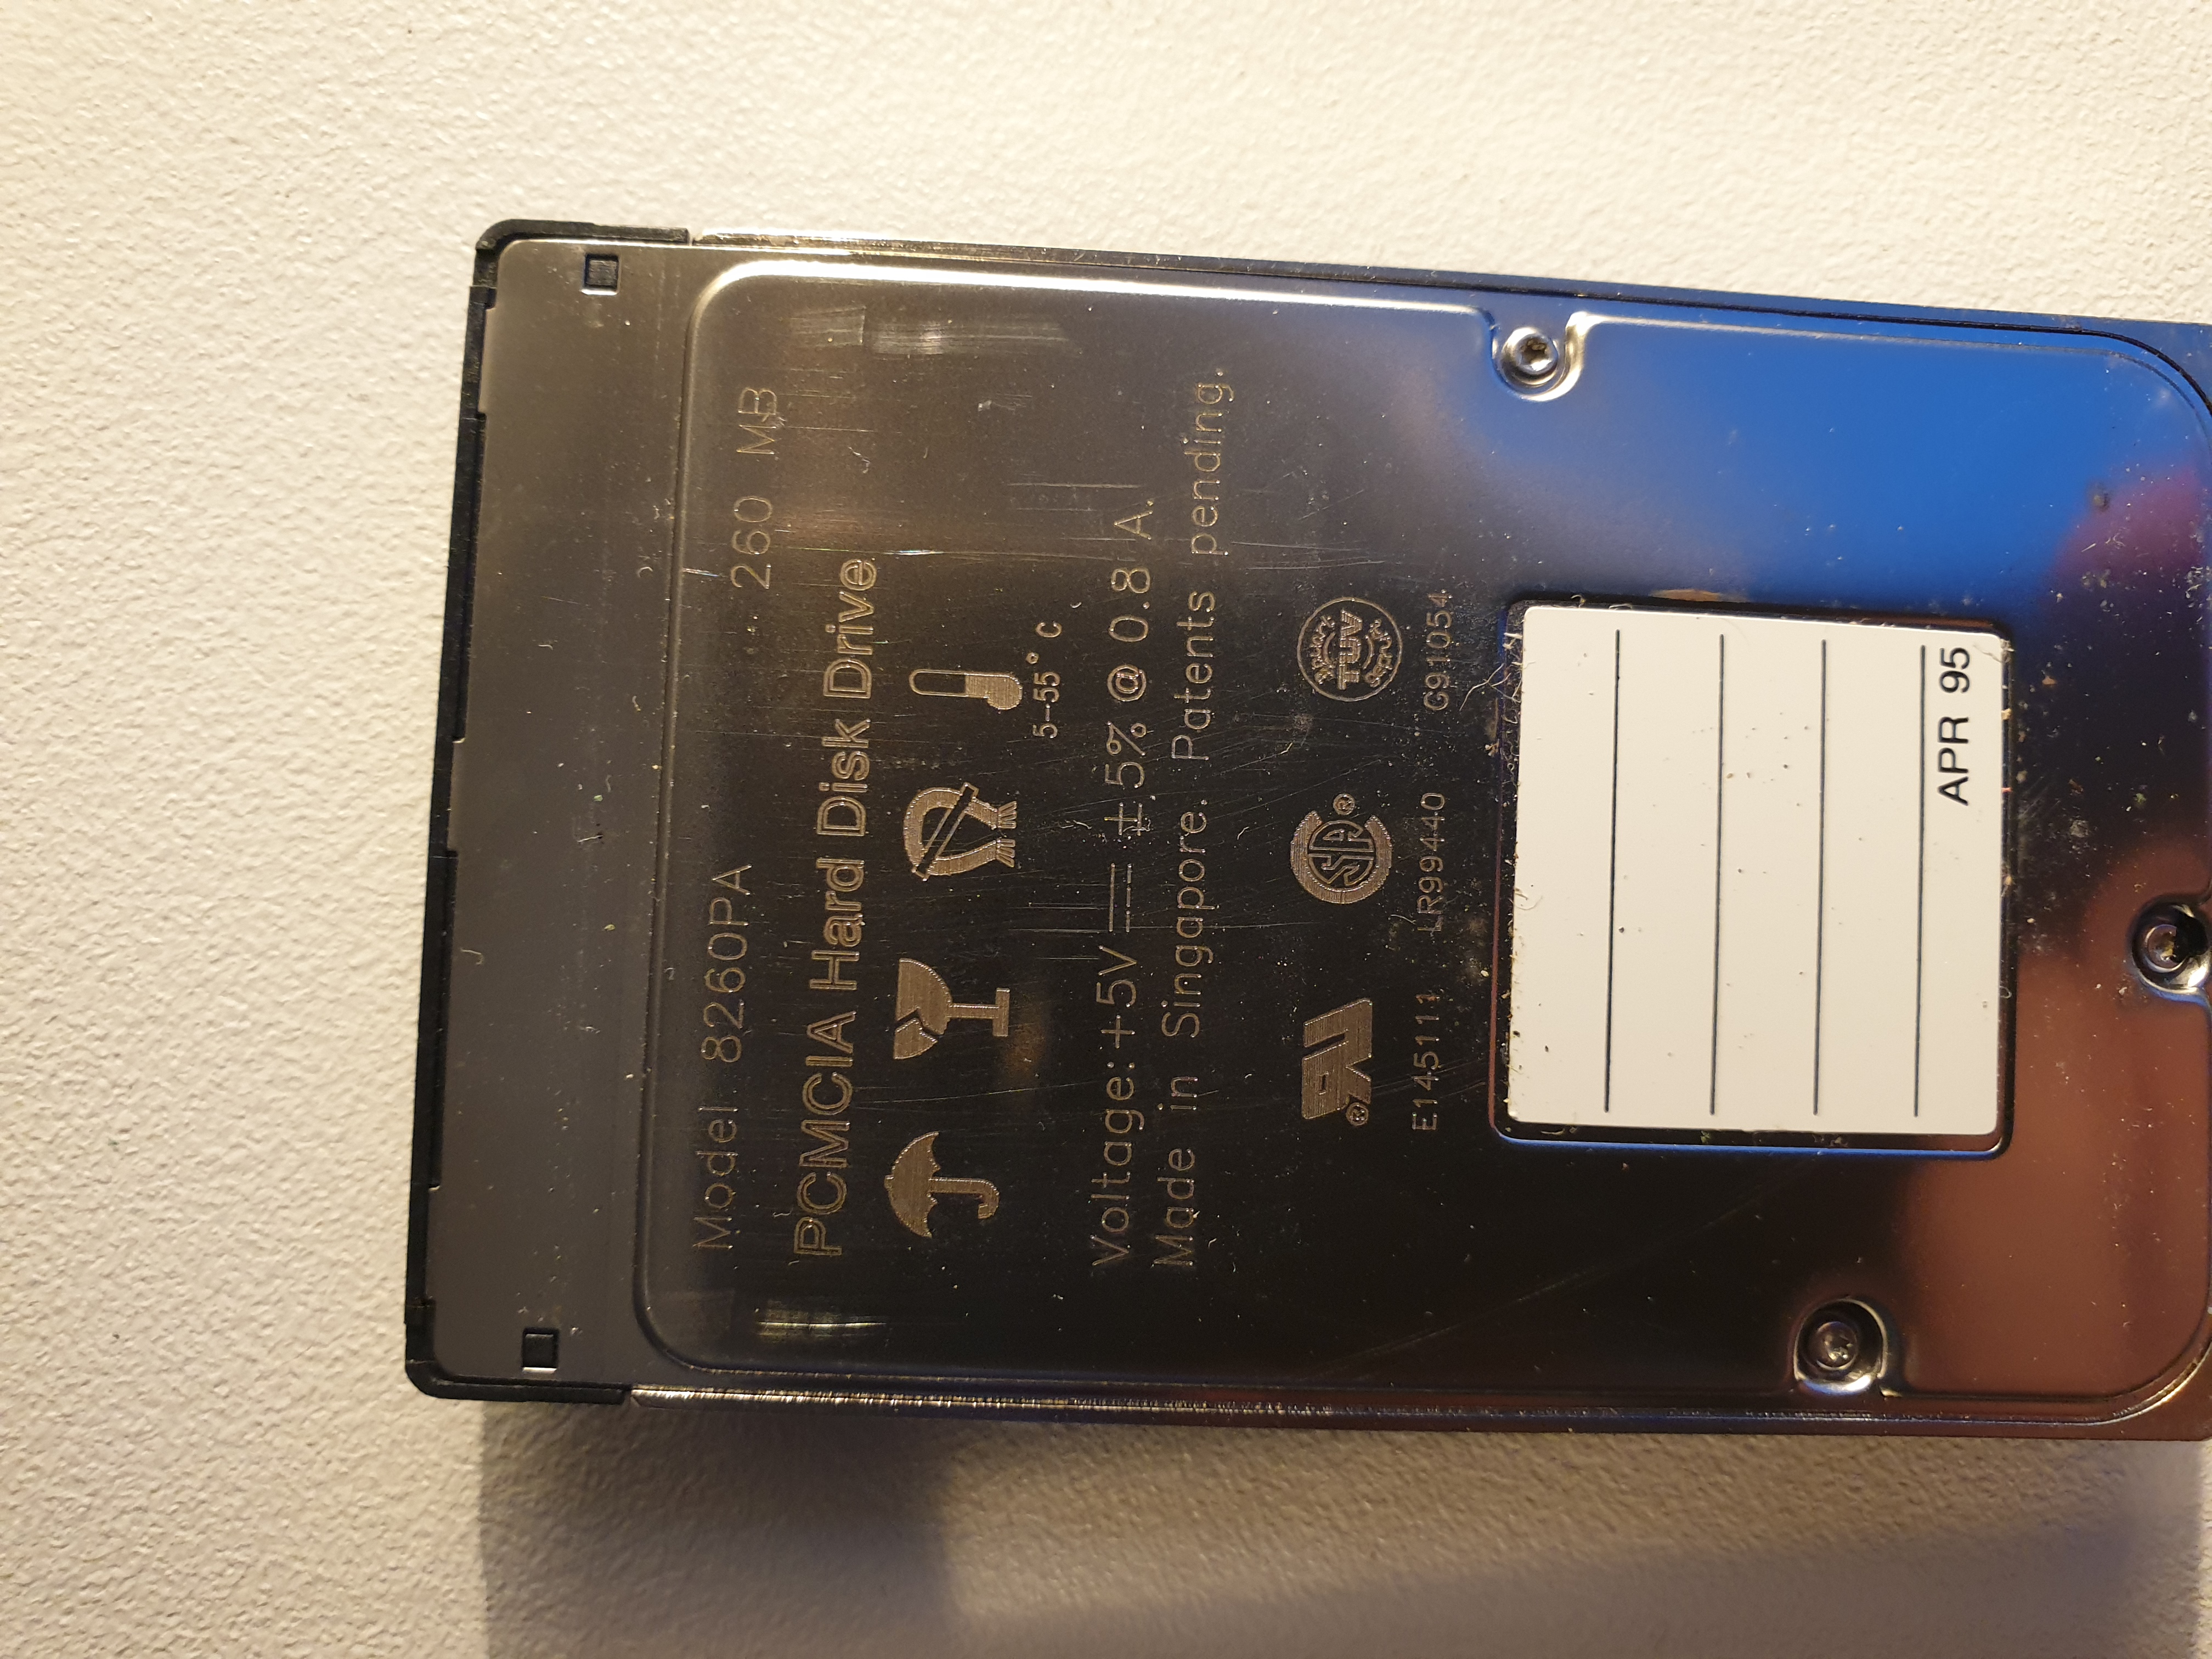
The Integral PCMCIA Hard Disk (Model 8260PA)
The hard disk controller in the Omnibook 600 is provided by VLSI.
The hard disk is installed in a caddy on the right front of the notebook, accessible by releasing two latches and pulling the unit out.
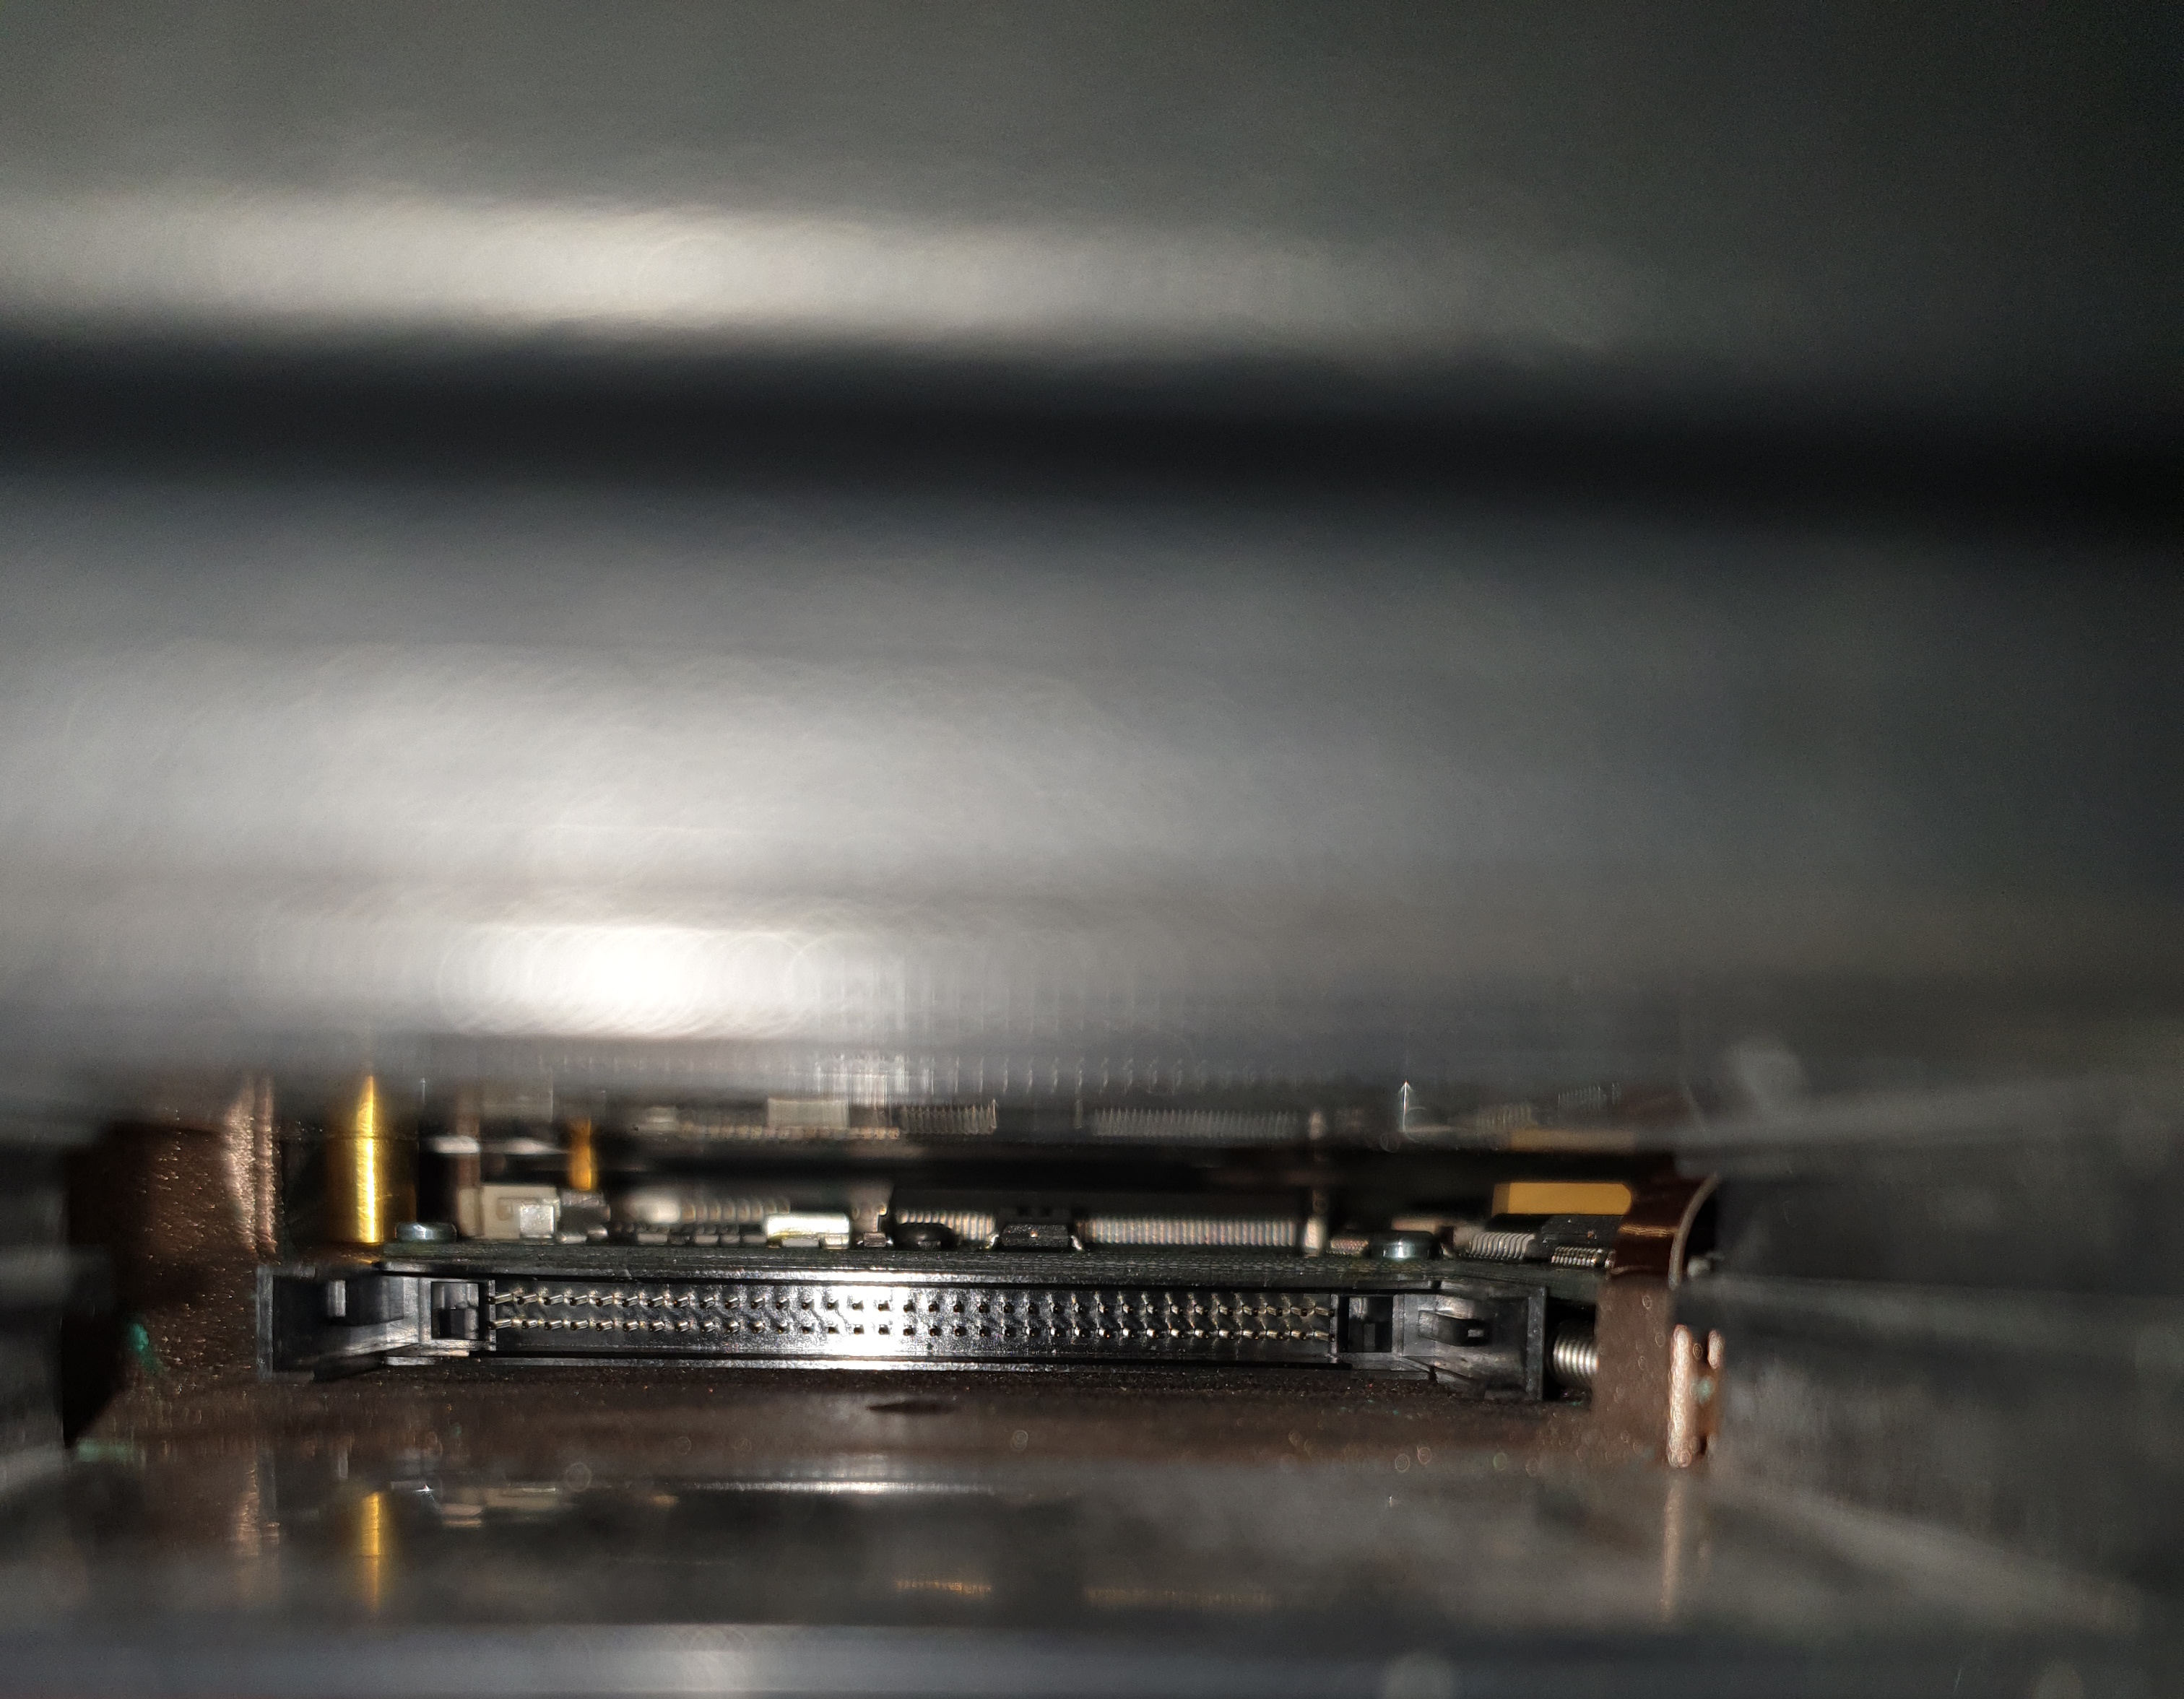
(Left) the hard disk bay with drive and caddy removed, and (right) the 68-pin PCMCIA connector in the bay
In addition to the hard disk, the Omnibook 600 series all came with an external 3.5" 1.44 MB floppy drive provided by TEAC. The interface and cable are proprietary to HP, and are very sturdy.
 Interesting that the disk eject button is a slider on the top of the unit. When a disk is inserted, this moves forward. To eject a disk, you slide this backwards. It's spring-loaded so not much force is needed. The design actually makes sense for a portable drive - if you accidentally dropped it and it landed on the eject button on a traditional drive it could easily snap, so having it flush with the top would give it better protection - nice job HP!.
The drive is hot-connectable, so there's no need to power down the notebook before connecting or disconnecting it.
As was typical of laptops of this time period, it also came with a PCMCIA slot, (this was later rebranded as the PC card slot) - well actually there were two slots, depending on the type of cards being used. These were very popular in 1990s laptops and notebooks and into the 2000s, offering a decent peripheral interface where previously there was none. These ones support the SystemSoft Card Services and Socket Service v2.1 standards. It's too early to support the CardBus standard, as that was a 32-bit version of the PC Card spec based on PCI that arrived in 1995. You could install two Type I or Type II PCMCIA cards, or a single Type III card. These slots were typically used to install mass storage or communication devices such as a network card or modem. Solid State hard disk cards tend to be Type III, which are taller than Type I or Type II cards to fit more components in, whereas modem cards for example, were typically Type II. If using the upper slot with a storage device, this will be your D: drive, and the lower slot will be drive E:. If you install a Type III storage card in the lower slot, this comes out as drive E:.
It's highly likely that these slots are different to the slot the hard disk uses - I'm guessing here, but the hard disk one (called the 'System Slot' in HP parlance) probably conforms to the supplemental PCMCIA-ATA standard to allow the fitted device to appear as a standard IDE hard disk to the PC.
Battery / AC Power
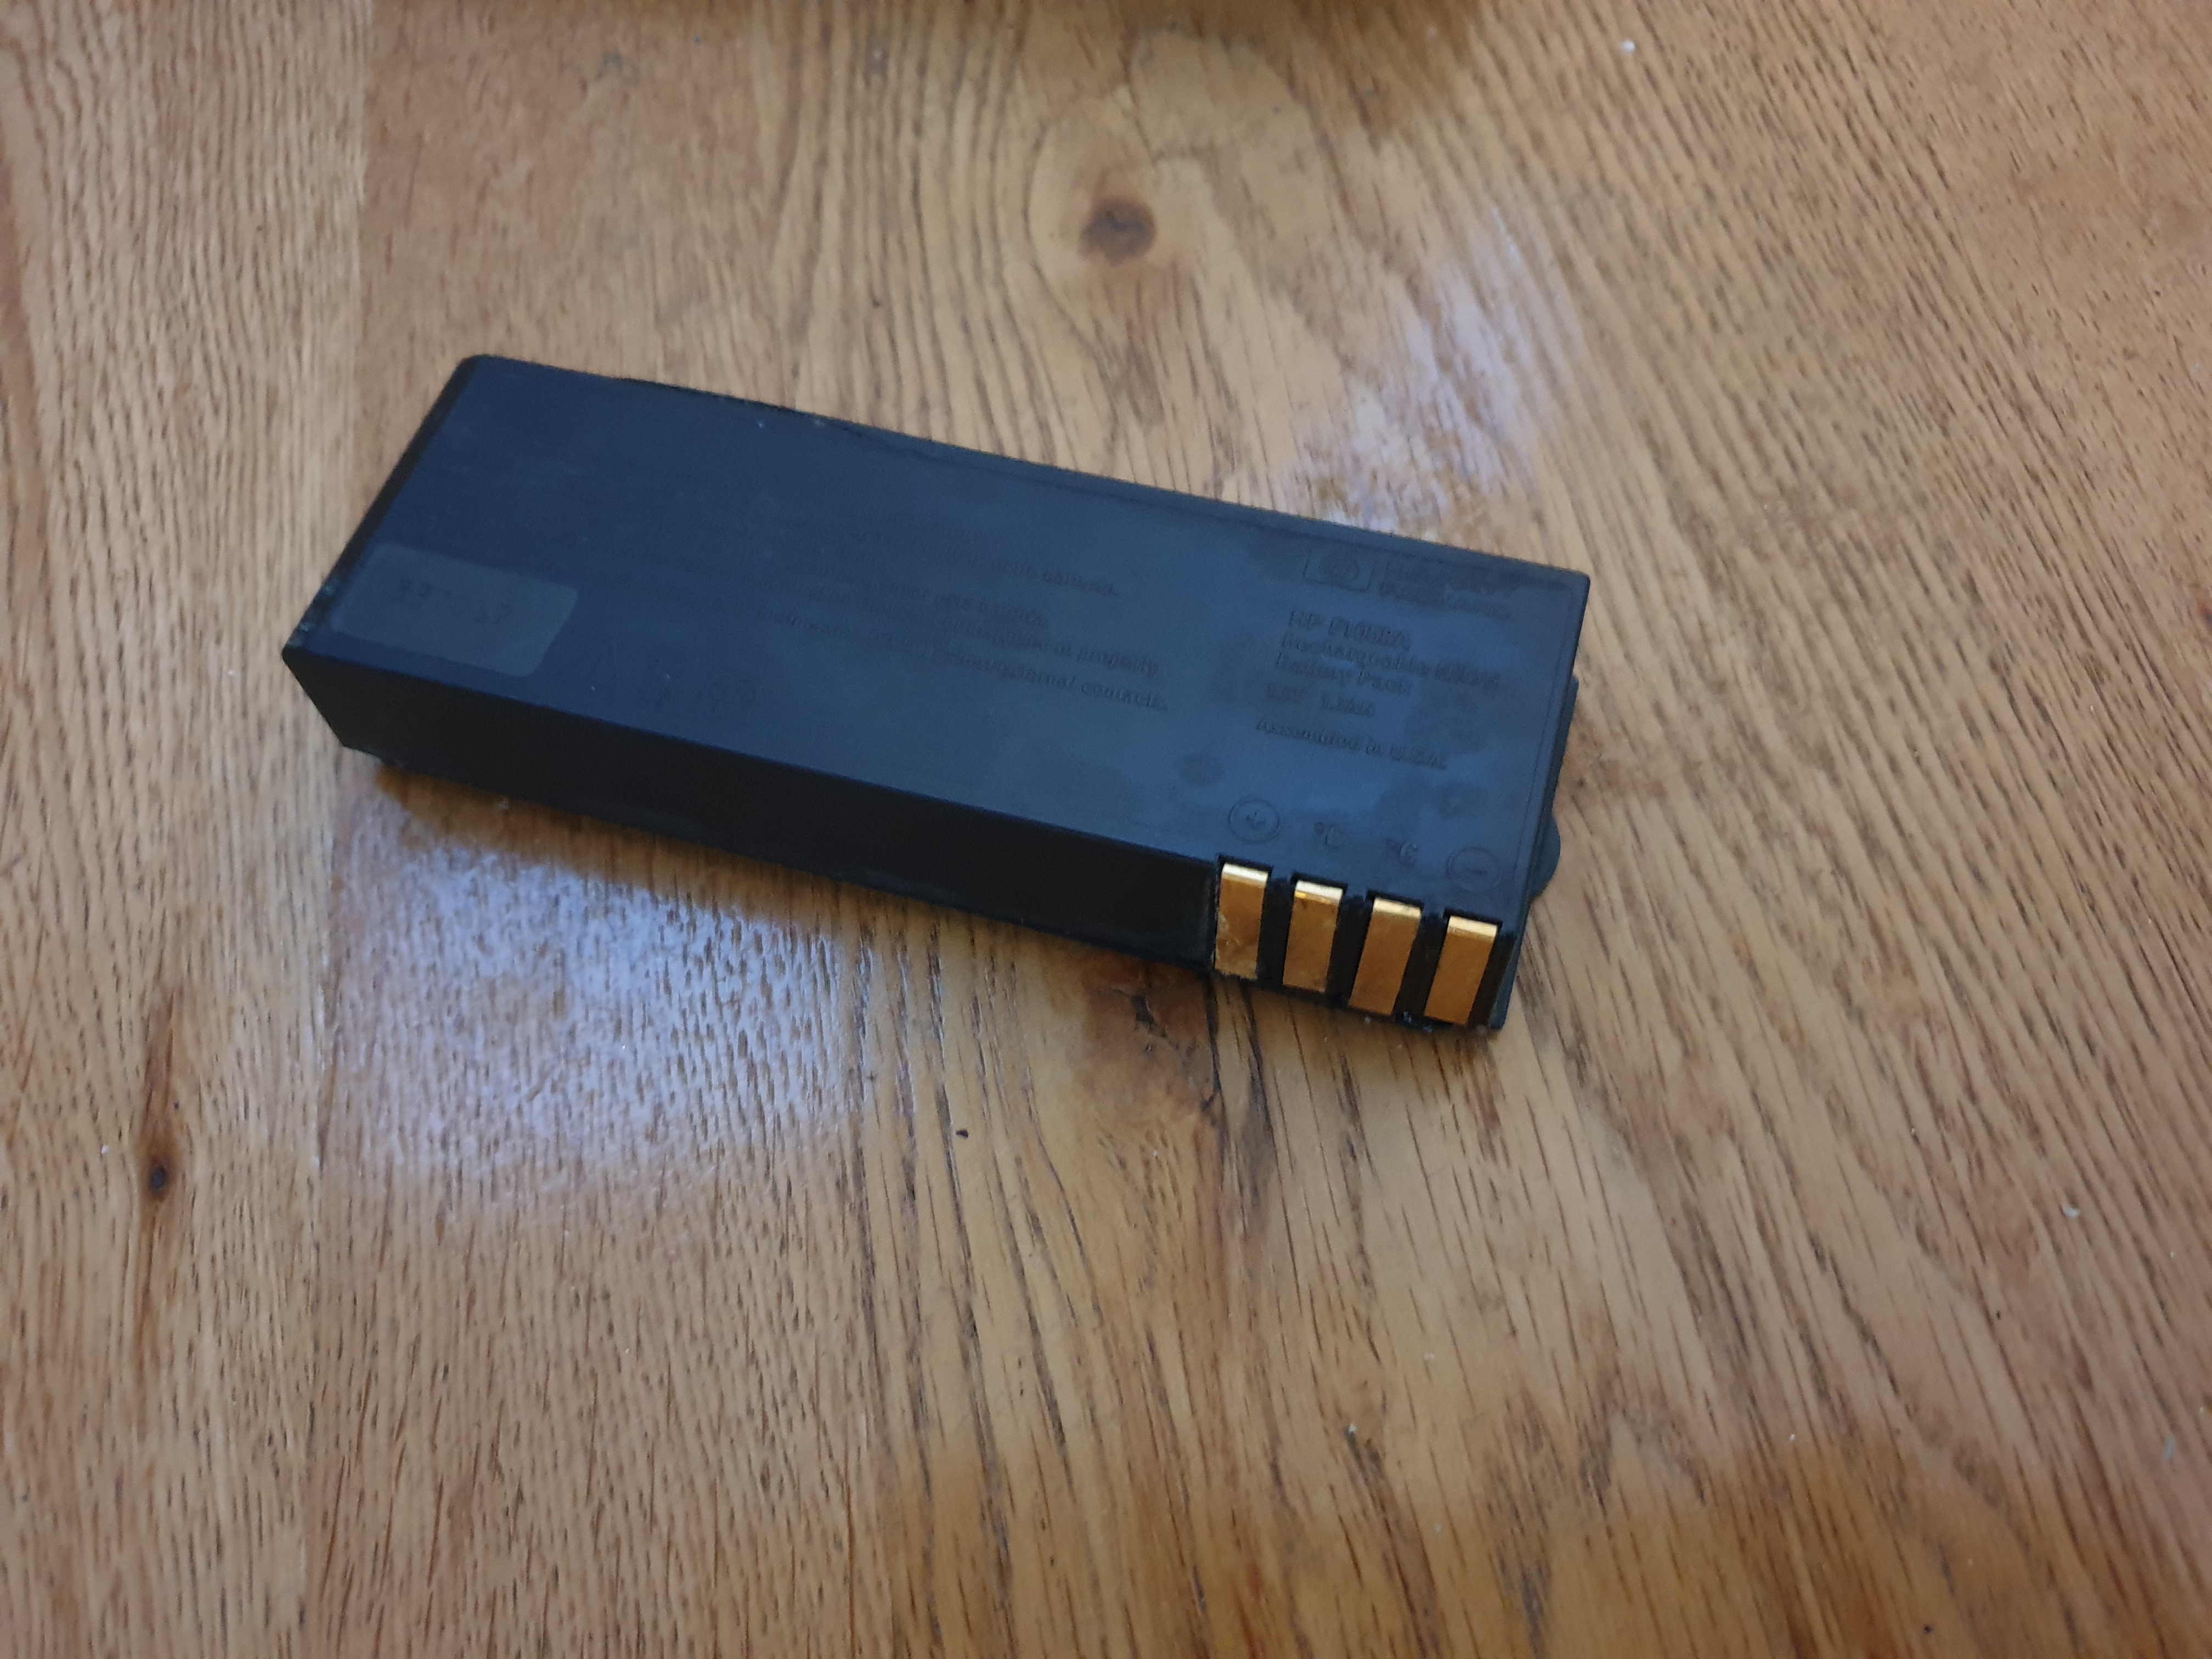 The 600C came with a NiMH (Nickel Metal Hydride) battery which, when new, would have been good for about 4 hours of runtime.
The 600CT came with a Li-Ion (Lithium Ion) battery which was more efficient, and able to run for up to 3.5 hours.
It provides 9.6V of DC voltage for the laptop, so without opening it up it probably has 8 individual 1.2V DC rechargeable cells inside.
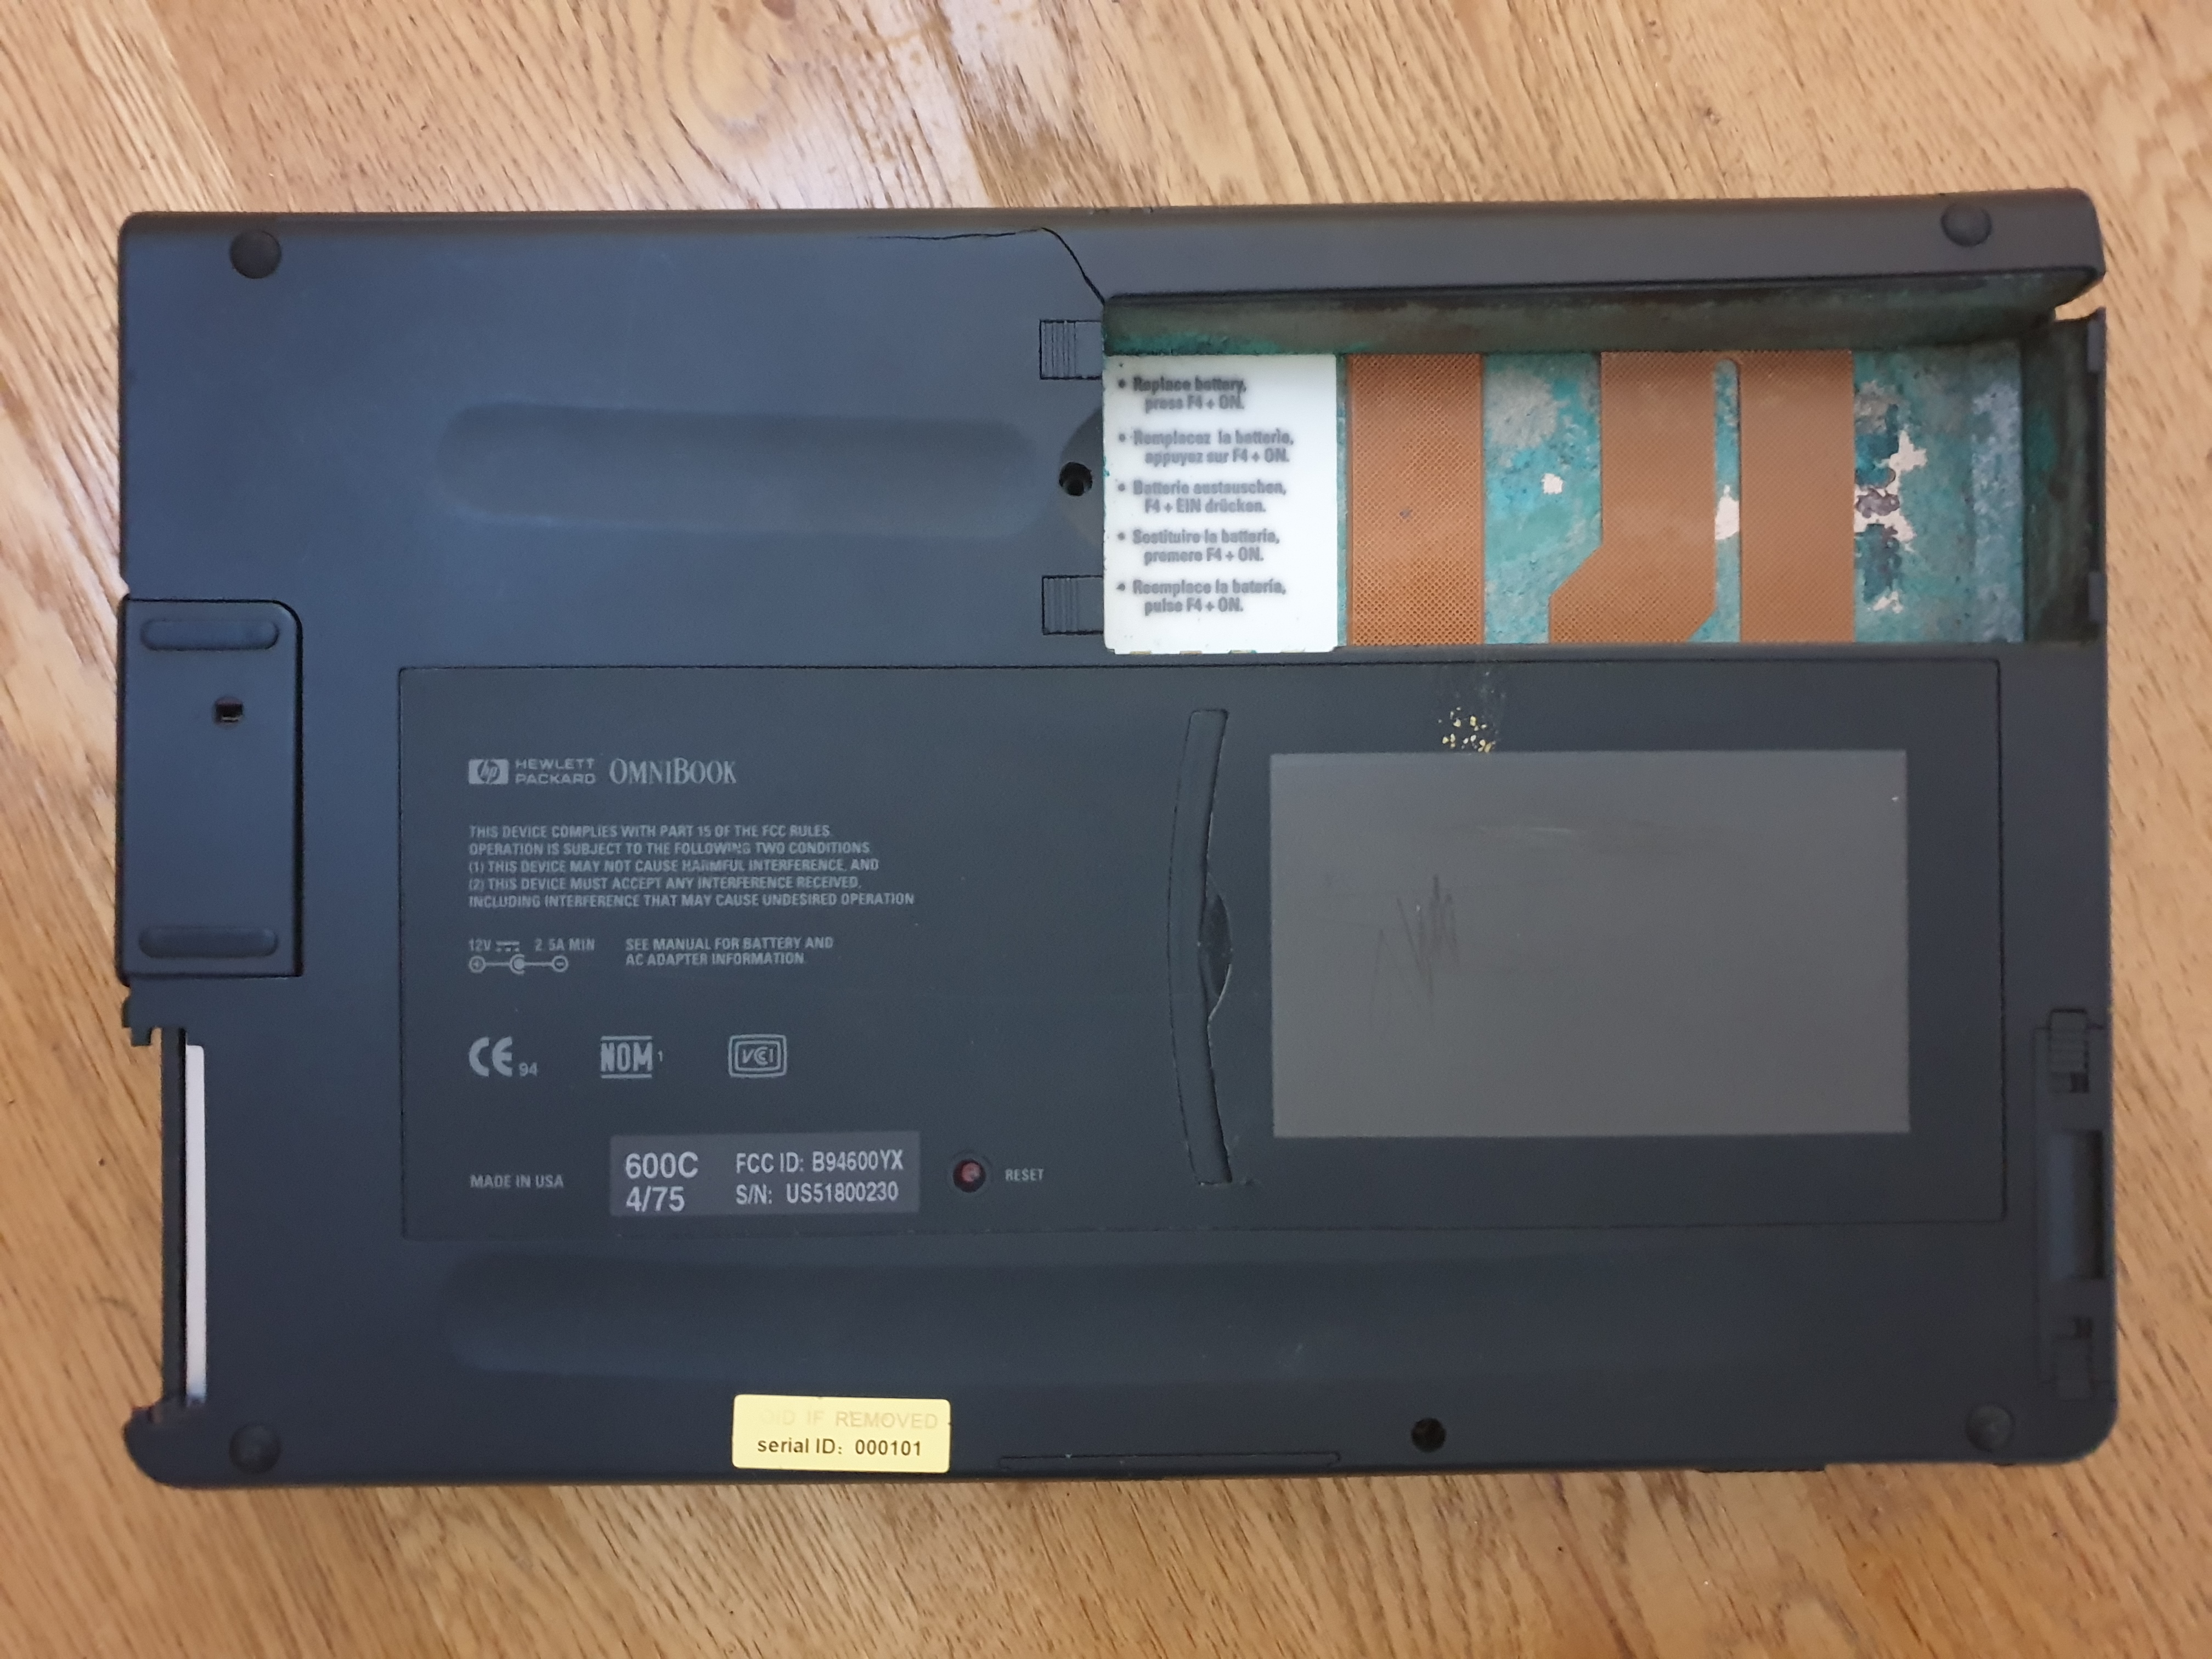
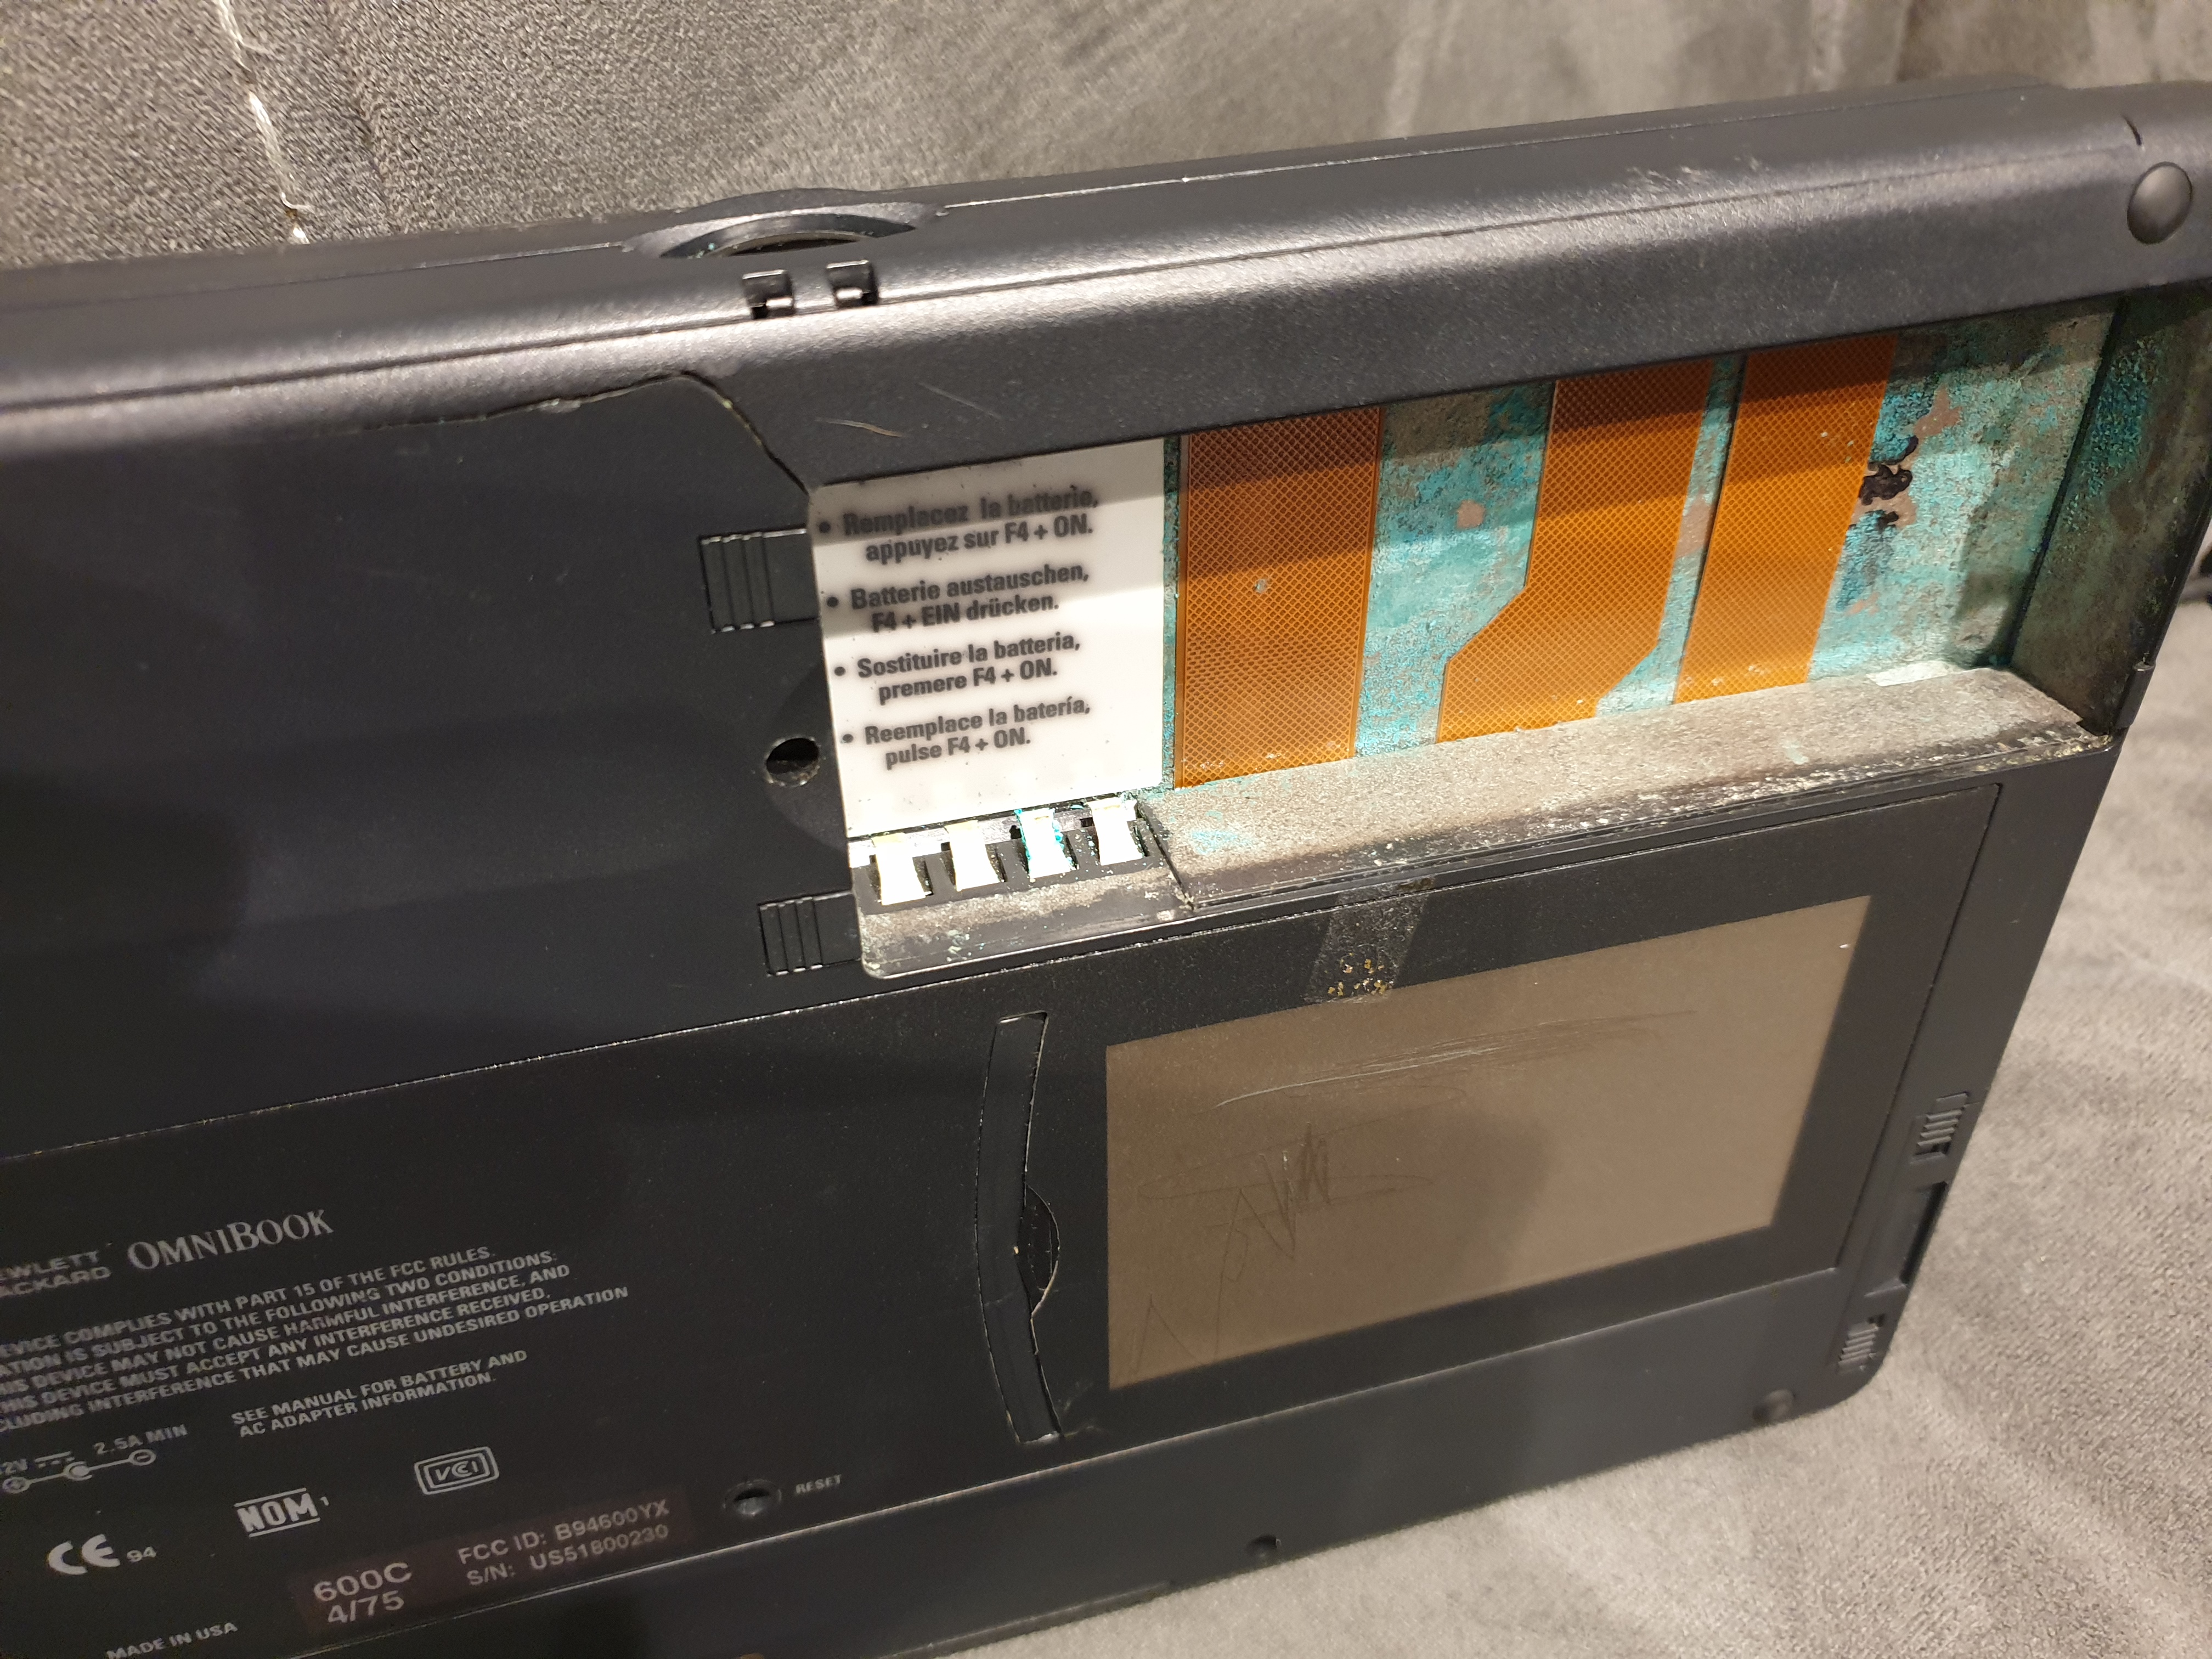
My NiMH battery (part #F1058A) had not only seen better days (it failed to even allow the laptop to start up while it was connected along with the AC adapter!), it had leaked and blown out to the point of damaging the laptop too - snapping a weak part of the plastic housing around the battery compartment. It's probably repairable, but there's a lot of leakage under where the battery was which is much more concerning.
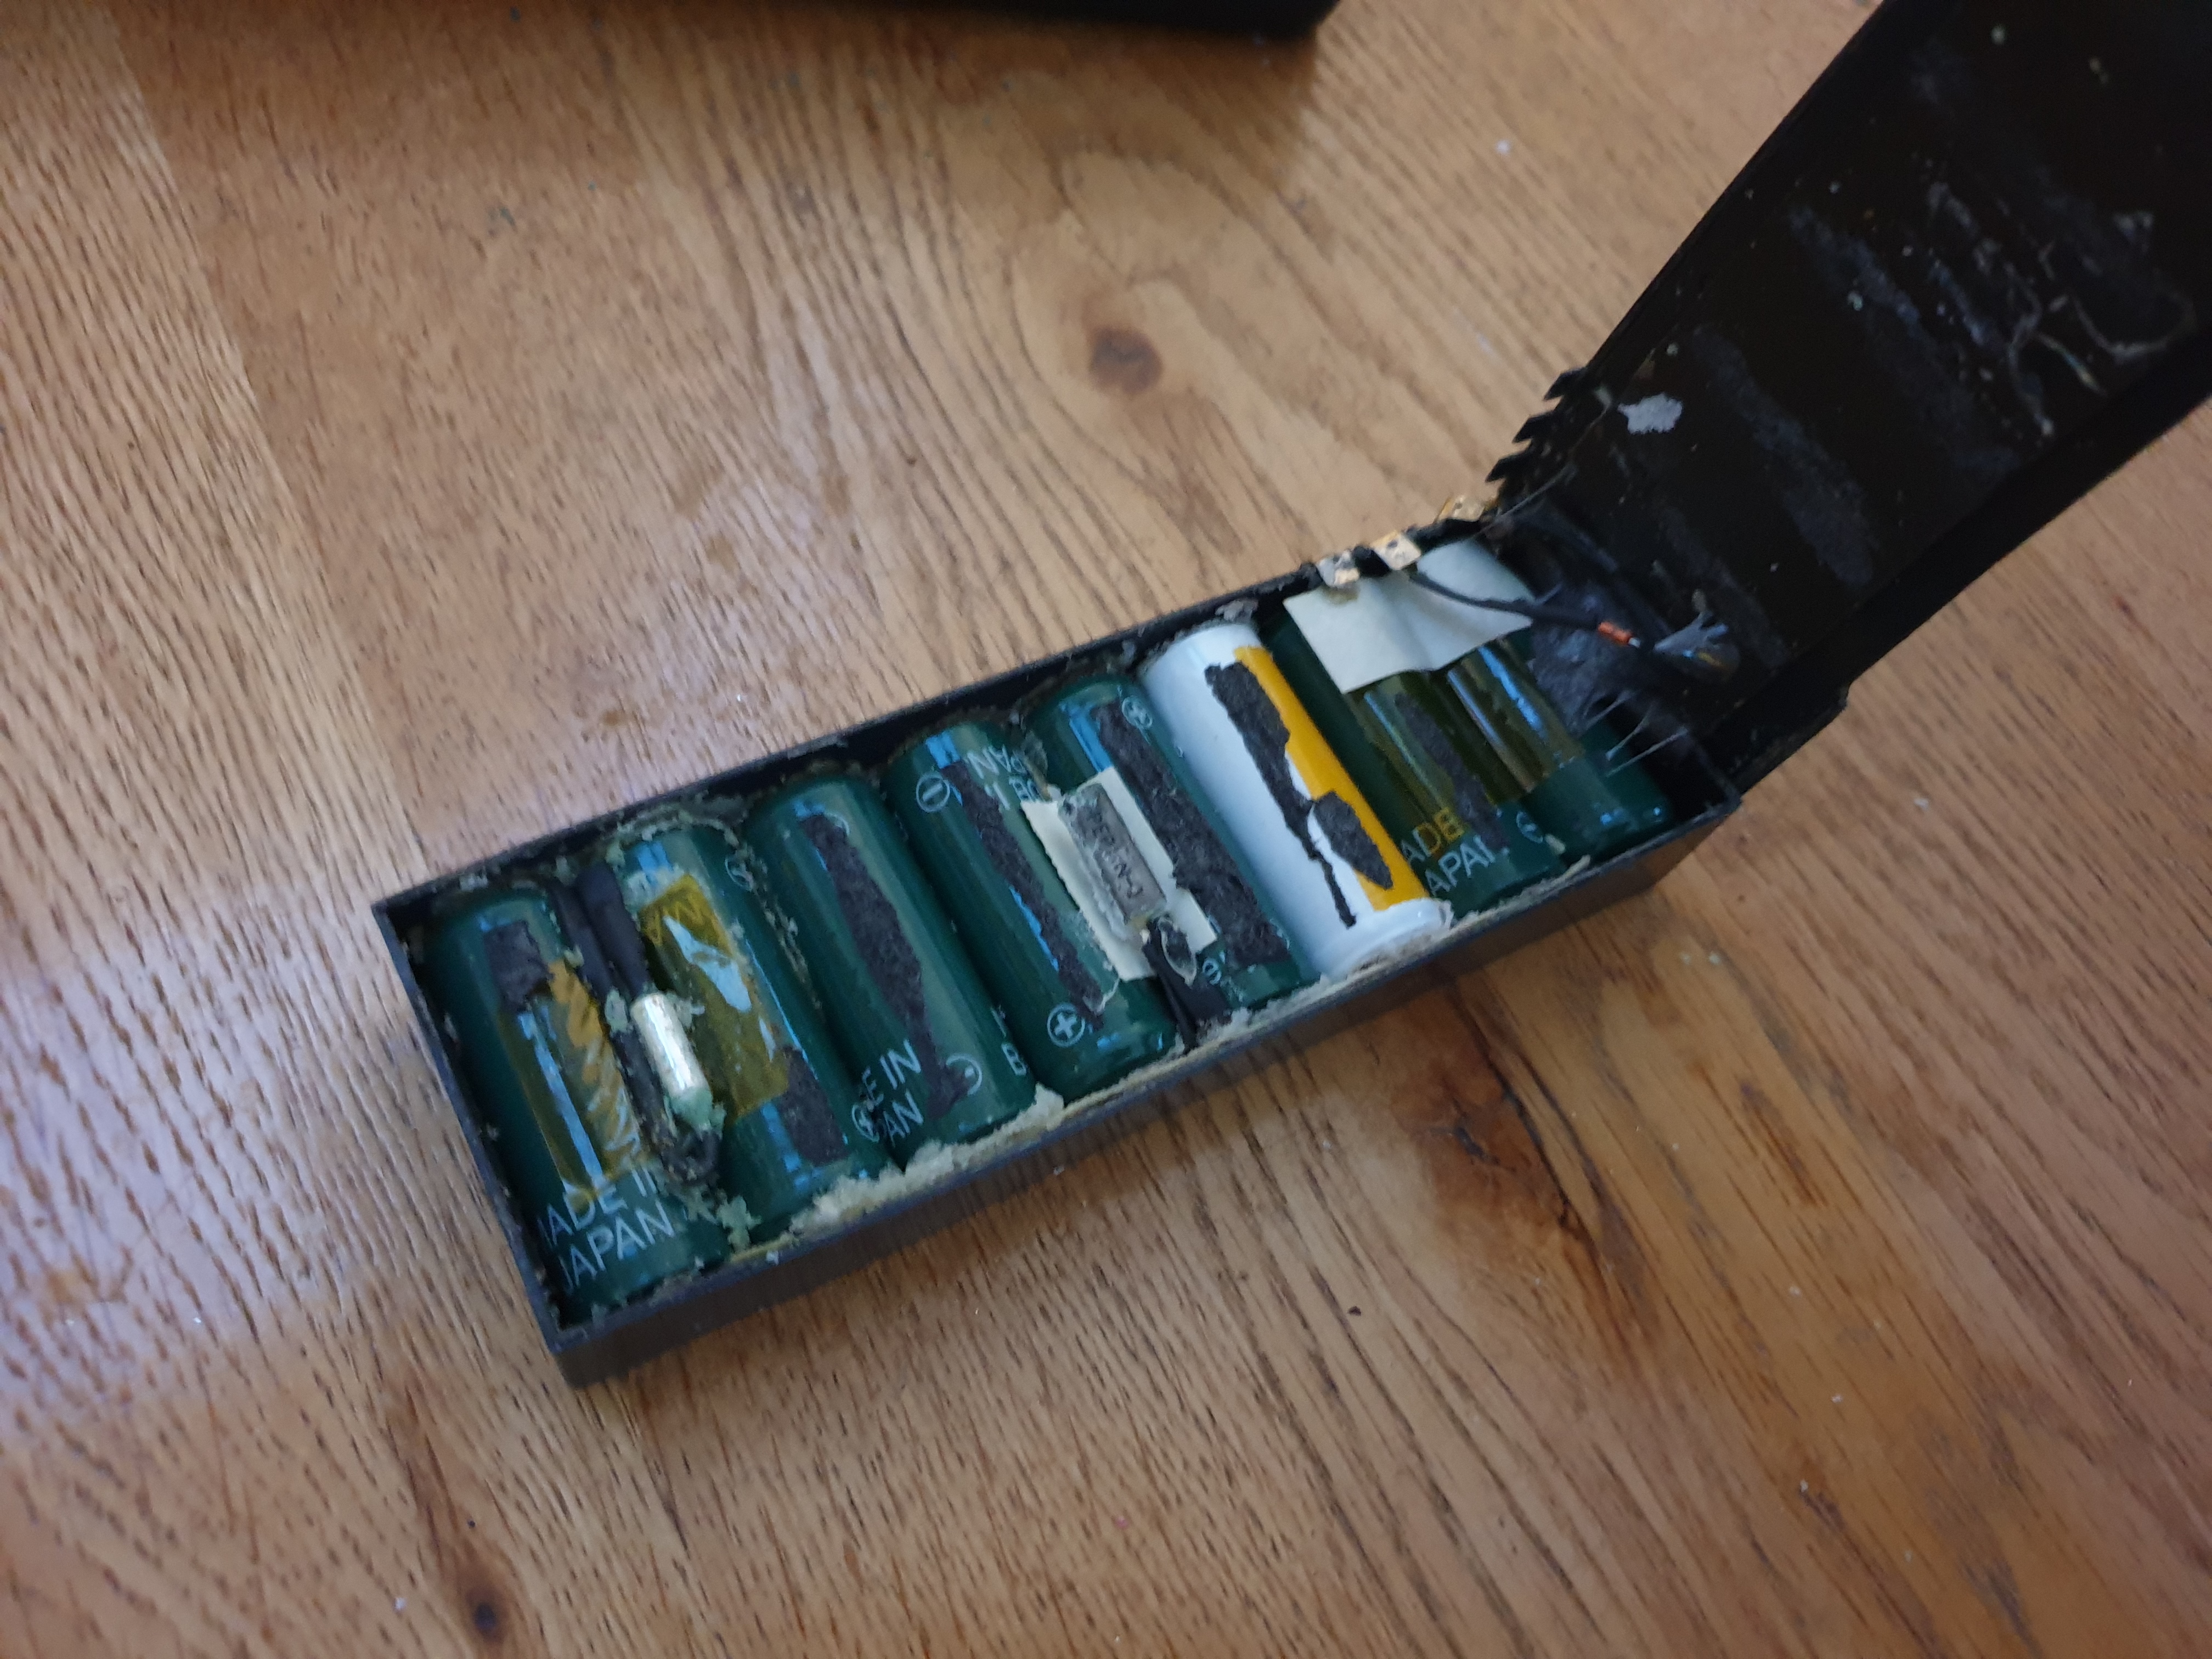
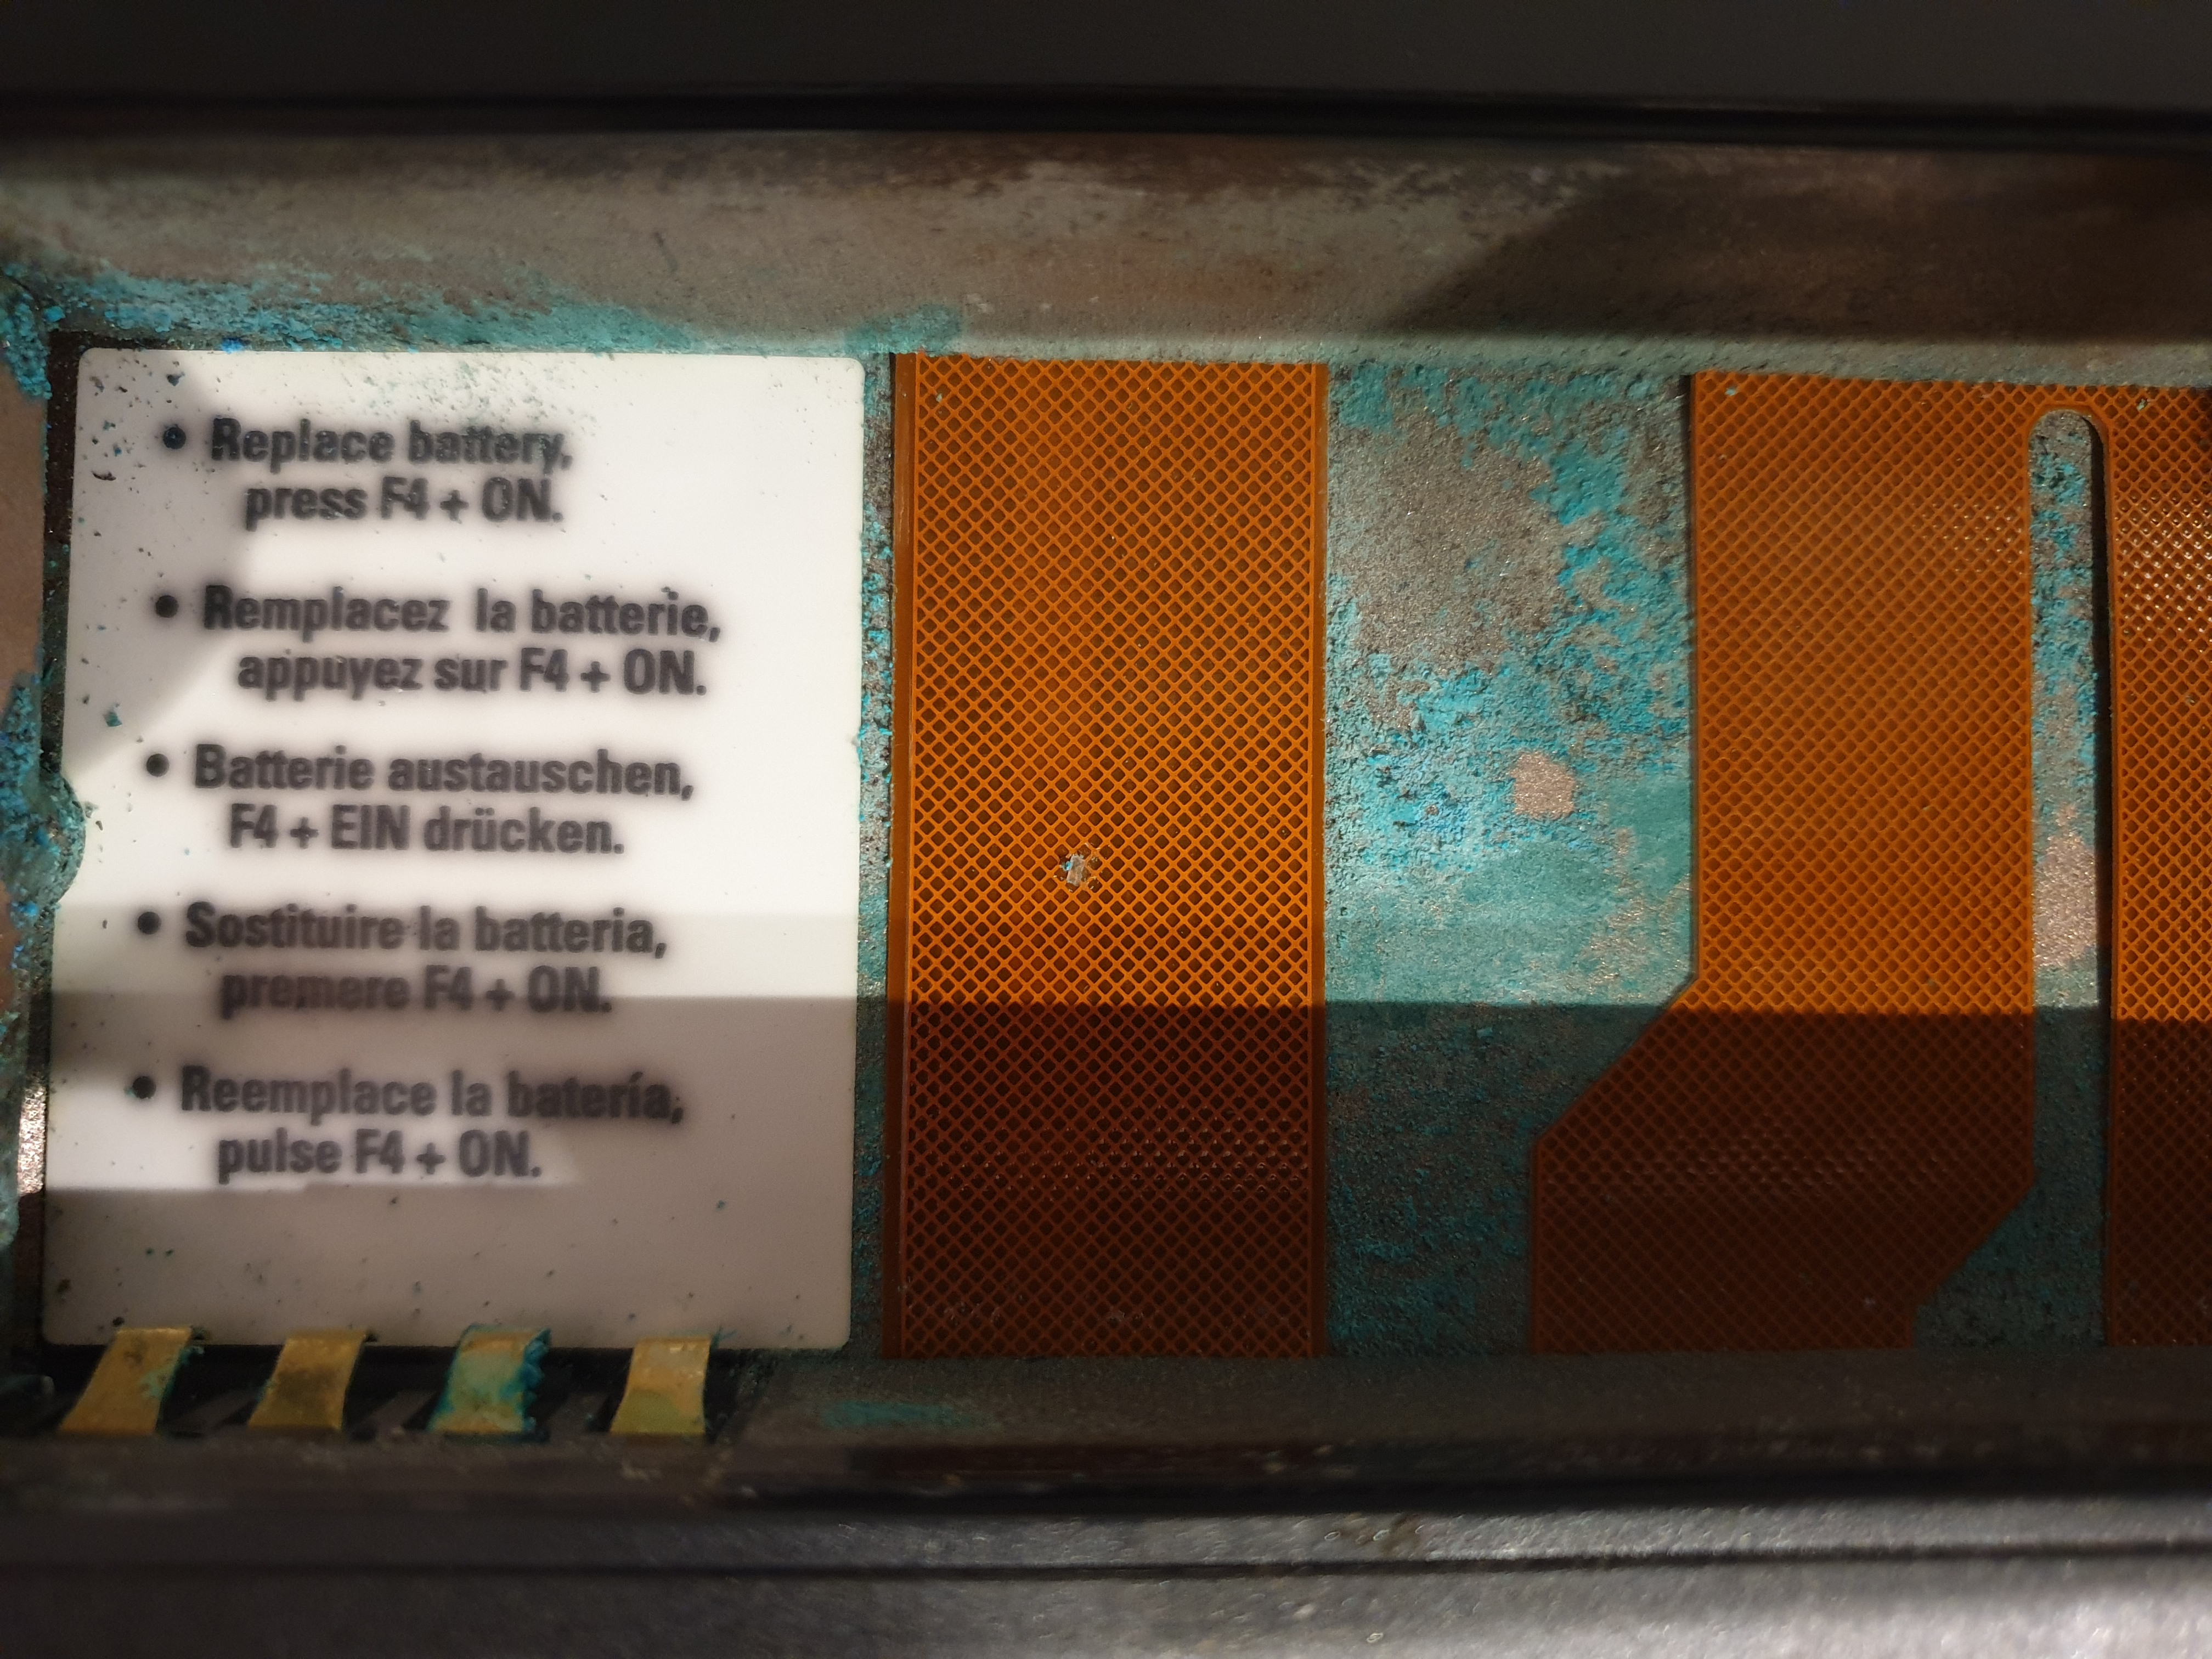

opening up the battery casing - what a mess, and the corrosion in the battery bay
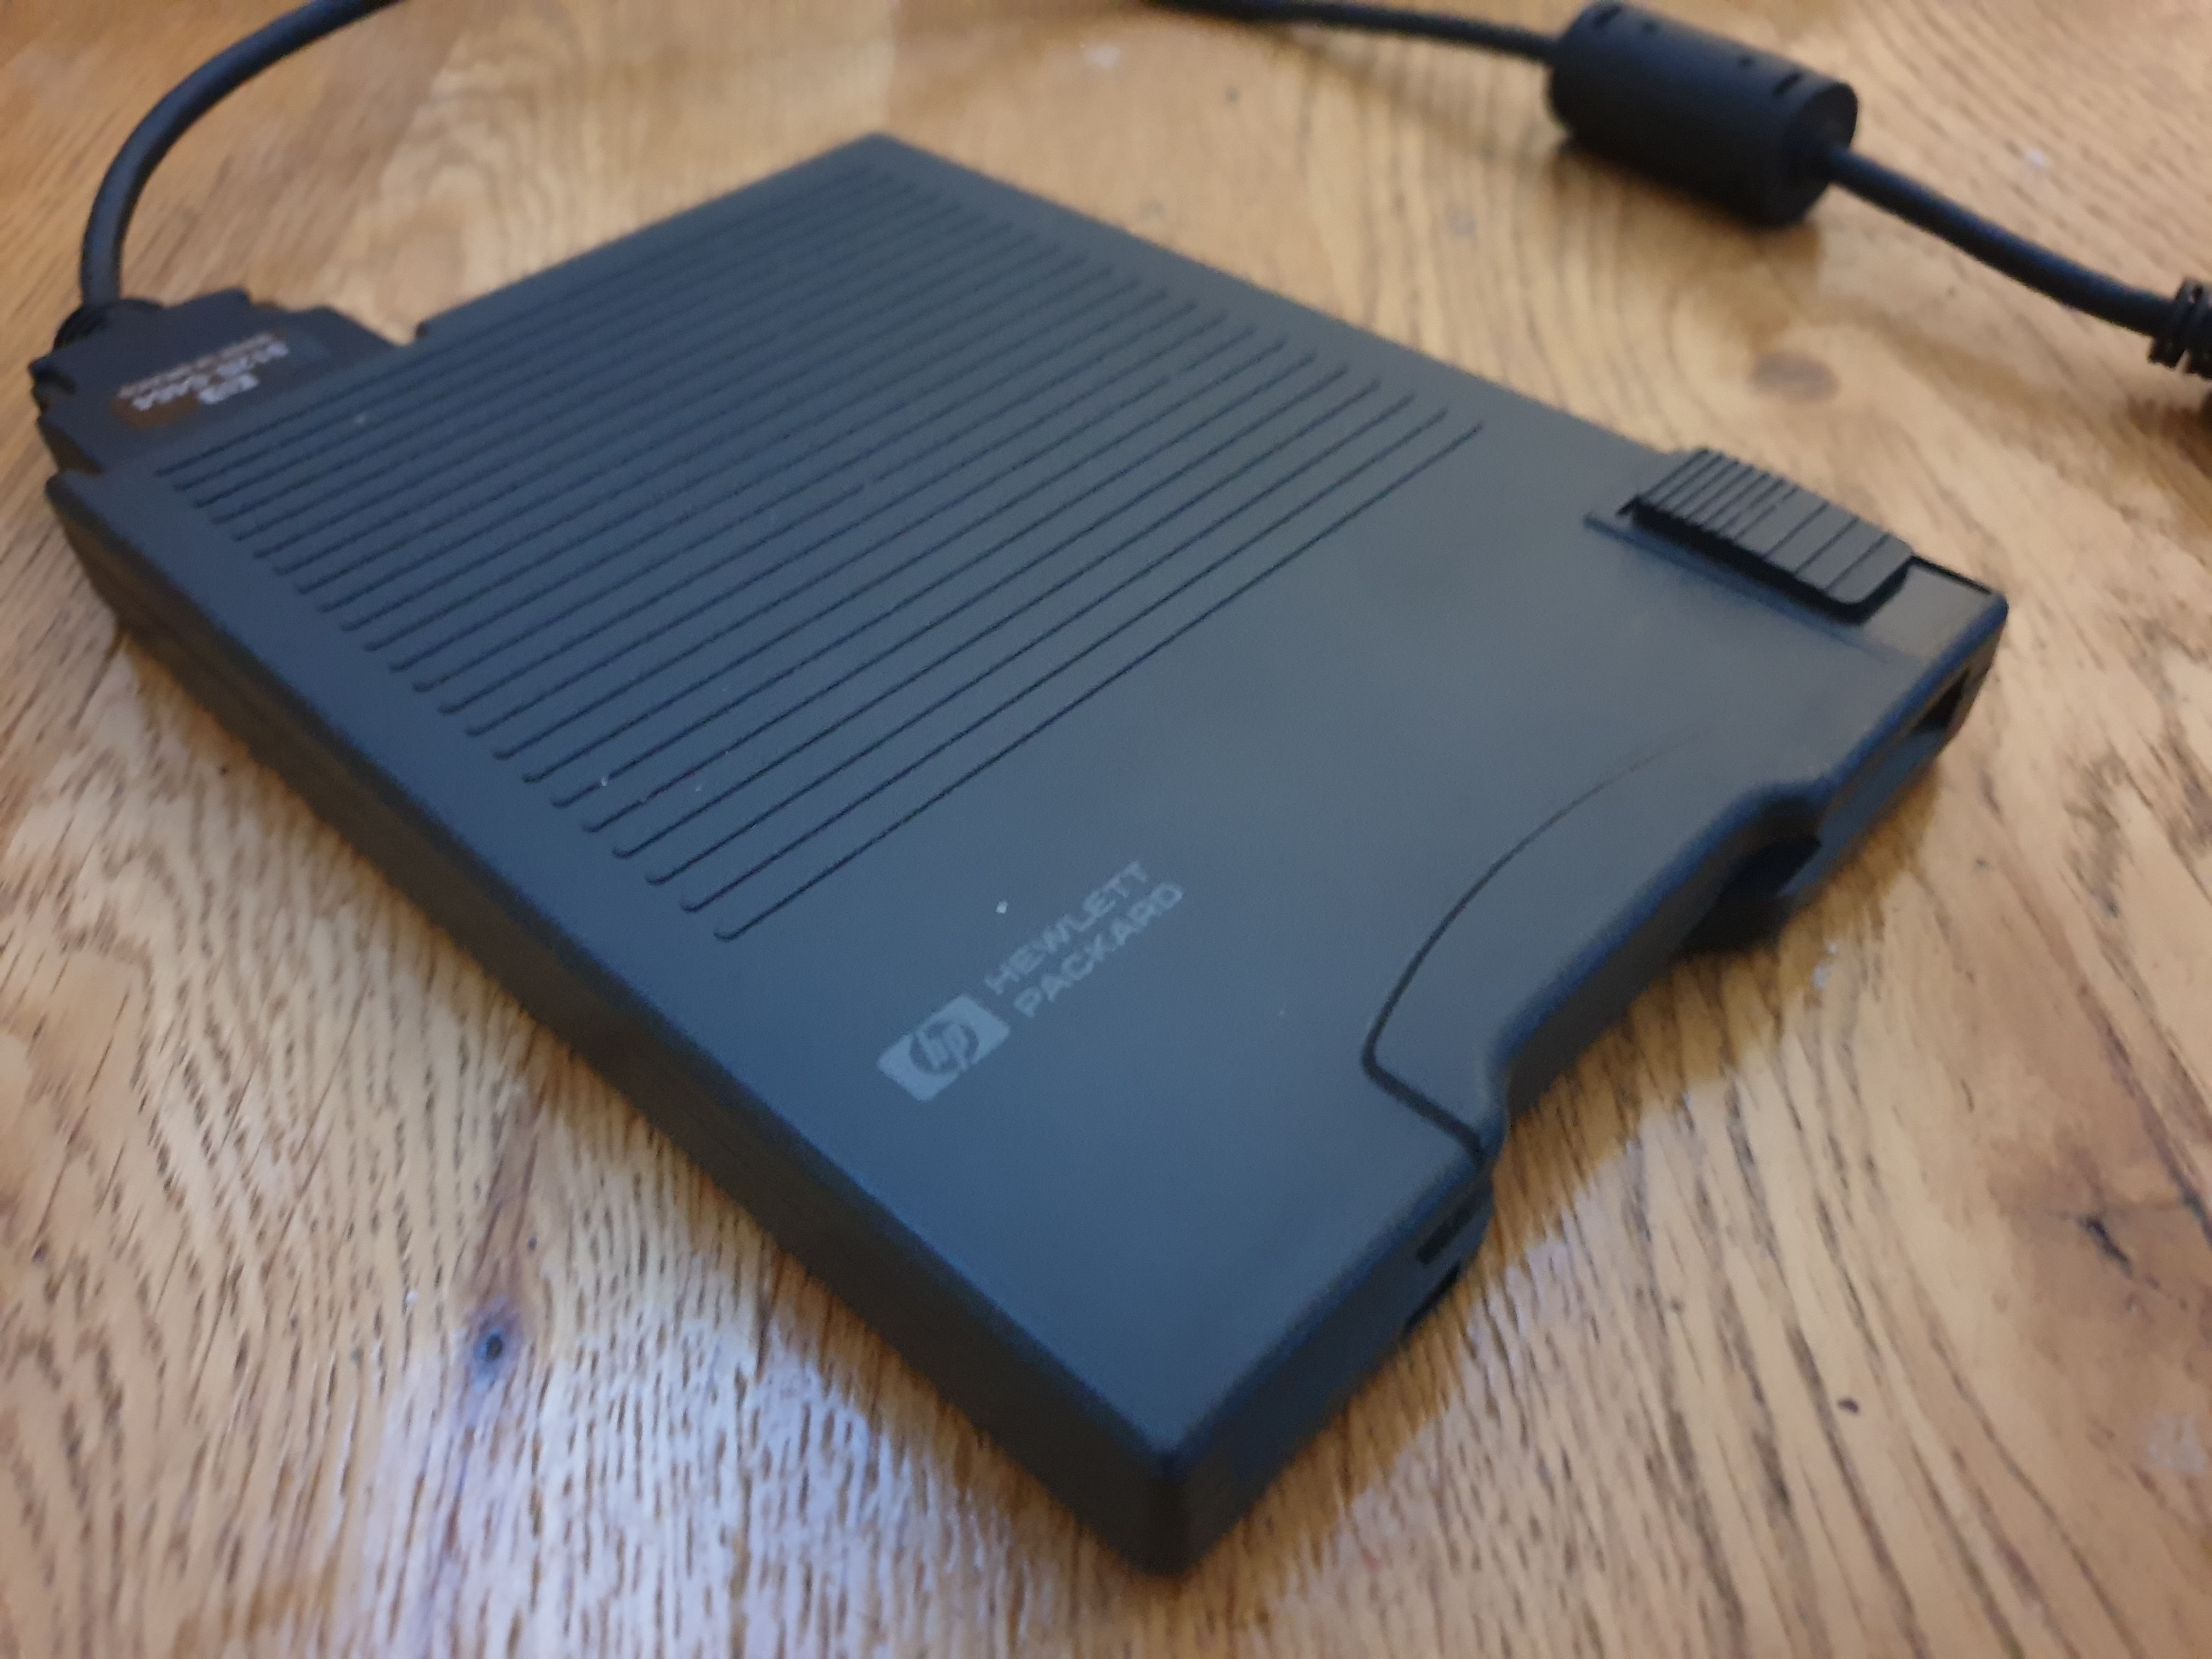
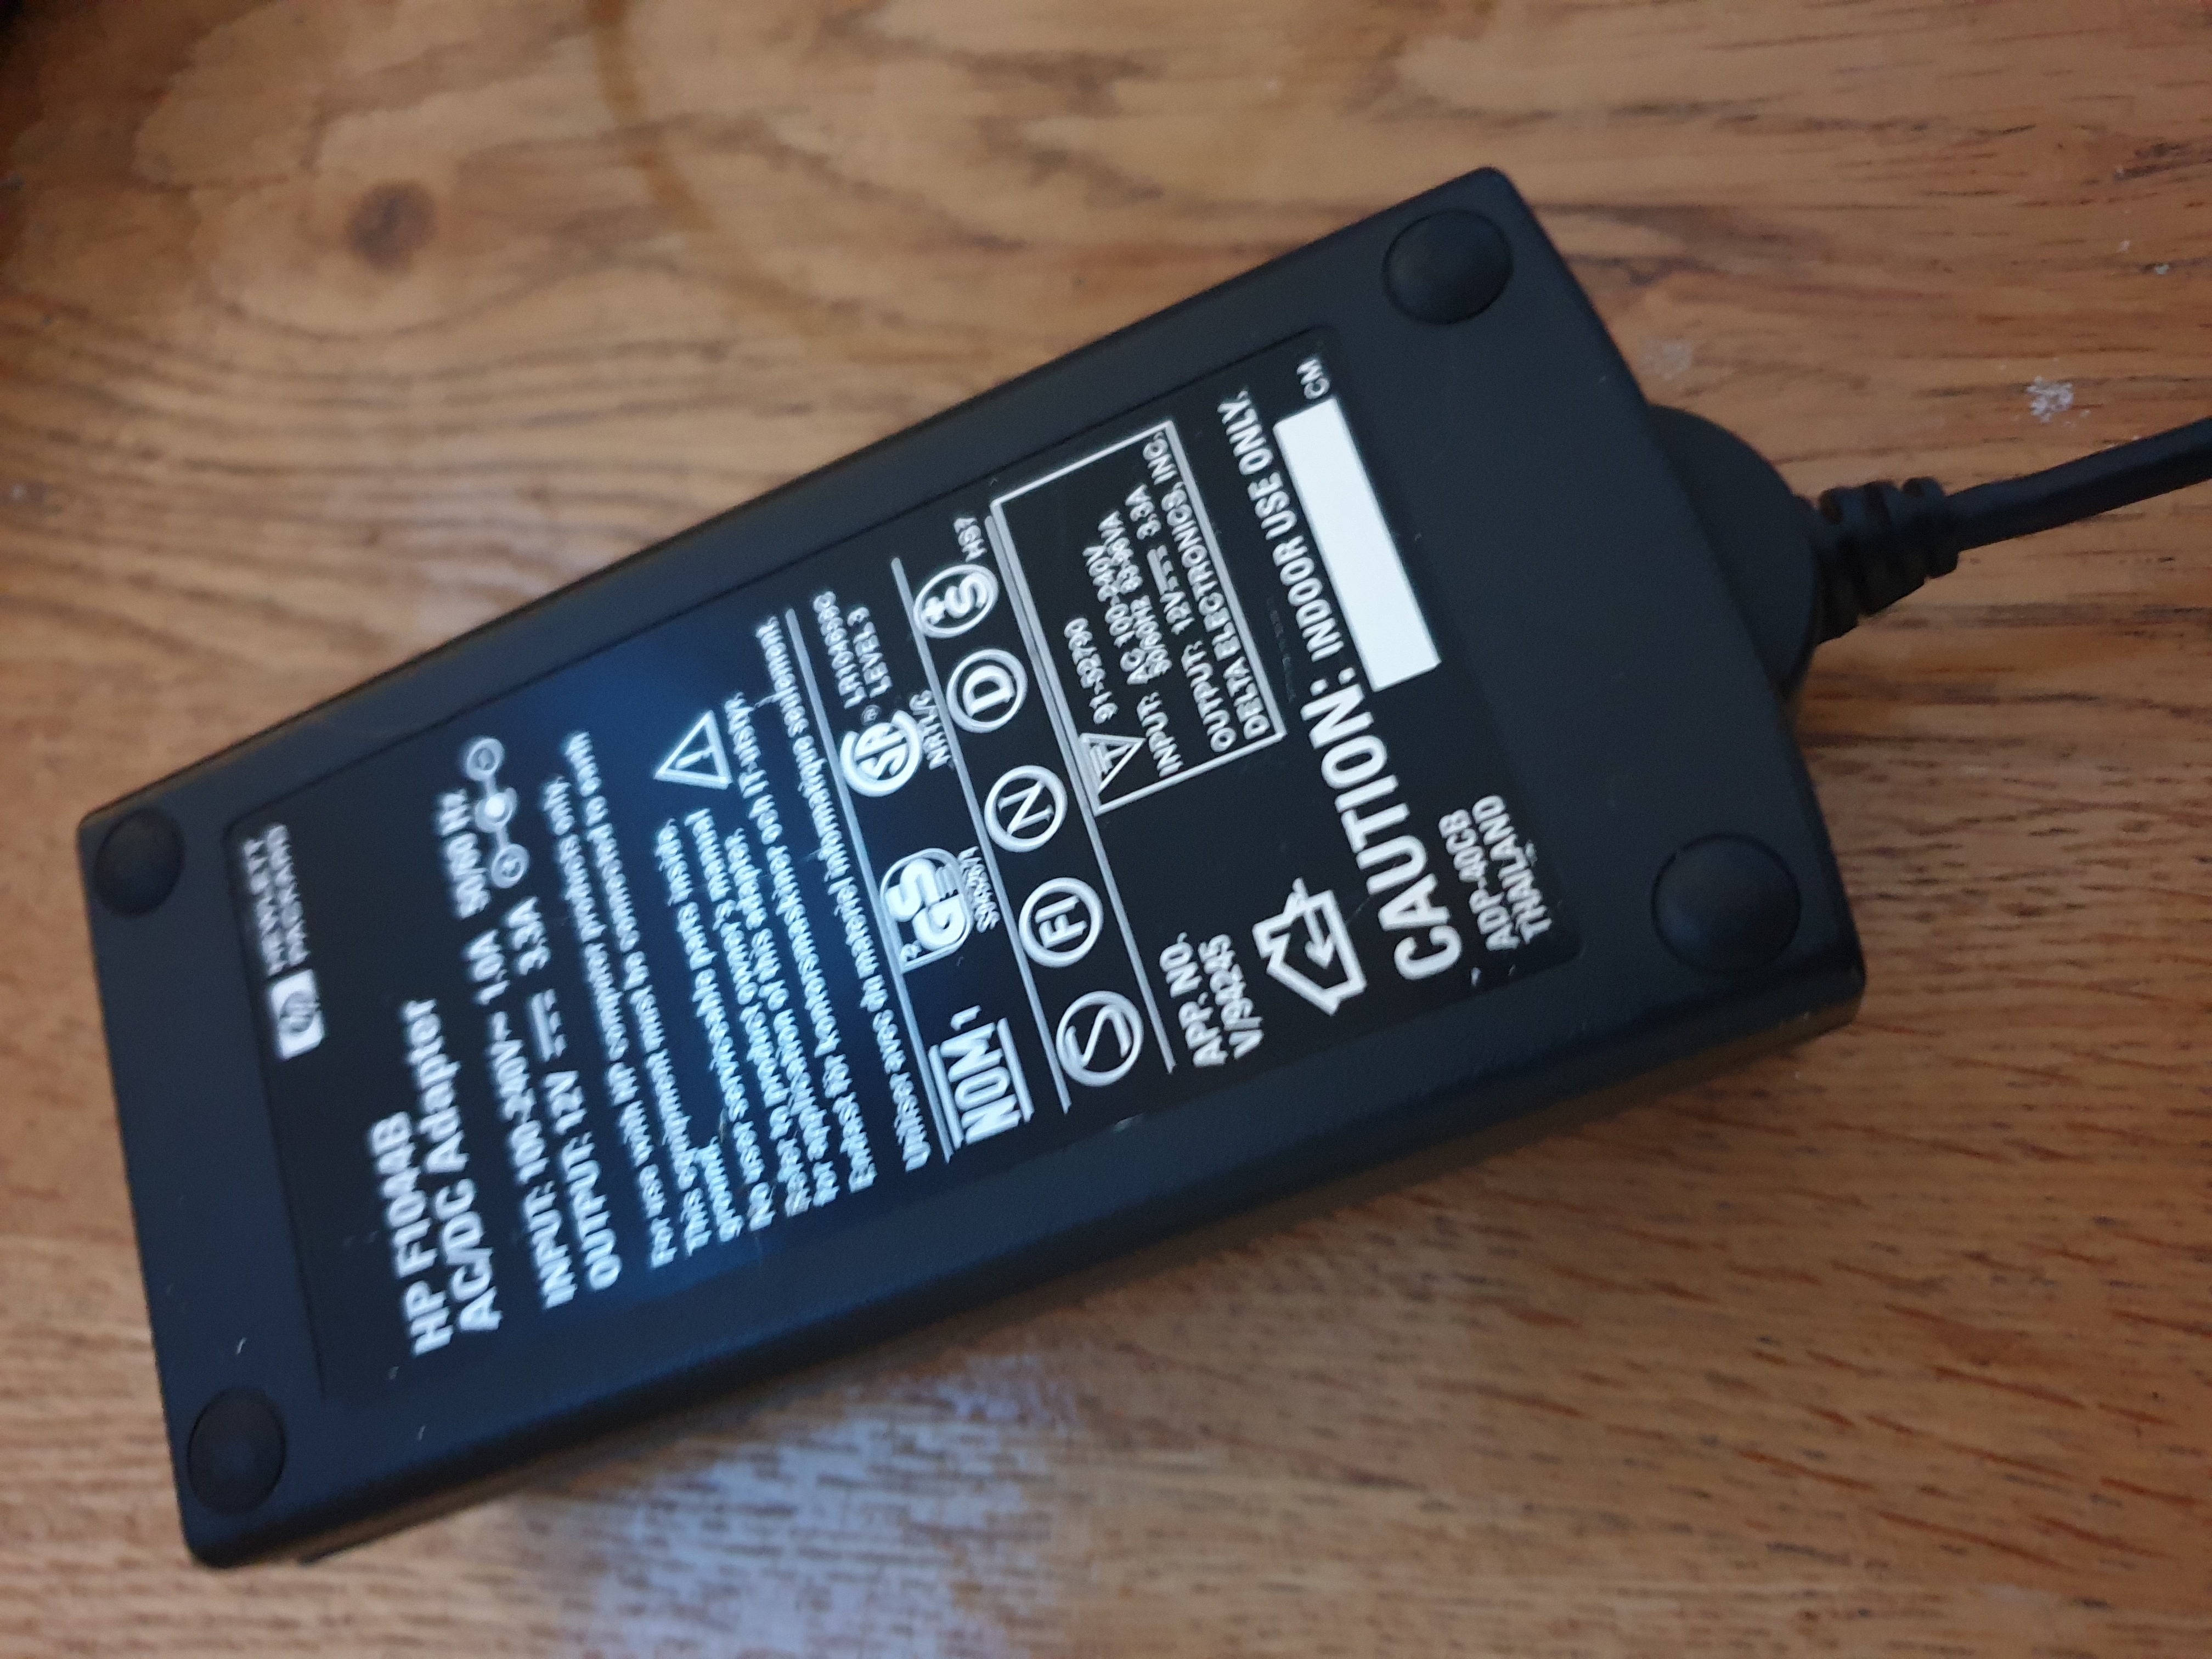
The external AC power supply provided with the laptop (part #F1044B) provides 12V DC at 2.5 amps. It will happily accept an input voltage from 100V to 240V AC if you're importing one from abroad. It takes a standard "kettle lead" (IEC?) 3-pin mains power plug, and has a barrel jack on the laptop end which is centre-negative (the pin is negative).
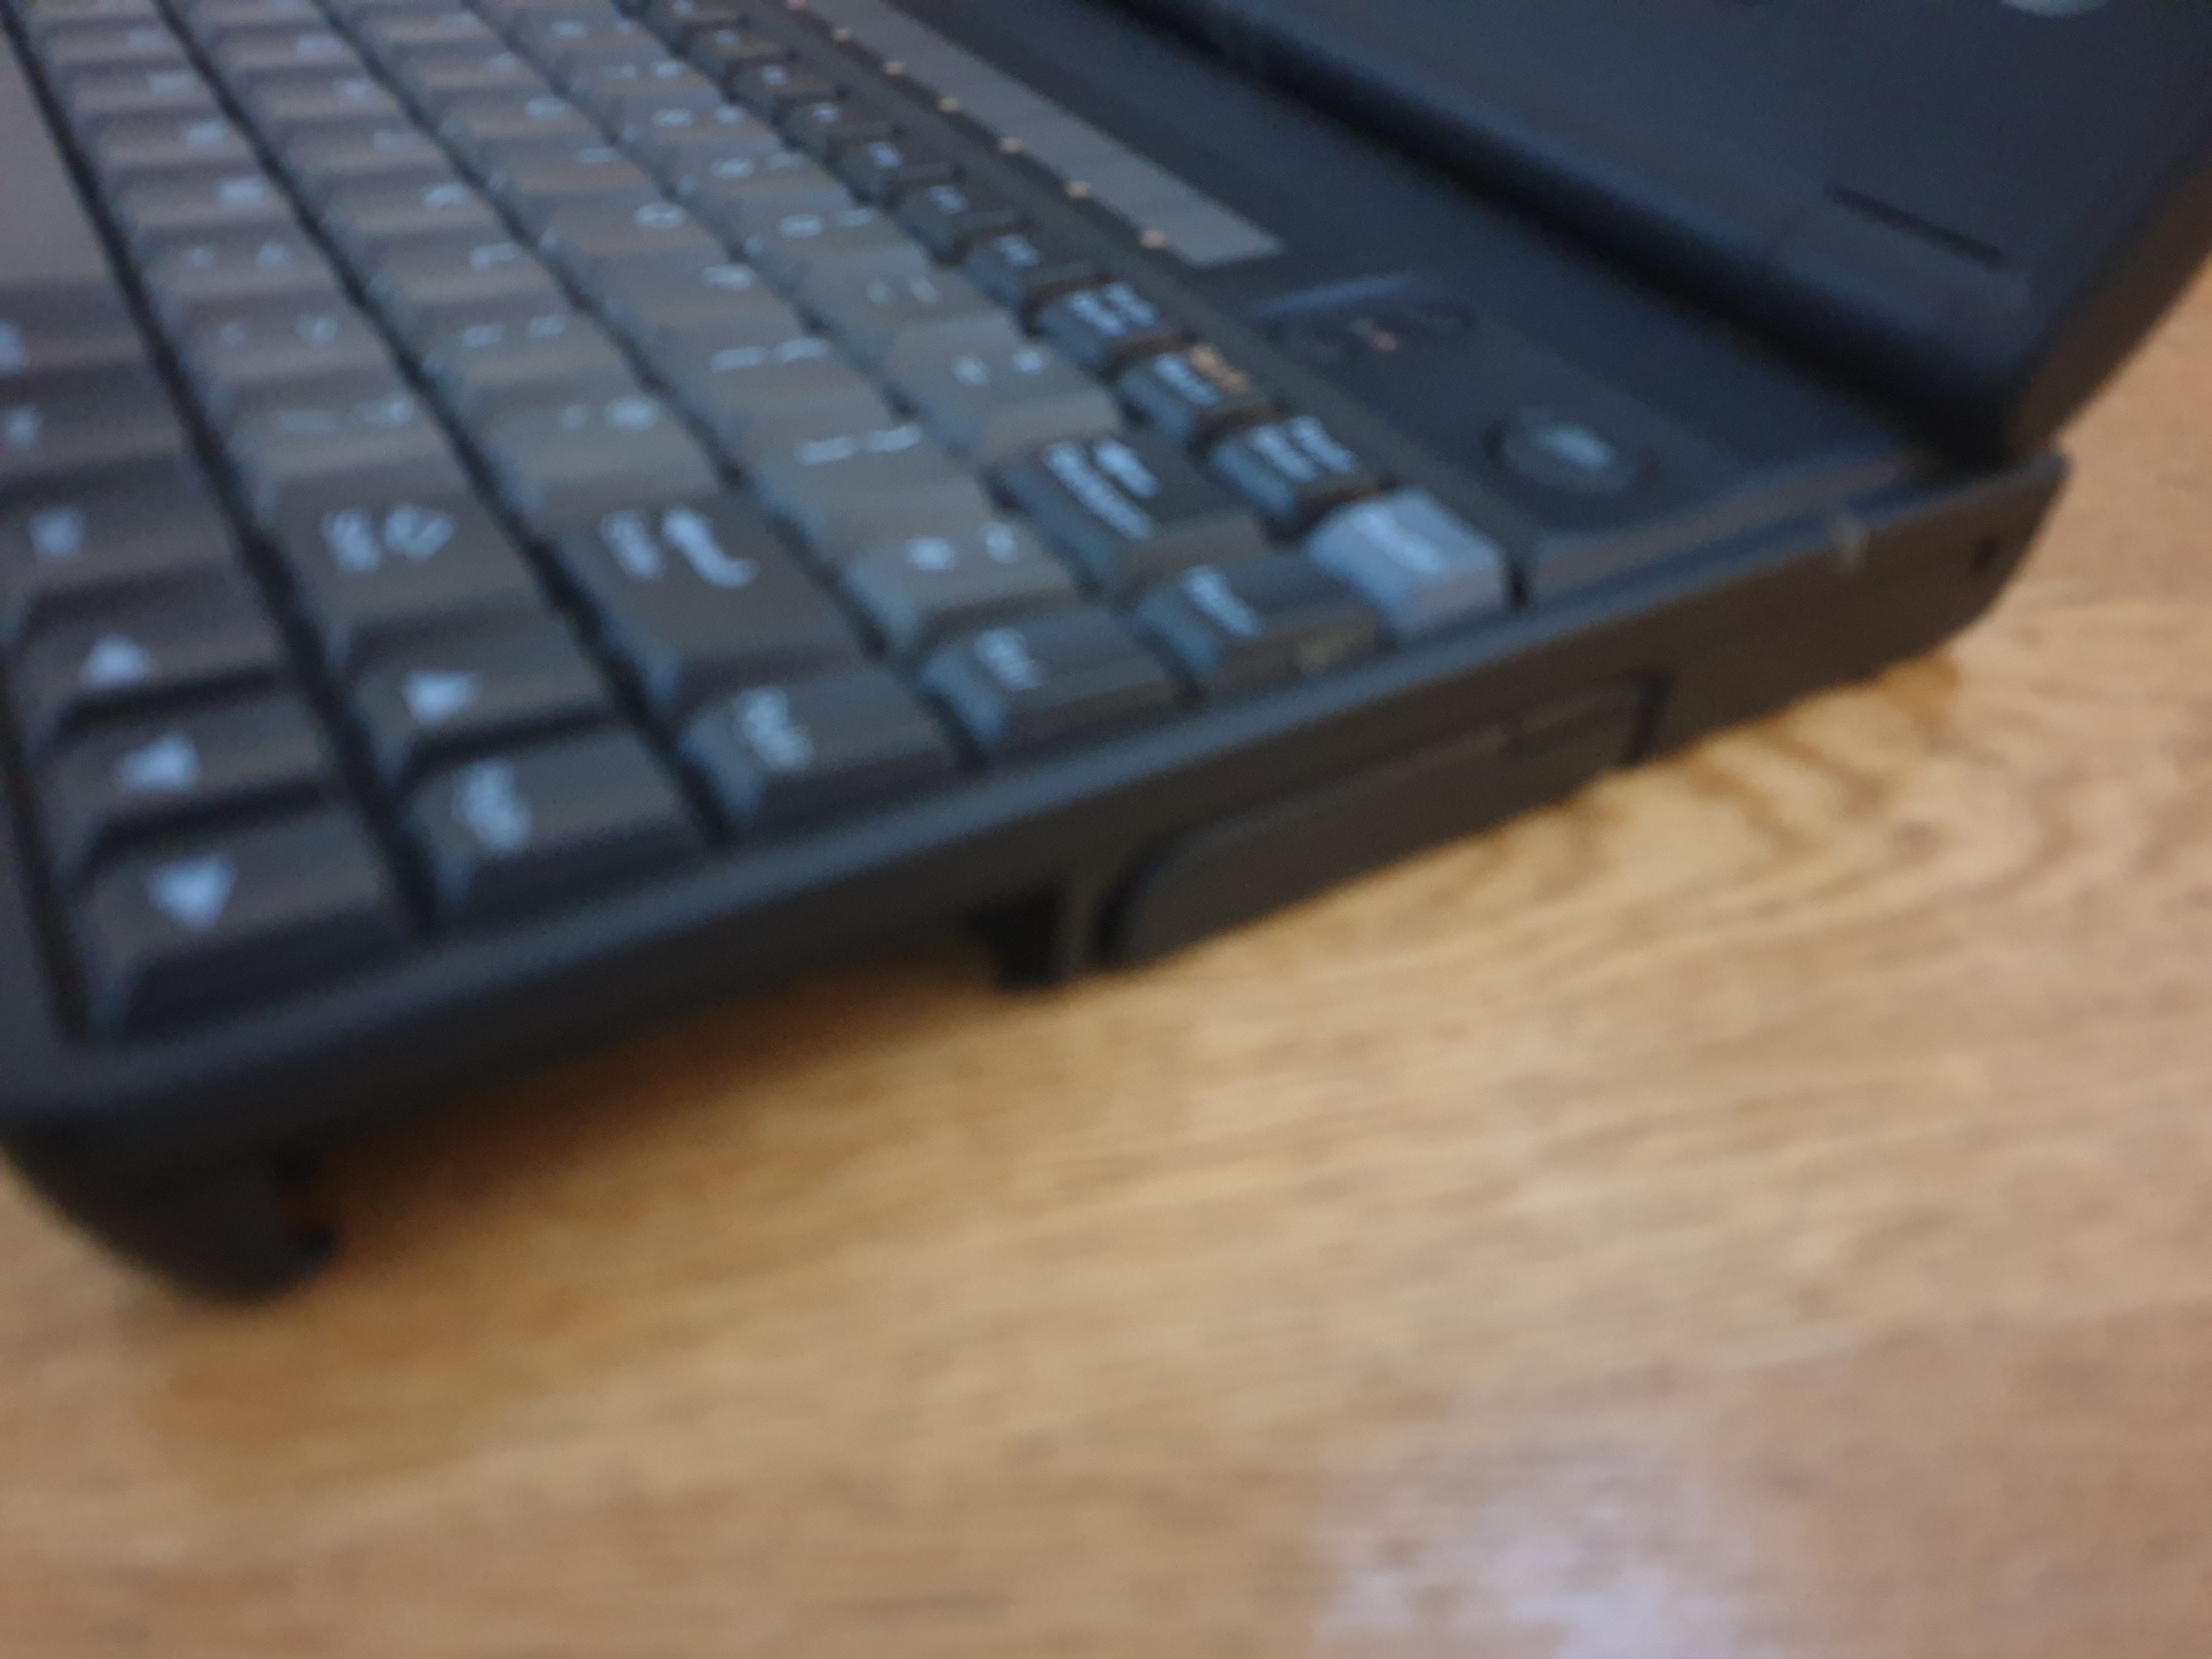
Keyboard
The 85-key keyboard on the Omnibook 600 series is very comfortable to use with full-size touch-type keys that have a decent amount of key travel and feedback. On my unit, they are however, very 'heavy' and are unforgiving if you try to push a key down on its edge. This is probably due to an extended time of non-use, and they ought to loosen up after some exercise.
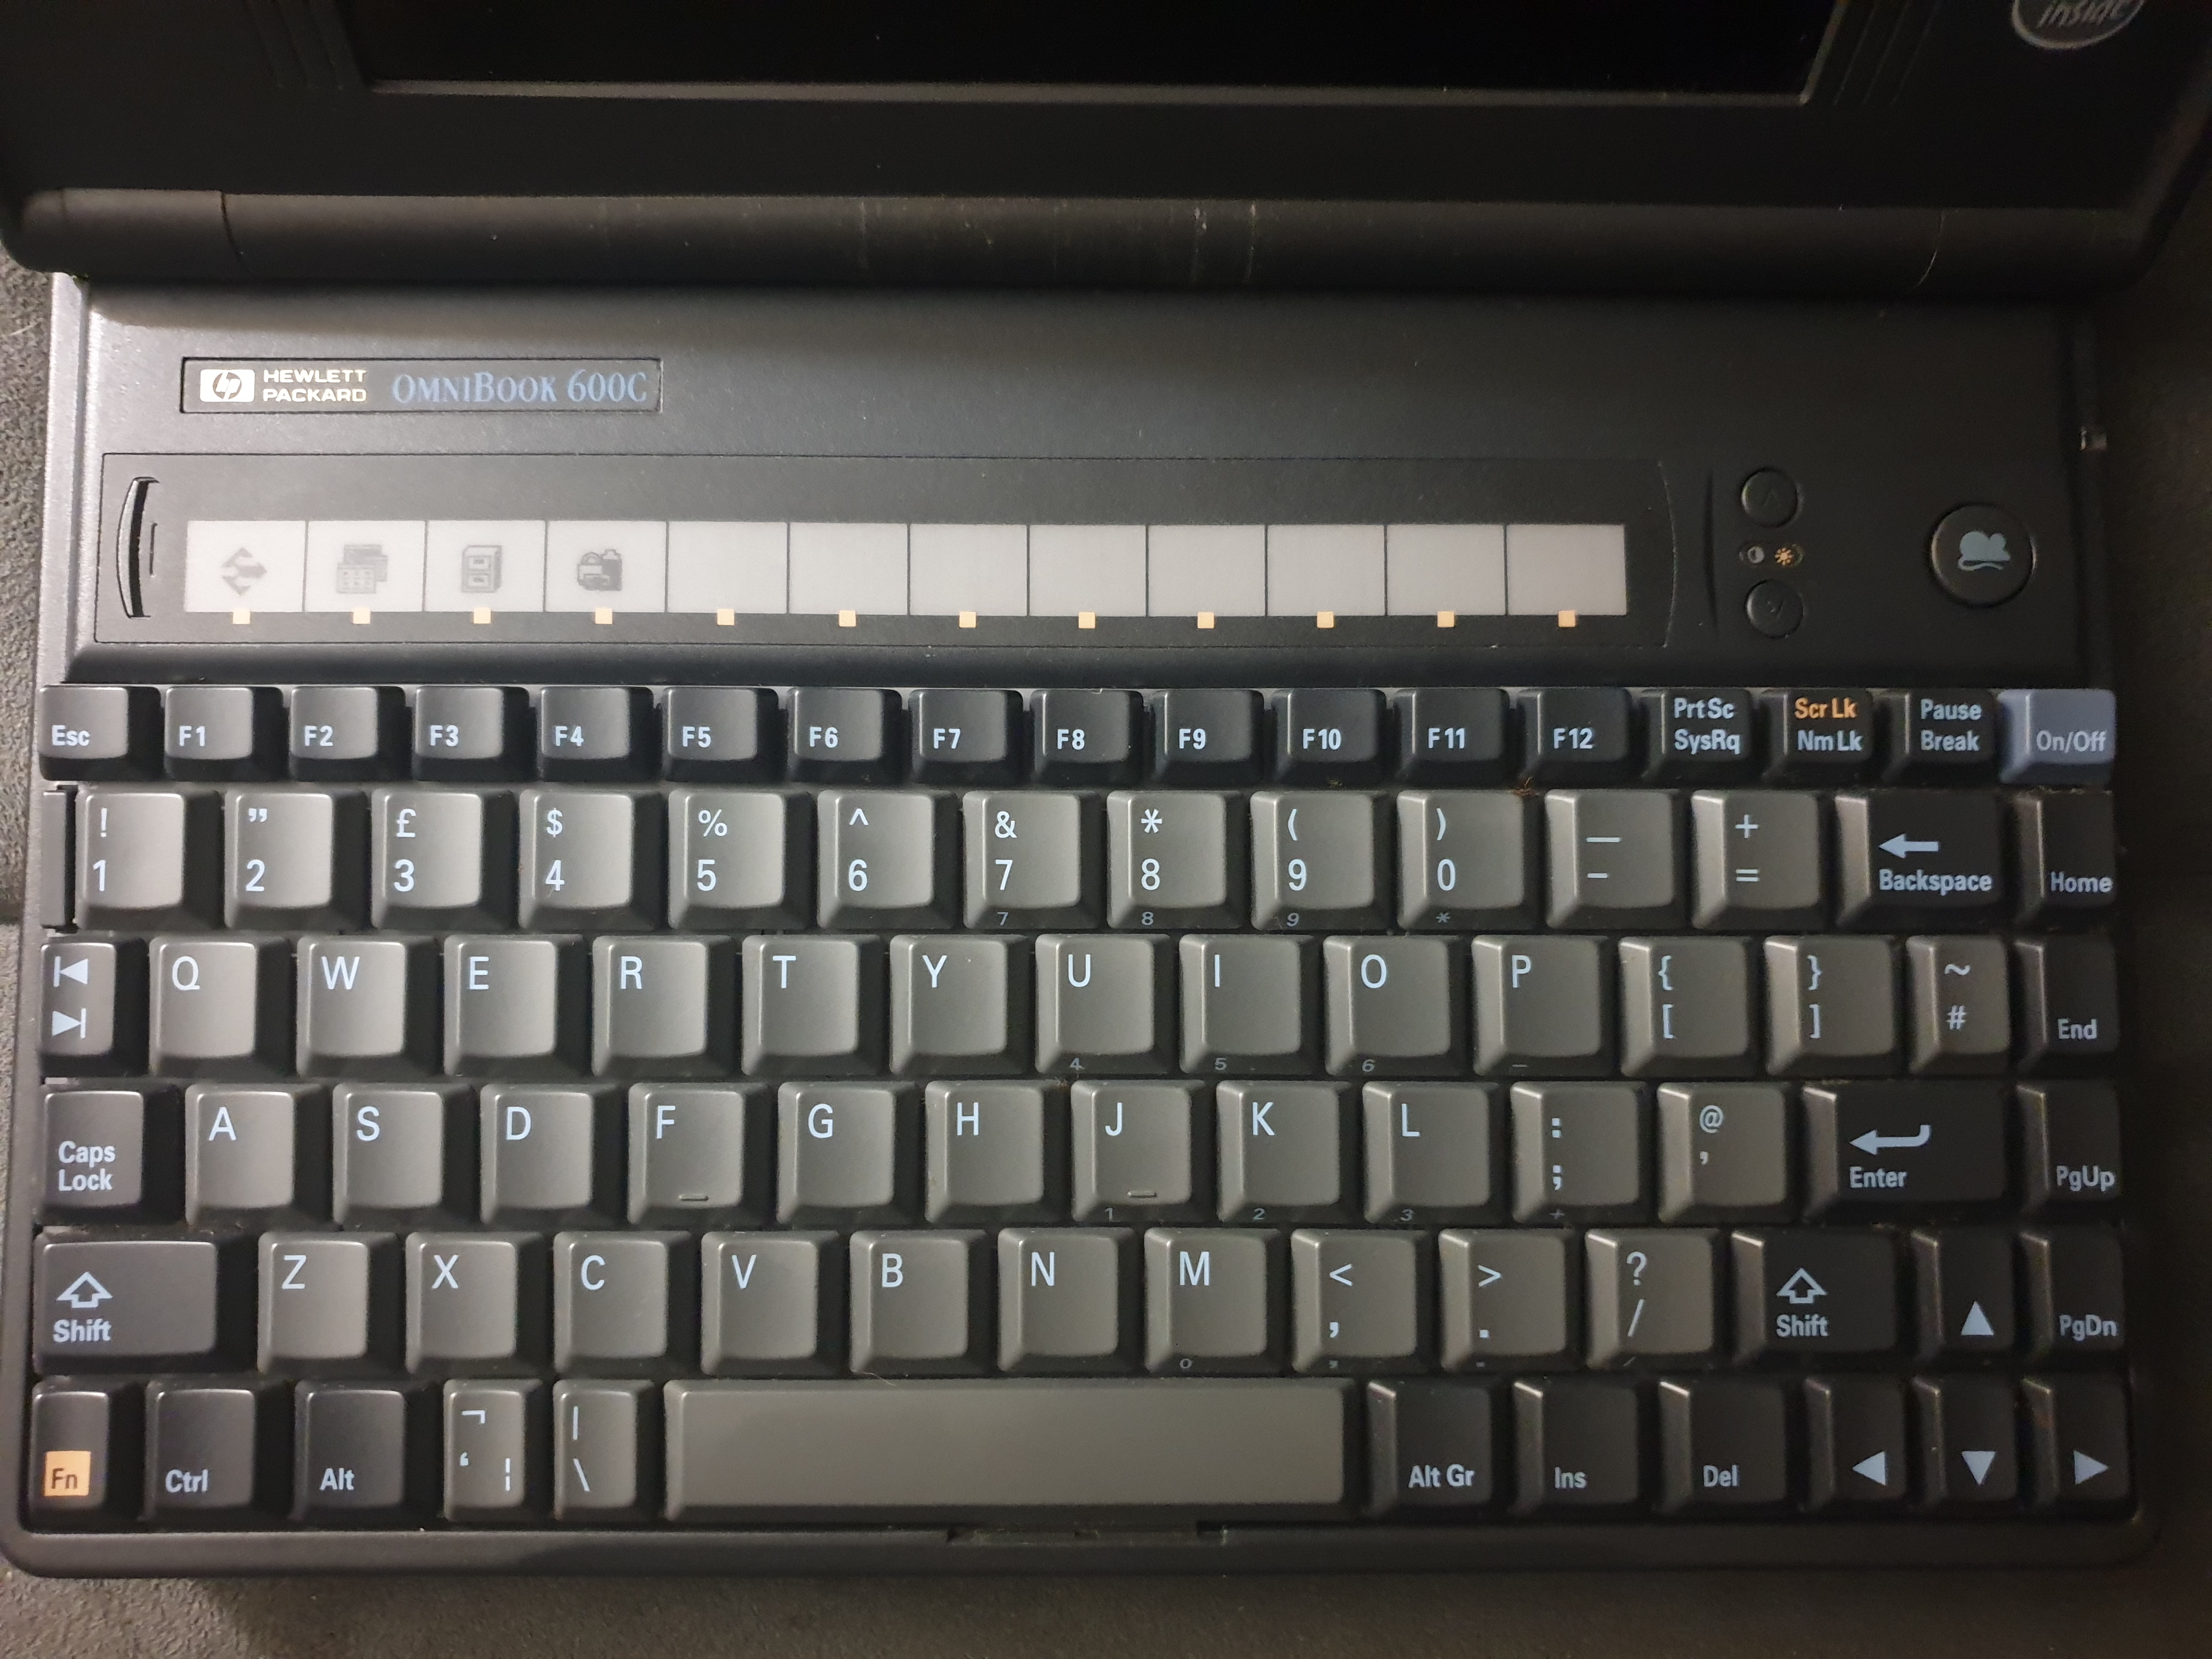
The OmniBook 600 keyboard
This sub-notebook pre-dates the Windows key, but it still seems a bit overcrowded, with an Enter key that is too small, though the space bar is a good size. Above the top row is a 'quick launch' touch panel which can be configured to open certain applications. You can also print your own template to install in here using a provided Windows 3.x utility called ICONPRNT.EXE. To the right of the quick launch bar are two small buttons used to control the screen contrast or brightness (if the 'Fn' key is held down while operating).
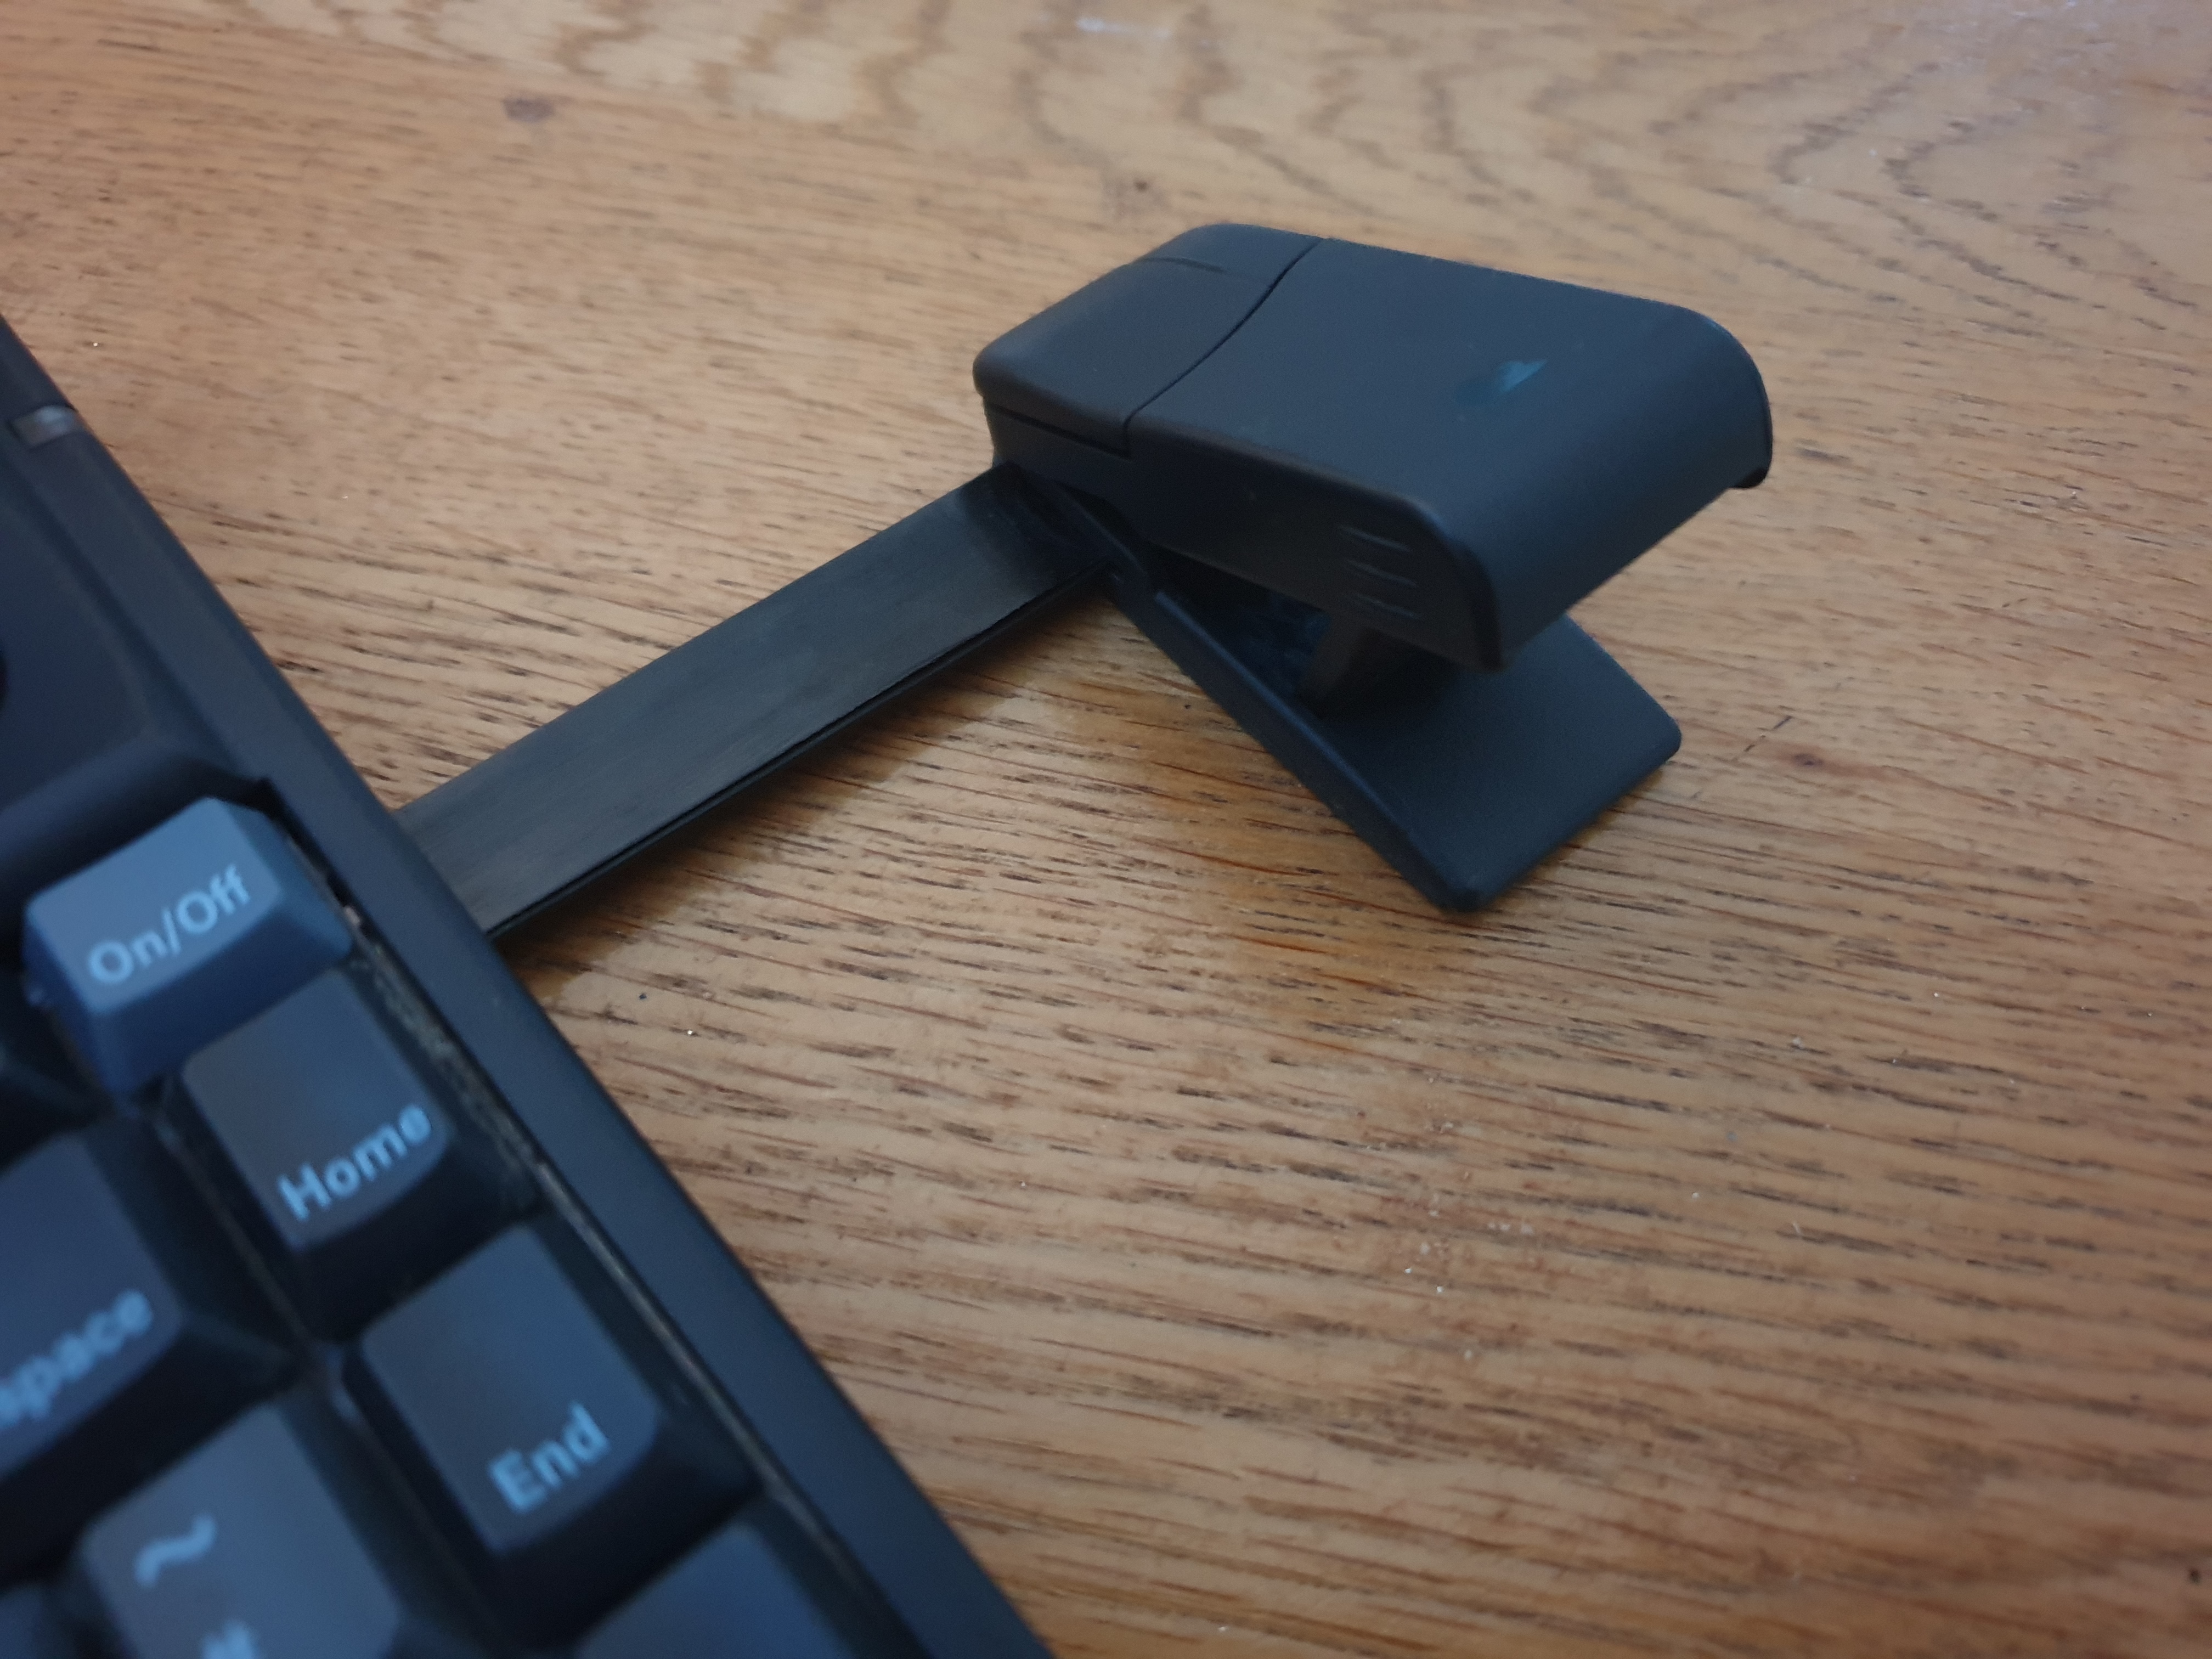 As mentioned, the Omnibook 600's unique feature is its built-in two-button Microsoft Mouse-compatible mouse. The mouse can be ejected from the machine using a clearly-marked round push button to the top-right of the keyboard - this allows you to retract the mouse from its bay and pull it out around 3 inches for use.
The 'bar' that permanently connects the tiny mouse to the notebook is actually like a flimsy ribbon cable (the mouse will flop down over the edge of a desk if allowed to do so). The mouse can be used in two positions: flat or raised (as seen in the picture to the right).
Early versions of the mouse were discovered to be prone to failure - check the date code on the underside when you raise it up - if it has a date code of 95-37 (year-week), it's one of the batch of unreliable units. Mine falls into this category with a date code of 95-01, and sure enough, in testing the left mouse button does not work. You can easily remove the mouse and its cable from the machine by holding down the mouse eject button and pulling the unit firmly out.
Audio
Because my unit here is the 600C, and not a 600CT it does not come with onboard audio, so I'm left with just a single PC speaker sound. The good news these days is that there are easy options to still get Sound Blaster (and more) audio working on such laptops. See my article on parallel port sound cards for details! The negative aspect of this is that you would need to carry a set of speakers with you if travelling, as there are no jacks on the 600C.
The 600CT came with onboard audio in the form of the ES1688 16-bit sound chip from ESS Technology. This supported Ad Lib, Sound Blaster Pro and Windows Sound System standards. The other difference with the 600CT was that it got two speakers instead of one, though these both output the same mono signal. The ES1688 used ESS' own version of the Yamaha OPL3, called "ESFM", which tends to be softer/more muffled than the original Yamaha, though is still decent.
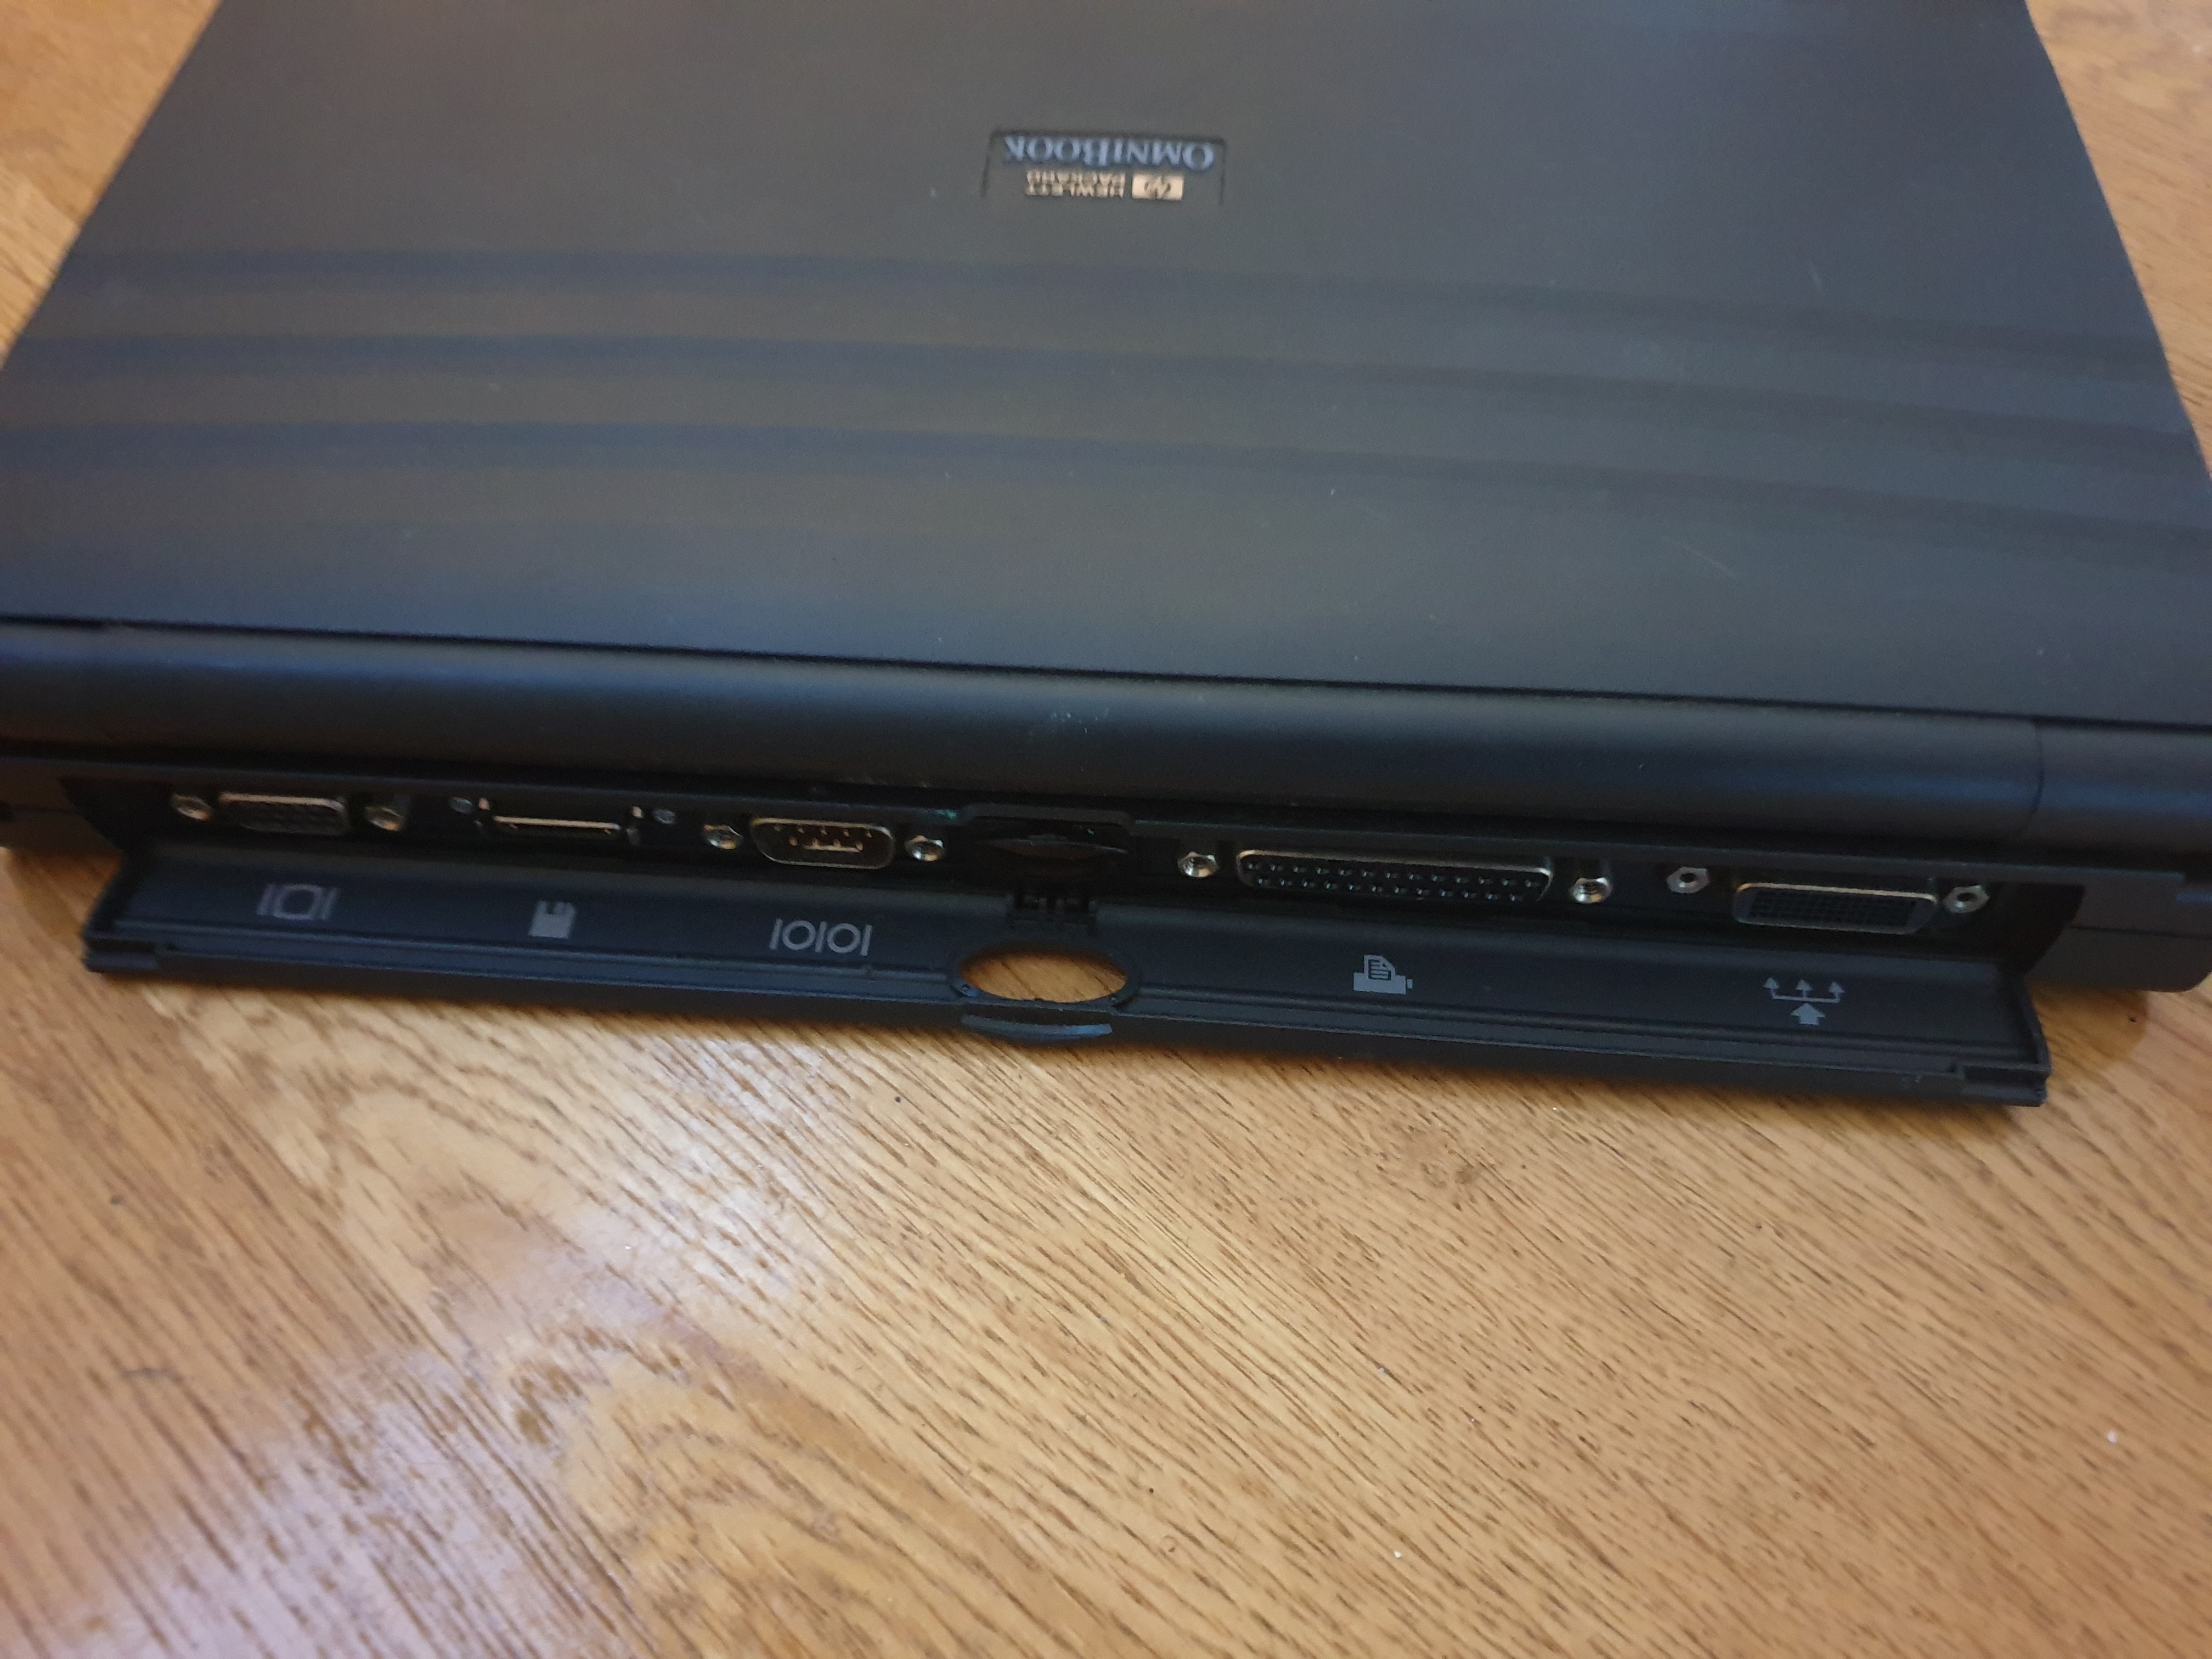
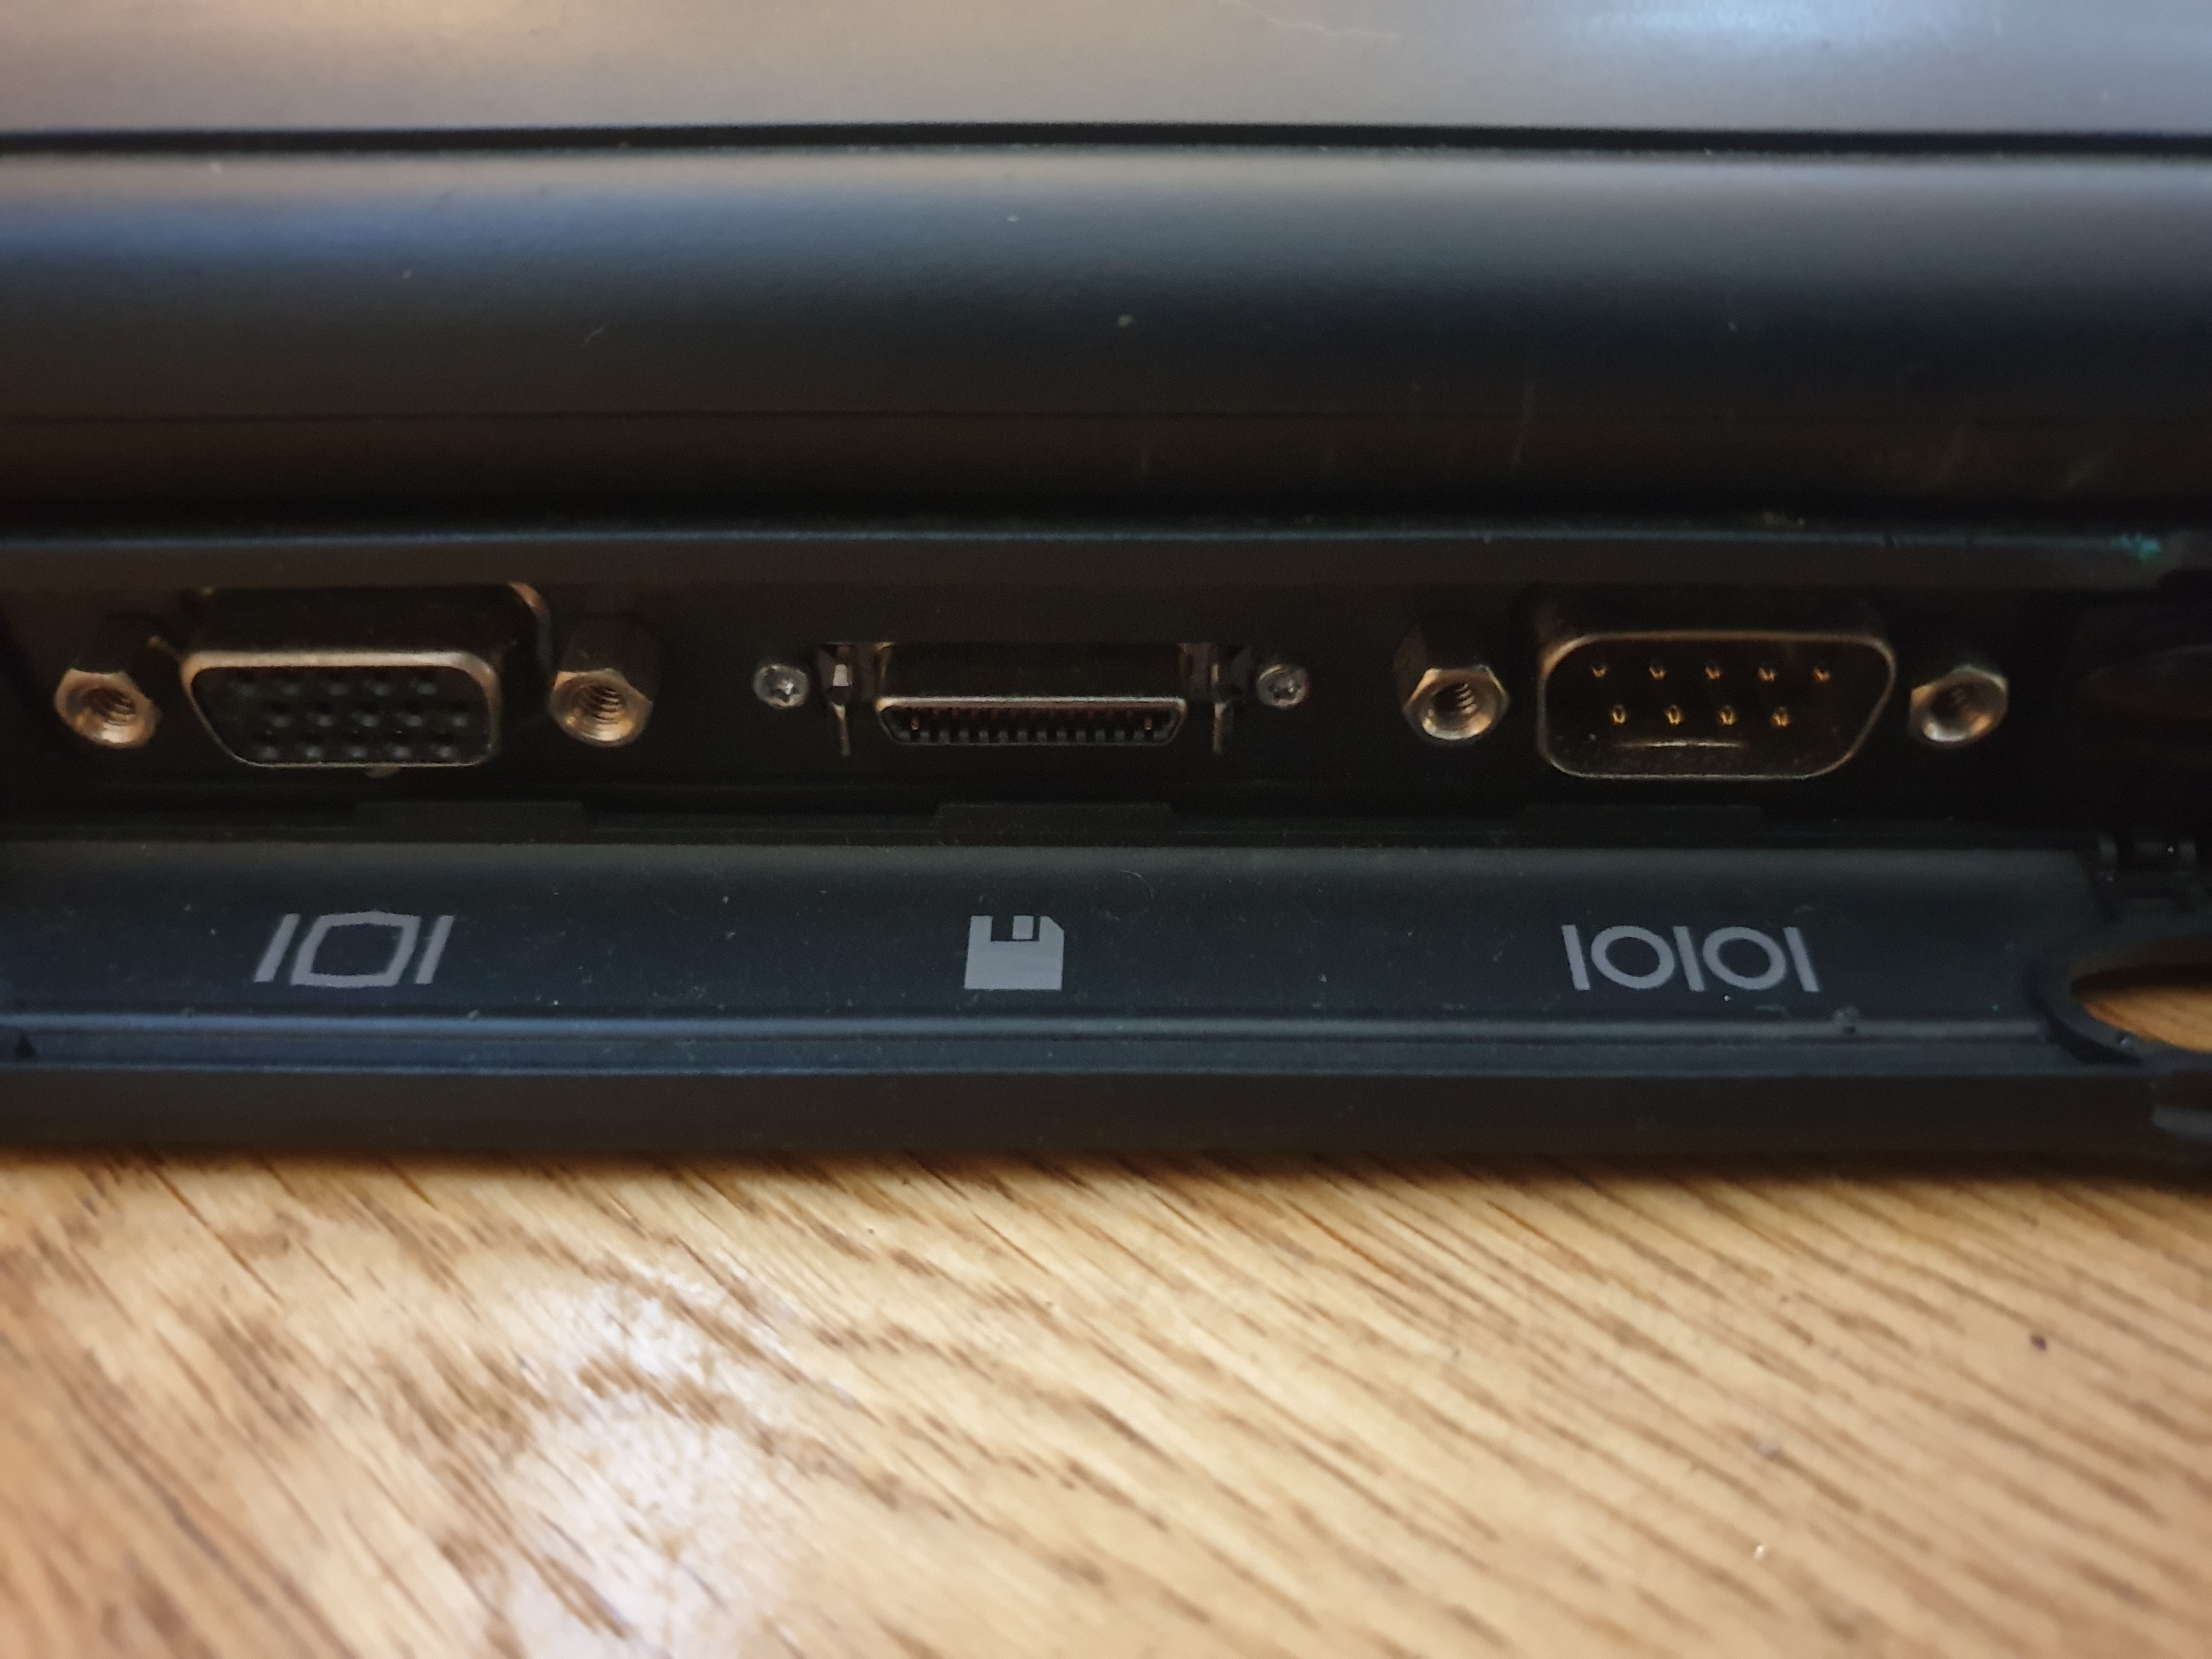
Rear Ports
On the rear of the notebook are the usual expected assortment of interface ports, most hidden behind the rear cover. This can be opened easily but pulling down just above the Infra-red window.
From the left, we have:
* 15-pin analogue (RGB) monitor out
* Floppy drive connector (called the 'Flexible drive port')
* 9-pin RS-232 serial port
* Infra-red (IrDA-compatible) communications window
* 25-pin Centronics parallel port
*
Expansion Bus Connector for connecting to the enhanced port replicator
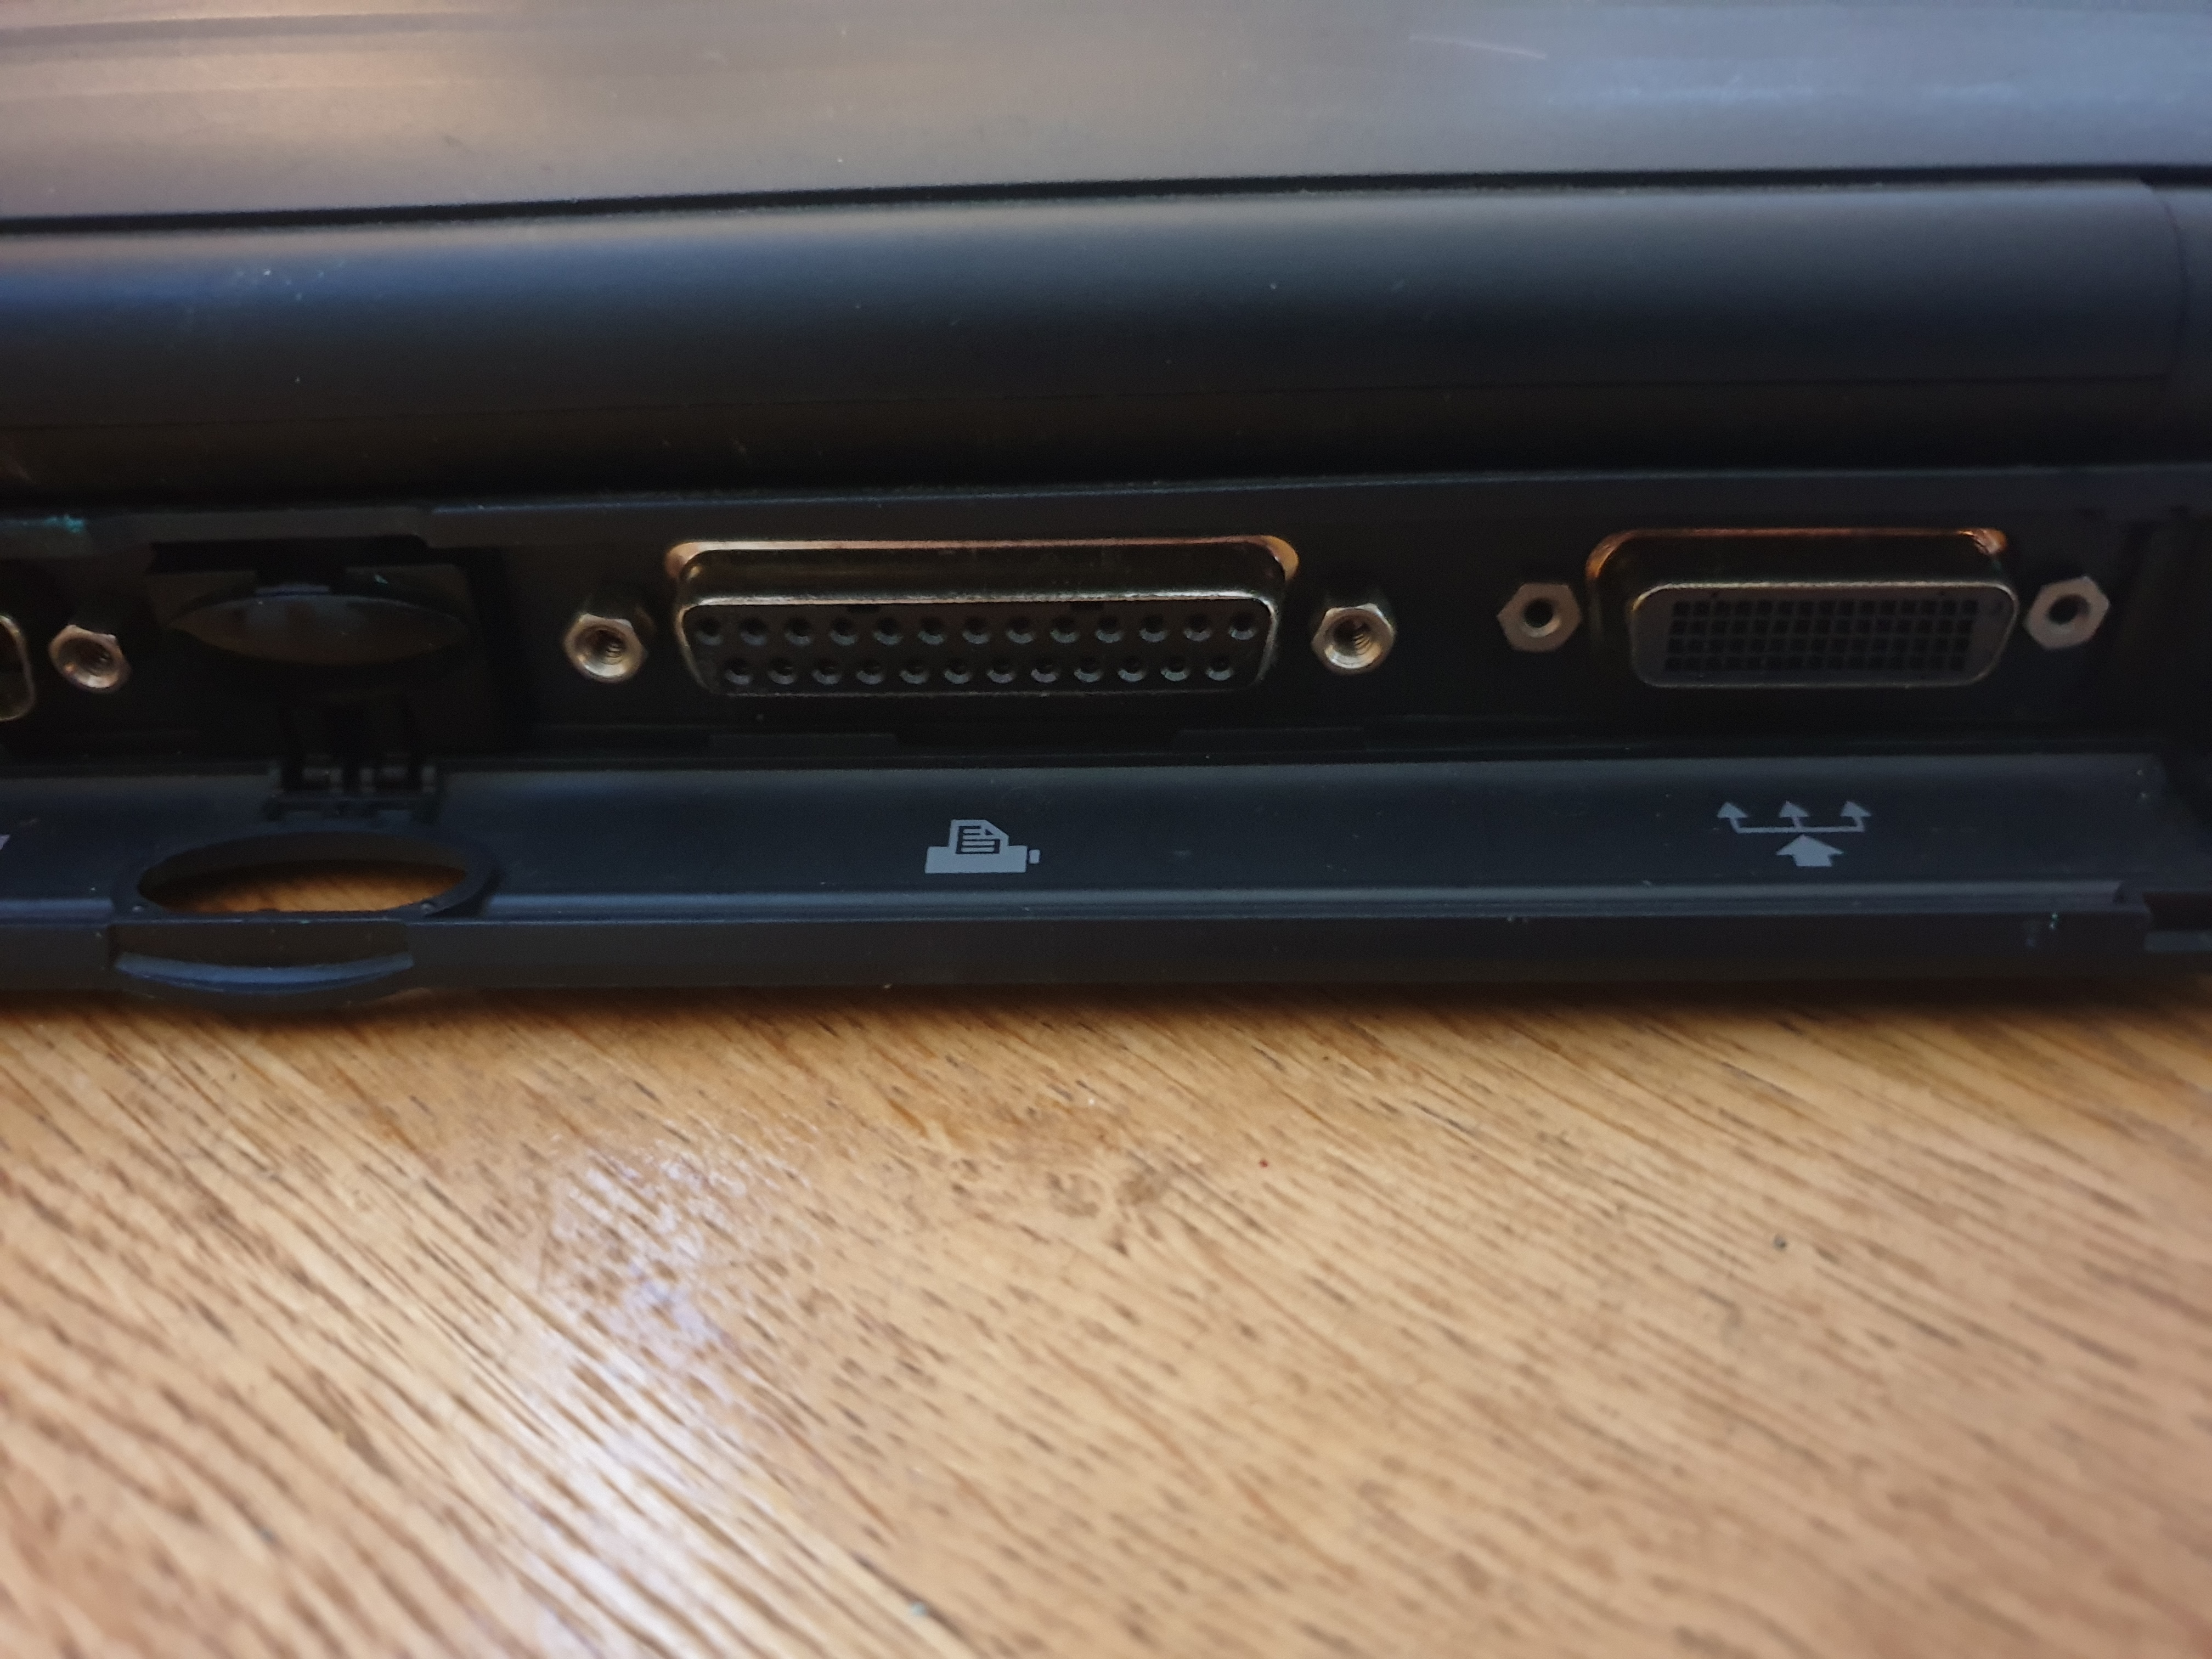
This really covers all the bases you would need. The IrDA port was a thing of its time, when many of us had PDAs (Personal Digital Assistants), and infra-red was a common and easy way to transfer data between your laptop and your PDA by lining up the devices' infra-red ports within about 1 foot of each other - it was slow but worked well enough for small files. These were able to transfer data at up to 115,200 kbps.
The Enhanced Port Replicator (HP Part #F1071A) was a cost option, and provided a serial port, PS/2 mouse port, keyboard port, SVGA out, an EPP-capable parallel port, SCSI-2 interface, an HP LAN card slot, and a Kensington lock.
As mentioned further up, attaching the laptop to an external analogue VGA monitor (or a multisync) provides the highest resolution the machine is capable of - 1024 x 768 in 256 colours - or if you want to have 64,000 colours on-screen, a resolution of 800 x 600. This laptop existed at a time when the 4:3 aspect ratio was standard (hence 640 x 480 = 4:3 ratio).
First Power-Up in Years!
In my initial testing, the Omnibook 600C started up just fine using just the AC adapter after I removed the fatally-damaged battery, but during its attempt to boot into Windows 3.11, the hard disk hit a snag and locked up the machine.
Windows for Workgroups 3.11 hung for ages during startup, showed this, and then dropped back to DOS after about 10 minutes - bad sectors on the hard disk mean numerous files aren't readable
Oh, and it's whistling like crazy the whole time it's on - sounds like a filter cap is on its way out. *UPDATE* Nope, the noise is definitely coming from the Integral 260 MB PCMCIA hard disk. That's a relief, as I wasn't even expecting it to still function. Perhaps I can replace it with a CF card installed in a PCMCIA to CF adapter, as the modern-day CF card is just a 50-pin subset of the original PCMCIA 68-pin PC Card interface. I'm using such an adapter on an Amiga 1200 in my collection.
Booting to DOS, I ran ScanDisk, and did a full surface scan on the 260 MB hard drive - numerous bad sectors were found, though the drive's contents were mostly still accessible. I then tested the external floppy drive and successfully formatted a disk, copied some files onto it and read them back without any issues.
Omnibook Drivers and Utilities
The HP OmniBook 600 series came with its operating system pre-installed (Windows 3.11 or later, Windows 95), plus some drivers and utilities. The ones that were part of the boot process on this machine are listed below, but the whole set of files can be downloaded here. Note that these were extracted from this Windows 3.11 machine manually. There were 2 or 3 files which were in the corrupt part of the hard disk, including VBRUN300.DLL and possibly a couple of the .VBX files (Visual Basic objects for the Control Panel add-on?).
| Filename | Directory | Purpose |
|---|---|---|
| OBSS.EXE | C:\CARDSOFT | OmniBook Socket Services 2.1 driver - required for card slot support. You should have this line in your CONFIG.SYS: devicehigh=c:\cardsoft\obss.exe |
| CS.EXE | C:\CARDSOFT | OmniBook Card Services 2.1 driver - required for card slot support. You should have this line in your CONFIG.SYS: devicehigh=c:\cardsoft\cs.exe /systemsoft1=1 |
| CS_APM.EXE | C:\CARDSOFT | Card Services APM support - required for card slot support You should have this line in your CONFIG.SYS: install=c:\cardsoft\cs_apm.exe |
| CSALLOC.EXE | C:\CARDSOFT | Initial resource allocator - required for card slot support You should have this line in your CONFIG.SYS: device=c:\cardsoft\csalloc.exe |
| ATADRV.EXE | C:\CARDSOFT | ATA card driver - required for ATA cards You should have this line in your CONFIG.SYS: devicehigh=c:\cardsoft\atadrv.exe /s:2 |
| MTSRAM.EXE | C:\CARDSOFT | Driver required for RAM cards You should have this line in your CONFIG.SYS: devicehigh=c:\cardsoft\mtsram.exe |
| MTDDRV.EXE | C:\CARDSOFT | Memory card driver - required for all memory cards. If this driver is not installed, remove /s:2 from the ATA card driver line above You should have this line in your CONFIG.SYS: devicehigh=c:\cardsoft\mtddrv.exe |
| CARDID.EXE | C:\CARDSOFT | Card identification driver - required for cards other than memory cards You should have this line in your CONFIG.SYS: devicehigh=c:\cardsoft\cardid.exe |
| OBMGM.COM | C:\OMNIBOOK | The HP OmniBook Message Manager - OBMGM must be installed for the system to operate properly You should have this line in your CONFIG.SYS: install=c:\omnibook\obmgm.com |
| OBMOUSE.COM | C:\MOUSE | The OmniBook mouse driver - required for the pop-up mouse to work You should have these lines in your AUTOEXEC.BAT set mouse=C:\mouse c:\mouse\obmouse |
| ENHMOUSE.COM | C:\MOUSE | If the above mouse driver doesn't work with your DOS application, use this one instead You should have these lines in your AUTOEXEC.BAT set mouse=C:\mouse c:\mouse\enhmouse |
Testing
I tried connecting the Omnibook's VGA out to my Gefen VGA-to-DVI Scaler Plus, but it refused to display anything. I shifted to using the Extron RGB-HDMI 300 and it worked a treat. The screenshots you see going forward are taken from that for better clarity. By default the machine outputs to both the LCD and the external monitor - there's no mode switch or hotkey required.
Now let's run some utilities and benchmarks on it....
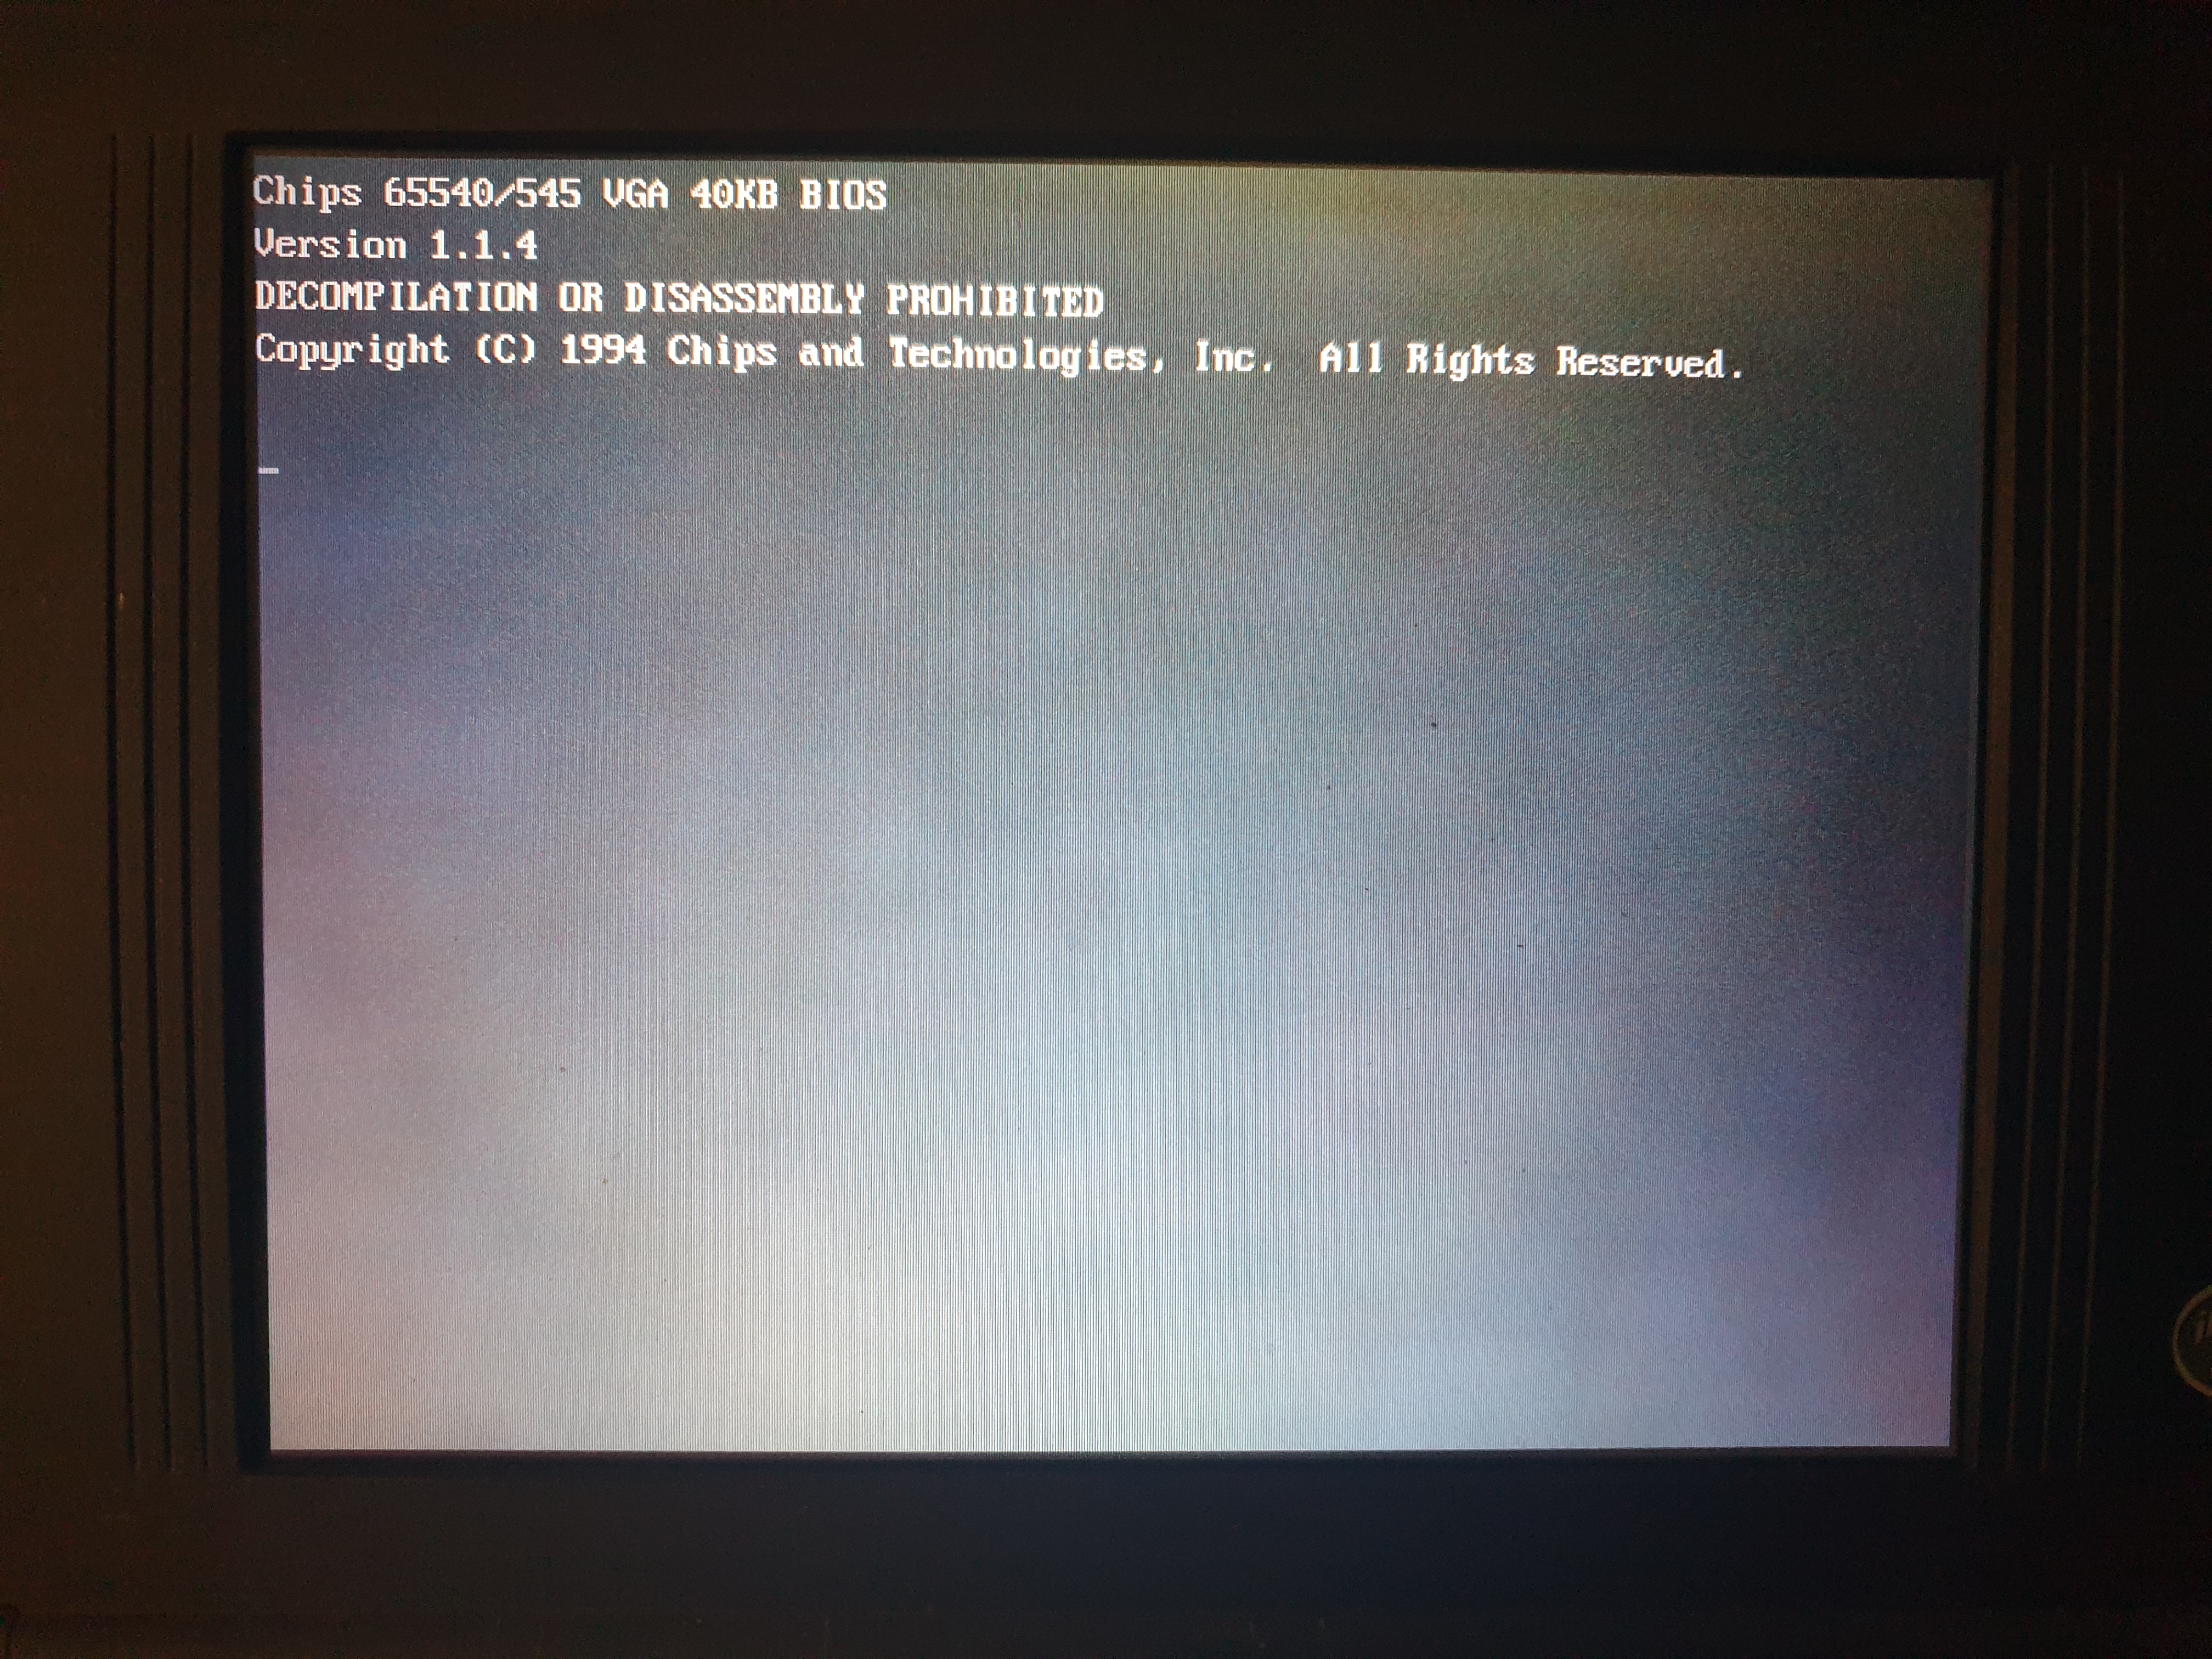
First off, here's the boot process. I couldn't capture the very first boot statement (see further up for the rough and ready camera shot of it), as the video chipset doesn't start outputting to the external display until the memory test screen.
Note the coloured 'AC' status display in the top right of most of these screenshots; this is the Omnibook OBSTATUS utility running, which you can show/hide using Fn+F4. It provides you with your battery status and a few other indicators like Caps Lock, etc.
ChkCPU v1.25 reported the CPU as an Intel 486DX4 running at 75.3 MHz with a 3x clock multiplier on a bus speed of 25.1 MHz. The CPU ID is 480, and the L1 cache is enabled in Write-Through mode.

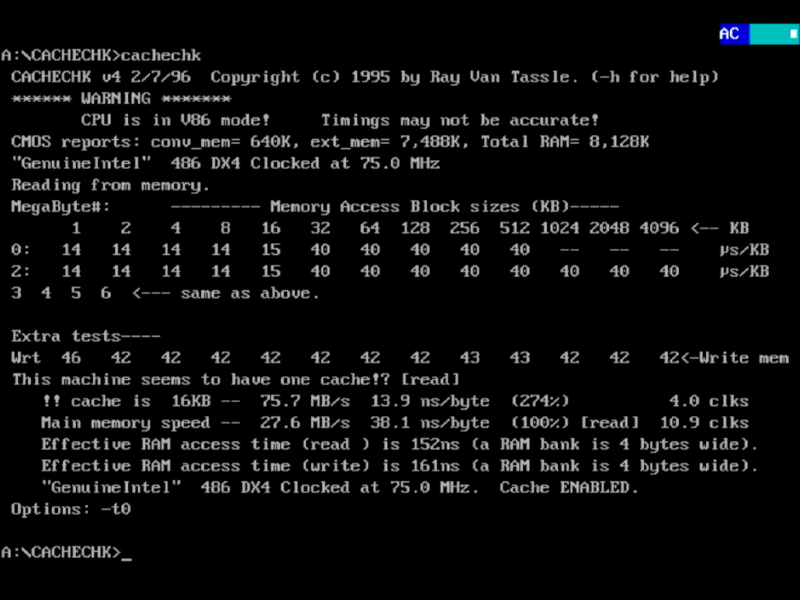
CacheChk reported on the 16 KB L1 cache having a throughput of 75.7 MB/sec with main memory speed at 27.6 MB/sec.
SpeedSys confirmed it's running a P24C CPU (16 KB write-through cache) which scored 26.84 on its processor benchmark. There's no L2 cache on the motherboard, which is going to let it down. The Integral PCMCIA hard disk performance was difficult to get good readings on, due to constantly hitting bad sectors in most tests which skewed the numbers. The best I saw were an average seek time of 10.68ms, track-to-track seek time of 2.06ms, and a random access time of 28ms.
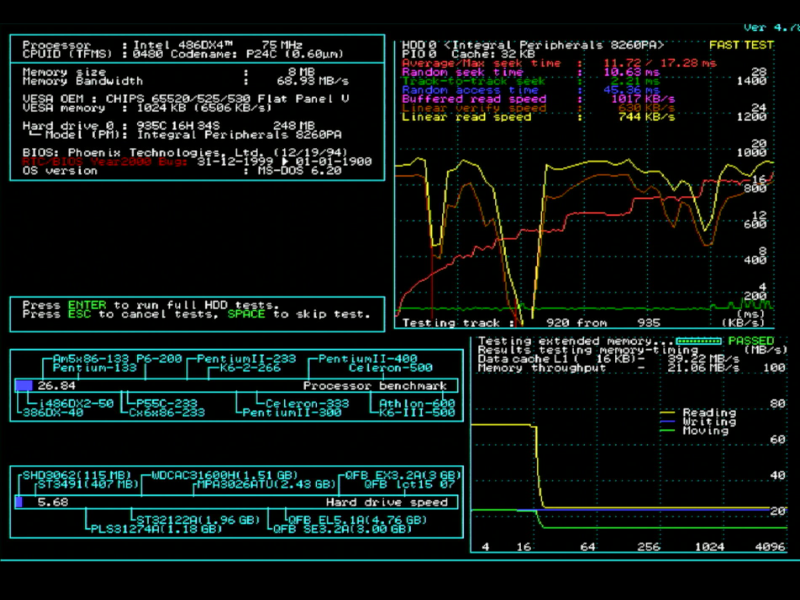
Check-It 3.0 reported a hard disk transfer speed of 520 KB/sec, and an average seek of 11.3ms. The VGA BIOS is VESA 1.10-compliant. It's OEM name is 'CHIPS 65520/525/530 Flat Panel VGA', and it's 40 KB in size. Interestingly, in the list of supported VESA modes there is a 1280 x 1024 in 16 colour mode (mode 0106h) as well as a 640 x 480 in 16.7 million colour mode (mode 0112h) - perhaps HP just didn't write drivers to support this for Windows. BIOS video speed came in at 9417 chars/sec, and direct video speed at 264,679 chars/sec. The hard disk appears to have 935 cylinders, 16 heads, and 34 sectors per track.
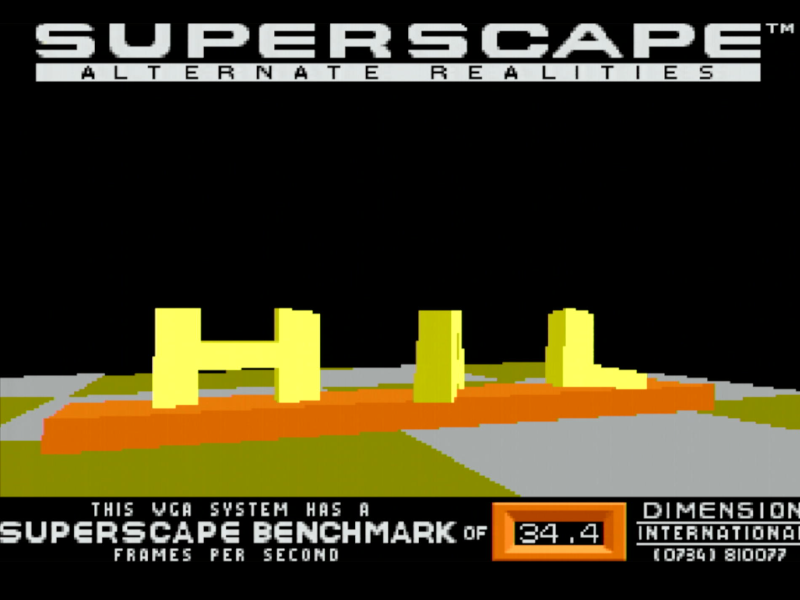
3DBench v1.0 scored a respectable 34.4.
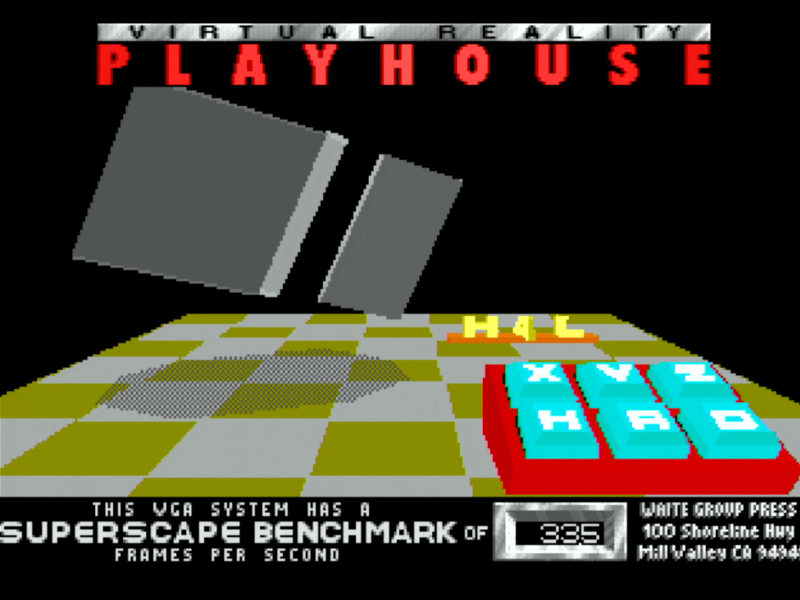
3DBench2 (v1.0C) scored 33.5.
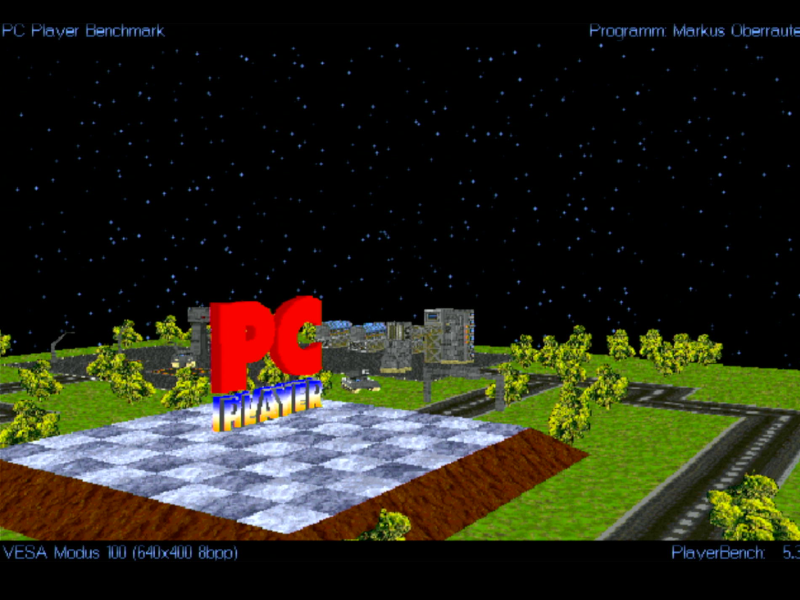
PC Player benchmark scored 12.3 fps in 320x200x8bpp, 5.3 fps in 640x400x8bpp, 4.7 fps in 640x480x8bpp, and 3.2 fps in 640x480x15bpp.
Head over to Part 2 where I do a teardown and see just what hidden damage that battery has done!