How to Format a Hard Disk
Formatting a hard disk in DOS requires a few more tasks and careful thinking compared to formatting a floppy disk. In the early days of the PC there were 3 programs you needed to run to format a hard disk:
1) Run a "Low-level format" program
2) Run FDISK.exe to create partitions
3) Run FORMAT.exe to "high-level format" the disk.
Step 1) Low-Level Format
Low-level formatting a hard disk actually physically formats it - it actually lays down tracks and sectors and it wipes all data off the drive. This step is *only* needed if you have an extremely old MFM or RLL hard disk drive. If you're wanting to format an IDE or SCSI hard disk these come from the factory already low-level formatted, so jump straight to step 2.
Again, to be clear: WARNING: DO NOT LOW-LEVEL FORMAT AN IDE DRIVE! They have special hidden areas of the drive that store information about its capacity which is wiped out if low-level formatted. Hence permanent damage can (and probably will) occur if you do this!
For old MFM or RLL hard disk drives, each hard disk manufacturer would provide instructions on how to low-level format the drive - this typically involved using the DOS DEBUG.COM program to communicate directly with the hard disk controller card and send it an instruction to low-level format the hard disk (these hard disk controllers had a "ROM BIOS extension" with a low-level format program built-in). There are exceptions though, such as the original IBM PC XT 10MB hard disk which came with the IBM Advanced Diagnostics diskette. This contained a convenient program to perform the low-level format. On Zenith PCs there was a Zenith DOS command called PREP. If you know you need to use the DEBUG.COM utility, follow these steps:
After booting your PC using a floppy disk, at the A: prompt type:
A:\>debug
You will get a '-' prompt. Now type one of the following commands, depending on your hard disk controller manufacturer:
  G=C800:5
  -or-				 for Western Digital controllers
	 G=C800:800
G=C800:CCC for Adaptec controllers.
G=C800:5 for DTC (Data Technonolgy) controllers
G=C800:6 for OMTI controllers
It's worth mentioning that not all MFM/RLL hard disk controllers have a ROM BIOS with a formatter embedded within. If you have no luck with DEBUG, or you know your hard disk controller doesn't have a low-level format utility stored in a ROM, you can use a utility called Seagate Disk Manager.
Step 2) Run FDISK
FDISK.exe is an external DOS command which is used to "partition" the hard disk (split it up into usable areas) after it's been low-level formatted. Even if you only want a single drive letter, say C:, for the entire drive, you must still run FDISK and define a single partition. Depending on the DOS version you are using there are limits to the size of hard disk it supports:
DOS v3.3 supports up to 4 hard disk partitions up to 32 MB formatted capacity each.
DOS v4.0 supports up to 4 hard disk partitions up to 512 MB formatted capacity each.
DOS v5.0 supports up to 4 hard disk partitions up to 2 GB formatted capacity each.
Since you probably don't have a hard disk already setup on your PC, you firstly need to boot into DOS using a bootable floppy disk which also contains the FDISK.EXE utility. Any original manufacturer's DOS boot disk or an original Microsoft MS-DOS or IBM PC-DOS will have FDISK.EXE on it. Once booted and you're at the A: prompt, type:
A:\>fdisk
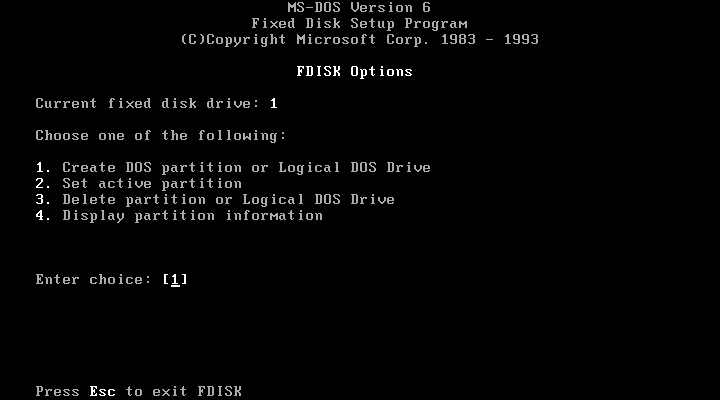
Within FDISK, drives are not letters yet - they are numbered starting from 1.
If you choose option 4 from the main menu (see above) it will display all the current partitions on your drive. There will initially be none, so go back to the main menu and choose option 1 to create a DOS partition. This is where you choose whether you want the full capacity of the drive to be a single drive letter or not. Whether this is even possible also depends on the version of DOS you are running. See the following table for the maximum DOS partition you can use:
| DOS Version | Native File System | Maximum Size of Each Partition |
|---|---|---|
| 2.0 - 2.11 | FAT12 | 16 MB |
| 3.0 - 3.3 | FAT12 | 32 MB |
| 3.31 | FAT16 | 512 MB |
| 4.0 - 7.0 | FAT16 | 2 GB |
Any version of DR-DOS 3.31 or higher supports 2 GB partition sizes. DOS Plus 1.1 and later supports 32 MB partitions. If you have an 8 GB hard disk (or SD card or CompactFlash card acting like a hard disk) you will need to create a minimum of 4 partitions to make full use of its capacity.
You need to create a 'primary' DOS partition before anything else.
Subsequent partitions (should you want to create them) are called 'extended DOS partitions', and for these to have a drive letter you then create a 'logical DOS drive' within the 'extended DOS partition'. Confusing, I know, but this is due to design limitations laid out by the original IBM PC.
The last step to perform within FDISK is to set one of the partitions to be the 'active' one - this basically
means the one the system will use to boot from.
After you've done all of the above FDISK steps, go back to option 4 from the main menu to see how your partitions are now set up. Exiting FDISK will prompt you to restart your computer, where you will need to boot from a floppy disk again.
Step 3) High-Level Format
At this point, FDISK has assigned each of your partitions a drive letter starting from C: then D: then E:, and so on.
Now that you have defined the physical partitions and logical drives for your hard disk, you need to do a "high-level format" on each partition (now a drive letter) to prepare them for use.
To do so following a reboot, at the A: prompt type:
A:\>format c: /s
This will perform a high-level format on the C: drive and copy the operating system (the /s argument) files from the floppy disk to the hard disk's C: drive, making it bootable. If you chose a different drive letter to be the 'active' partition, choose this drive letter instead of C:.
Once the format has completed, you will be able to restart your computer without a floppy disk in the drive and it will boot from the active partition on the hard disk instead.
Final Step
After successfully booting from the hard disk, I then do the following tasks to get my machine really usable and no longer dependent on a floppy disk:
1) Using the example earlier where I had 4 partitions, each of 2 GB capacity, run format D:, format E: and format F: (without the /s argument) to format those partitions as well to make them ready for use.
2) At the C: prompt, if I have an original DOS boot floppy later than version 3.3 I run the SETUP utility and follow the on-screen instructions to copy all the DOS utilities onto the hard disk. When prompted for a directory, I tend to use C:\DOS.
If you are running a DOS version 3.3 or older, there is no setup utility. In such cases run MD C:\DOS followed by COPY A:\*.* C:\DOS to copy all the files from the floppy disk into the C:\DOS directory. Do this for all the DOS floppy disks.